Reolink RLC-1212A Manual
Hide thumbs
Also See for RLC-1212A:
- Operational instruction (34 pages) ,
- User manual ,
- Operational instruction (14 pages)
Advertisement
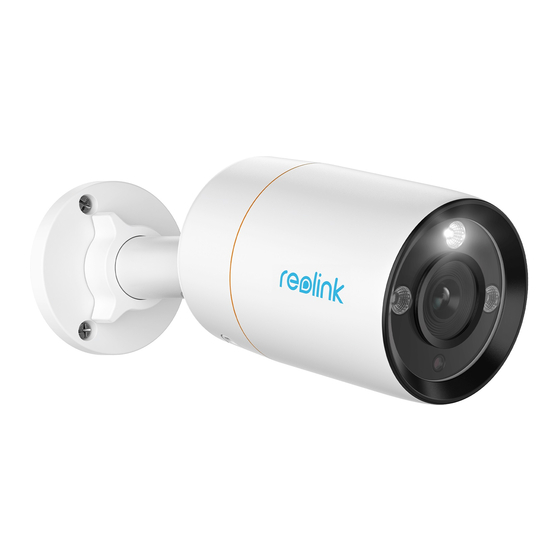
RLC-1212A
With F1.6 large aperture lens and 12MP ultra high definition, RLC-1212A allows you
to enjoy the flawless pictures and videos. You can easily view the hard-to-see
details captured by the camera.
1. Specs
1
Mount
2
Speaker
3
Metal Aluminum Case
4
Spotlight
5
IR LEDs
6
High Definition Lens
7
Daylight Sensor
8
Built-in Mic
Advertisement
Table of Contents

Subscribe to Our Youtube Channel
Related Manuals for Reolink RLC-1212A


Summary of Contents for Reolink RLC-1212A
- Page 1 RLC-1212A With F1.6 large aperture lens and 12MP ultra high definition, RLC-1212A allows you to enjoy the flawless pictures and videos. You can easily view the hard-to-see details captured by the camera. 1. Specs Mount Speaker Metal Aluminum Case Spotlight...
- Page 2 Micro SD Card Slot Power Reset Button Network Waterproof Lid...
- Page 3 Waterproof Lid *1 Pack of Screws*1 Mounting Template *1 Set up the Camera on the App Here is a guide on how to initially set up the camera via Reolink App. Step 1. Tap the icon in the top right corner.
- Page 4 Note: If you've enabled the Add Device Automatically option on the App's Settings page, you can tap this device on the Devices page and turn to Step 3 directly. Step 2. Scan the QR code on the back of the camera. You may tap Light to enable a flashlight when setting up the camera in a dark environment.
- Page 5 Step 3. Create a login password for your camera. Then tap Next. Step 4. Name your camera. Then tap Next. Step 5. Initialization finished! You can start live viewing now.
- Page 6 Install the Camera Please follow the steps below to install the camera. Step 1. Drill holes in accordance with the mounting hole template. Step 2. Install the mount base with the mounting screws included in the package. (For WiFi cameras, please install antenna in advance)
- Page 7 Notes: Run the cable through the cable notch on the mount base. As for the WiFi camera, it is recommended that the antennas be installed upward or horizontally for better WiFi connection. Step 3. loosen the adjustment knob by twisting it counterclockwise on the security mount, and turn the camera to get an ideal view.
- Page 8 Note: If your camera has another mount without the adjusting knob, please loosen the adjusting screw with the provided hex key and turn the camera as shown below to adjust the angle.
Need help?
Do you have a question about the RLC-1212A and is the answer not in the manual?
Questions and answers