Nikon NIKKOR Z 24-200mm f/4-6.3 VR - Camera Lens Manual and Review Video
- User manual (3 pages) ,
- Reference manual (26 pages) ,
- User manual (7 pages)
Advertisement
Introduction
Before using this product, please read these instructions carefully. You will also need to consult the camera manual.
- This lens is intended exclusively for use with mirrorless cameras featuring a Nikon Z mount.
- Update to the latest version of the camera firmware before using this lens with the Z 7, Z 6, or Z 50, as otherwise the camera may fail to correctly recognize the lens and features such as vibration reduction may be unavailable. The latest firmware is available from the Nikon Download Center.
For Your Safety
To prevent damage to property or injury to yourself or to others, read "For Your Safety" in its entirety before using this product.
Keep these safety instructions where all those who use this product will read them.

Failure to observe the precautions marked with this icon could result in death or severe injury.

Failure to observe the precautions marked with this icon could result in injury or property damage.
![shock hazard]() Do not disassemble or modify this product.
Do not disassemble or modify this product.
Do not touch internal parts that become exposed as the result of a fall or other accident.
Failure to observe these precautions could result in electric shock or other injury.![burn hazard]() Should you notice any abnormalities such as the product producing smoke, heat, or unusual odors, immediately disconnect the camera power source.
Should you notice any abnormalities such as the product producing smoke, heat, or unusual odors, immediately disconnect the camera power source.
Continued operation could result in fire, burns or other injury.![burn hazard]()
![shock hazard]()
Keep dry.
Do not handle with wet hands.
Failure to observe these precautions could result in fire or electric shock.- Do not use this product in the presence of fl ammable dust or gas such as propane, gasoline or aerosols.
Failure to observe this precaution could result in explosion or fire. - Do not directly view the sun or other bright light source through the lens. Failure to observe this precaution could result in visual impairment.
- Keep this product out of reach of children.
Failure to observe this precaution could result in injury or product malfunction. In addition, note that small parts constitute a choking hazard. Should a child swallow any part of this product, seek immediate medical attention. - Do not handle with bare hands in locations exposed to extremely high or low temperatures.
Failure to observe this precaution could result in burns or frostbite.
 Do not disassemble or modify this product.
 Should you notice any abnormalities such as the product producing smoke, heat, or unusual odors, immediately disconnect the camera power source.
![burn hazard]() Do not leave the lens pointed at the sun or other strong light sources.
Do not leave the lens pointed at the sun or other strong light sources.
Light focused by the lens could cause fire or damage to product's internal parts. When shooting backlit subjects, keep the sun well out of the frame. Sunlight focused into the camera when the sun is close to the frame could cause fire.![burn hazard]() Do not leave the product where it will be exposed to extremely high temperatures, for an extended period such as in an enclosed automobile or in direct sunlight.
Do not leave the product where it will be exposed to extremely high temperatures, for an extended period such as in an enclosed automobile or in direct sunlight.
Failure to observe this precaution could result in fire or product malfunction.- Do not transport cameras or lenses with tripods or similar accessories attached.
Failure to observe this precaution could result in injury or product malfunction.
Using the Lens
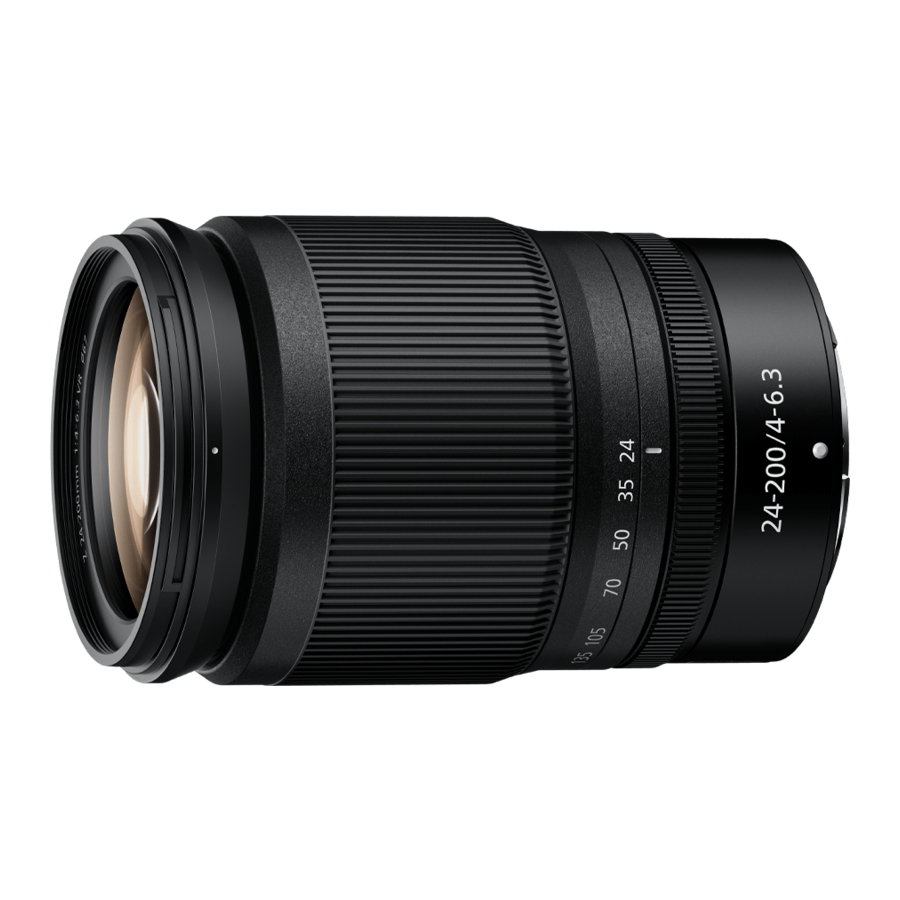
Parts of the Lens: Names and Functions

 Lens hood mounting mark Lens hood mounting mark | Use when attaching the lens hood. | See "Attachment and Removal" |
 Zoom ring Zoom ring | Rotate to zoom in or out. | — |
 Focal length scale Focal length scale | Determine the approximate focal length when zooming the lens in or out. | — |
 Focal length mark Focal length mark | ||
 Control ring Control ring | Autofocus mode selected: In autofocus mode, rotate the ring to adjust a setting such as [Focus (M/A)] or [Aperture] assigned using the camera. For more information, see the description of [Custom control assignment]/[Custom controls (shooting)] in the camera manual. | — |
| Manual focus mode selected: Rotate the ring to focus. | ||
 Lens mounting mark Lens mounting mark | Use when mounting the lens on the camera. | See "Attaching and Removing the Lens Hood" |
 Rubber lens-mount gasket Rubber lens-mount gasket | — | — |
 CPU contacts CPU contacts | Used to transfer data to and from the camera. | — |
 Zoom lock switch Zoom lock switch | To lock the zoom ring, zoom out to the 24 mm position and slide the switch to LOCK. This prevents the lens extending under its own weight while you are carrying the camera. | — |
 Lens hood Lens hood | Lens hoods block stray light that would otherwise cause fl are or ghosting. They also serve to protect the lens. | See "Attachment and Removal" |
 Lens hood lock mark Lens hood lock mark | Use when attaching the lens hood. | |
 Lens hood alignment mark Lens hood alignment mark | ||
 Lens cap (front cap) Lens cap (front cap) | — | — |
 Lens cap (rear cap) Lens cap (rear cap) | — | — |
Attachment and Removal
Attaching the Lens
- Turn the camera off, remove the body cap, and detach the rear lens cap.
- Position the lens on the camera body, keeping the mounting mark on the lens aligned with the mounting mark on the camera body, and then rotate the lens counterclockwise until it clicks into place.
Removing the Lens
- Turn the camera off.
- Press and hold the lens release button while turning the lens clockwise.
Attaching and Removing the Lens Hood
Align the lens hood mounting mark with the lens hood alignment mark (  ) and then rotate the hood (
  ) until the mounting mark is aligned with the lens hood lock mark (
  ).
).
To remove the hood, reverse the above steps.

When attaching or removing the hood, hold it near the lens hood alignment mark (  ) and avoid gripping the front of the hood too tightly. The hood can be reversed and mounted on the lens when not in use.
Using the Lens on Cameras with a Built-in Flash
Shadows will be visible in photos where the light from the built-in flash is obscured by the lens or lens hood. Remove the lens hood before shooting. Note, however, that even if the hood is removed, shadows may still be visible at some focal lengths and subject distances.

- The lens may produce shadows in photographs taken with the built-in flash when mounted on the following camera. The focal lengths and minimum subject distances at which shadows will not appear are as follows:
| Camera 1 | Focal lengths | Minimum distance without shadow 2 |
| Z 50 | 24 mm | Shadows occur at all subject distances |
| 35 mm | 1.5 m (5 ft) | |
| 50 mm | 1.0 m (3 ft 4 in.) | |
| 70 – 200 mm | No shadows |
- See the camera manual for the latest information.
- Lens hood removed.
Vibration Reduction (VR)
The lens's on-board vibration reduction can be enabled or disabled using camera controls; see the camera manual for details. With [Normal] selected for the on-camera vibration reduction option, vibration reduction allows speeds up to 5.0 stops * slower than would otherwise be the case, expanding the range of shutter speeds available.
* Measured according to CIPA standards. Values for lenses that support FX format are measured on FX -format mirrorless cameras, those for DX lenses on DX-format mirrorless cameras. Values for zoom lenses are measured at maximum zoom.
 Vibration Reduction
- Due to the design of the vibration reduction system, the lens may rattle when shaken. This does not indicate a malfunction.
- To reduce blur caused by tripod shake, select [Normal] or [Sport] for the on-camera vibration reduction op-tion when the camera is mounted on a tripod. Note, however, that depending on the type of tripod and shooting conditions, there may be cases in which [Off ] is the preferred option.
- [Normal] or [Sport] is recommended when the camera is mounted on a monopod.
When the Lens Is Attached
The focus position may change if you turn the camera off and then on again after focusing. If you have focused on a pre-selected location while waiting for your subject to appear, we recommend that you do not turn the camera off until the picture is taken.
Precautions for Use
- Do not pick up or hold the lens or camera using only the lens hood.
- Keep the CPU contacts clean.
- Should the rubber lens-mount gasket be damaged, cease use immediately and take the lens to a Nikon-authorized service center for repair.
- Replace the lens caps when the lens is not in use.
- To protect the interior of the lens, store it out of direct sunlight.
- Do not leave the lens in humid locations or in locations in which it may be exposed to moisture. Rusting of the internal mechanism can cause irreparable damage.
- Do not leave the lens next to open fl ames or in other extremely hot locations. Ex-treme heat could damage or warp exterior parts made from reinforced plastic.
- Rapid changes in temperature may cause damaging condensation inside and outside the lens. Before taking the lens from a warm to a cold environment or vice versa, place it in a bag or plastic case to slow the change in temperature.
- We recommend that you place the lens in its case to protect it from scratches during transport.
Lens Care
- Removing dust is normally sufficient to clean the glass surfaces of the lens.
- The fluorine-coated front lens element can be cleaned as described below.
- Smudges, fingerprints, and other oily stains can be removed using a soft, clean cotton cloth or lens cleaning tissue; clean from the center outwards using a circular motion.
- To remove stubborn stains, wipe gently using a soft cloth lightly dampened with a small amount of distilled water, ethanol, or lens cleaner.
- Any drop-shaped marks left from this process on the water- and oil-repellent surface can subsequently be removed with a dry cloth.
- When cleaning the rear lens element, which is not fluorine-coated, remove smudges, fingerprints, and other oily stains using a soft, clean cotton cloth or lens cleaning tissue lightly dampened with a small amount of ethanol or lens cleaner. Wipe gently from the center outwards in a circular motion, taking care not to leave smears or touch the lens with your fingers.
- Never use organic solvents such as paint thinner or benzene to clean the lens.
- Neutral Color (NC) filters (available separately) and the like can be used to protect the front lens element.
- If the lens will not be used for an extended period, store it in a cool, dry location to prevent mold and rust. Do not store in direct sunlight or with naphtha or camphor moth balls.
Accessories
Supplied Accessories
- LC-67B Lens Cap (front cap)
- LF-N1 Lens Cap (rear cap)
- HB-93 Lens Hood
- CL-C1 Lens Case
Using the Lens Case
- The case is intended to protect the lens from scratches, not from falls or other physical shocks.
- The case is not water resistant.
- The material used in the case may fade, bleed, stretch, shrink, or change color when rubbed or wet.
- Remove dust with a soft brush.
- Water and stains can be removed from the surface with a soft, dry cloth. Do not use alcohol, benzene, thinner, or other volatile chemicals.
- Do not store in locations exposed to direct sunlight or high temperatures or humidity.
- Do not use the case to clean the monitor or lens elements.
- Be careful that the lens does not fall from the case during transport.
Material: Polyester
Compatible Accessories
67 mm screw-on filters
Filters
- Use only one filter at a time.
- Remove the lens hood before attaching filters or rotating circular polarizing filters.
Specifications
| Mount | Nikon Z mount |
| Focal length | 24 – 200 mm |
| Maximum aperture | f/4 – 6.3 |
| Lens construction | 19 elements in 15 groups (including 2 ED elements, 1 aspherical ED element, 2 aspherical elements, and elements with an ARNEO coat and a fl uorine-coated front lens element) |
| Angle of view |
|
| Focal length scale | Graduated in millimeters (24, 35, 50, 70, 105, 135, 200) |
| Focusing system | Internal focusing system |
| Vibration reduction | Lens shift using voice coil motors (VCMs) |
| Minimum focus distance (measured from focal plane) |
|
| Maximum reproduction ratio | 0.28× |
| Diaphragm blades | 7 (rounded diaphragm opening) |
| Aperture range |
|
| Filter-attachment size | 67 mm (P = 0.75 mm) |
| Dimensions | Approx. 76.5 mm/3.1 in. maximum diameter × 114 mm/4.5 in. (distance from camera lens mount fl ange) |
| Weight | Approx. 570 g (1 lb 4.2 oz) |
Nikon reserves the right to change the appearance, specifications, and performance of this product at any time and without prior notice.

VideosNikon NIKKOR Z 24-200mm f/4-6.3 VR - Review Video
Documents / ResourcesDownload manual
Here you can download full pdf version of manual, it may contain additional safety instructions, warranty information, FCC rules, etc.
Download Nikon NIKKOR Z 24-200mm f/4-6.3 VR - Camera Lens Manual and Review Video
Advertisement


Need help?
Do you have a question about the NIKKOR Z 24-200mm f/4-6.3 VR and is the answer not in the manual?
Questions and answers