Advertisement
Quick Links
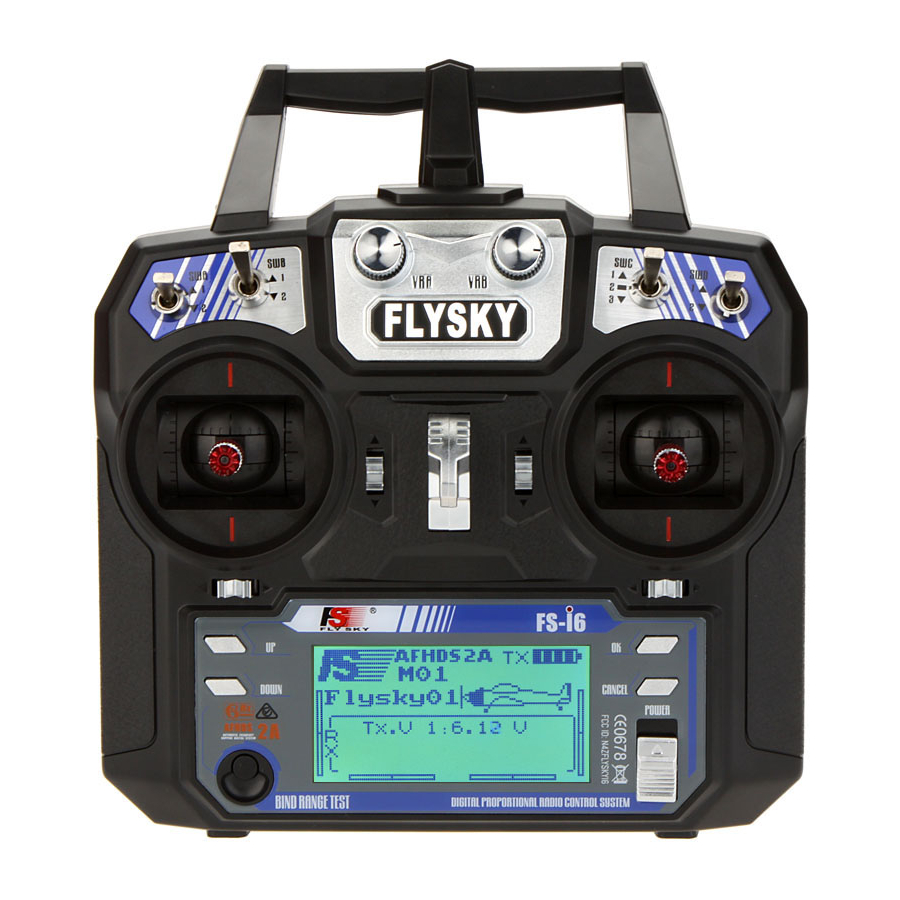
FlySky FS-i6 and FS-i6X Programming for Winch and Rudder Control
Sept 2022
[ Revision 04]
Introduction
These instructions were compiled from thoughts originally found on the internet authored by a David
Flakelar (in Sydney) and intended for DF65 and DF95s. The transmitters (Tx) work well in conjunction with
the FS-iA6B receivers (Rx).
The two FlySky i6 Txs are very similar and adequately control the two primary channels required for most
competitive RC yachts. The use of other "channels" (switches) to moderate the two primary channels aids
the sailor to more precisely control the yacht under various conditions.
Sailors can easily use the one transmitter with more than one yacht by creating a separate model name for
each and installing a separate, extra 'bound' receiver in each additional boat.
These instructions are intended to familiarize interested sailors in two major functions of rudder and winch
control of RC yachts that they may not have attempted themselves because the available instructions are
intended for RC planes etc. and written in "chinese English."
Having become familiar with the principles and use of the Tx menu system, novice users will then be
confident to use additional functions available on the transmitters.
Overview
Sheet Control
The winch stick operation is supplemented by the Switch A immediately above and to the left of the winch
stick on the transmitter. This two-position switch having an up and down position can be programmed to
slightly ease the sheets for both Jib and Main (say 5 to 15 mm) in the Up position and to tighten the sheets
to the normal close-hauled in the Down position. Note that the switch moves in a similar direction to the
stick for easing and tightening.
This function can be used to accelerate out of tacks and to quickly ease sheets in stronger puffs of wind,
and later; recover normal sailing.
[The Tx controller also has one three-position switch, and if this switch could be physically moved to the left
side, some sailors may wish to have two stages of easing, OR one easing (SwA UP), centre-normal close-
hauled (SwA centre), and one tight - for pinching (SwA DOWN) – your choice!]
Rudder Control
The rudder stick operation is supplemented by the Switch D immediately above and to the right of the
rudder stick on the transmitter. This two-position switch can be programmed to narrow the rudder swing
and soften the movement in the centre of the stick travel for smoother, strong wind downwind sailing, by
using the Down position. In normal light wind conditions, the Up position is used to vary the normal
rudder swing.
1
Advertisement

Related Manuals for FlySky FS-i6


Summary of Contents for FlySky FS-i6
- Page 1 Flakelar (in Sydney) and intended for DF65 and DF95s. The transmitters (Tx) work well in conjunction with the FS-iA6B receivers (Rx). The two FlySky i6 Txs are very similar and adequately control the two primary channels required for most competitive RC yachts. The use of other “channels” (switches) to moderate the two primary channels aids the sailor to more precisely control the yacht under various conditions.
- Page 2 Factory User Manuals are available online and generally cover material for model aircraft. Sadly, radio sailing needs are not specifically covered, hence these instructions may help to bridge the gap between aircraft and yachts. Try the link below for the FS-i6 manual. https://static1.squarespace.com/static/5bc852d6b9144934c40d499c/t/5c0787e10e2e721a7f17c998/1...
- Page 3 Pre-requisites These are the important issues to address initially. Boats with RMG Smart winches (IOMs), need to be initially “Setup” using the winch instructions, with the default transmitter travel end points programmed into the RMG winch permitting only about 10 to 20 mm of sheet control travel beyond the normal working end points, yet still within the safe travel of the sheeting system.
-
Page 4: Model Copy
Model Copy The transmitter (Tx) can store 20 models: each including most of the characteristics programmed into the Tx. Sailors with an existing RC yacht and transmitter programmed and functioning satisfactorily should consider copying their working model (probably #01) to a separate model memory location for safe keeping. - Page 5 This should save a copy of Model 01 to Model 11. Think seriously about creating a back-up NOW! When satisfied with any new changes to your working model (#01), don’t forget to update your back- up model (#11) as well. Should you ultimately wish to discard any recent changes and return to original settings, just copy your back-up, (in # 11), to its original working position (#01).
- Page 6 Photo 2 End Point setting 3. Programming the Transmitter Primary Channels for Switch Control Firstly - Select & Assign the Switch A to Channel #5 and Switch D to Channel #6. a) At the HOME screen, select the MENU by a long press of the OK button, b) At the MENU screen, using the UP or DOWN button, select the FUNCTIONS screen, (Tools symbol) and select it with a quick press of OK, c) At the Functions screen, using the DOWN button, move the pointer to Aux.
- Page 7 Secondly - Assign the Switch D whilst In Fly Mode, to “Normal” and “Sport” Descriptions g) At the HOME screen, select the MENU by a long press of the OK button, h) At the MENU screen, using the UP or DOWN button, select the FUNCTIONS screen, (Tools symbol) and select it with a quick press of OK, i) At the Functions screen, using the DOWN button, move the pointer to Switches Assign field, and quick press of OK,...
- Page 8 Now Switch A (SwA) will be used to ease the sails a programmed amount and Switch D (SwD) will be used to soften and limit the rudder action in strong winds downwind. 4. Starting with the Rudder (Channel #1) a) At the HOME screen, select the MENU by a long press of the OK button, b) At the MENU screen, using the UP or DOWN button, select the FUNCTIONS screen, (Tools symbol) and select it with quick press of OK, c) At the Functions screen, using the DOWN button, move the pointer to Dual rate/exp field, and...
- Page 9 Photo 4 Sport mode SwD Down You can experiment with both the Rate and the Exponent settings to achieve your own preferences. 5. Continuing with the Winch (Channel #3) a) At the HOME screen, select the MENU by a long press of the OK button, b) At the MENU screen, using the UP or DOWN button, select the FUNCTIONS screen, (Tools symbol) and select it with quick press of OK, c) At the Functions screen, using the DOWN button, move the pointer to Mix field, and quick press...
- Page 10 Phot 5 Mix #1 Applying a Mix will permit Switch A (SwA), now (channel 5), when UP, (the same direction as the winch stick when easing), to instruct the winch to ease the sheets (- 12%). When SwA is DOWN, and the stick is down (close hauled), the 95% end point set above will prevail. Now, you have become very confident in use of the buttons, try the following in an abbreviated form: - 6.
- Page 11 7. Throttle Curve – Precision Increase in the Bottom 25% of the Winch Stick movement. Try this: - Home > Functions > Throttle Curve > OK and replicate the screen contents in Photo below. Now SAVE. This improves precision of the winch stick giving only 7% easing of the sheets for the first 25% of the stick movement upwards and a linear response thereafter.
-
Page 12: Model Type Selection
8. Model Type Selection Model type selection is important when a new yacht is to be ‘Bound’ (with a second Receiver Rx) using the same Tx. RC yachts are normally set on Mode 2, normally given a unique Number & Name and given the model Type of Airplane/Glider. - Page 13 9. SubTrim Adjustment to correct rudder and Winch Trim SubTrim can be used to semi-permanently correct minor mechanical imperfections in rudder and winch trim by Tx software. This, however, relies on the sliders adjacent to the rudder and winch sticks to be each set at zero.
- Page 14 10.Extra switch Assignments for FS – i6X users only – Aux Switches This function has been added to the FS – i6X only and is not available in the older FS – i6. For only those FS - i6X sailors try this : - HOME >...
Need help?
Do you have a question about the FS-i6 and is the answer not in the manual?
Questions and answers