Table of Contents
Advertisement
Advertisement
Table of Contents

Related Manuals for Tenways AGO X


Summary of Contents for Tenways AGO X
- Page 1 AGO X USER MANUAL Energized Urban Ride...
- Page 2 Scan the QR code to access the user manuals in German / Dutch / French / Italian / Spanish User manuals in English / German / Dutch / French / Italian / Spanish are also available inside the TENWAYS App. QR Code...
-
Page 3: Table Of Contents
ASSEMBLE YOUR TENWAYS E-BIKE Toolbox checklist Bicycle structure and components Assembly steps DISPLAY OPERATIONS Display size Features and parameters Buttons Operation methods User menu BIKE USAGE Connect to the TENWAYS app Before your first ride Routine maintenance Frame code IMPORTANT REMINDERS Warranty Warnings... -
Page 4: Toolbox Checklist
TOOLBOX CHECKLIST Tools Tool Box No.3 Hex Key No.4 Hex Key No.5 Hex Key No.10 Wrench No.15 Wrench Phillips Head Screwdriver Battery Box No.10 Wrench No.15 Wrench Accessories Charger and adapter Bicycle Pedals L Bicycle Pedals R Portable Air Pump Front &... -
Page 5: Bicycle Structure And Components
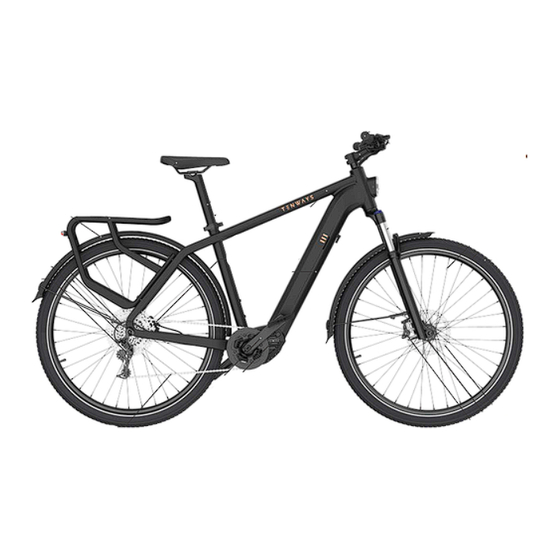
BICYCLE - STRUCTURE AND COMPONENTS Seat Post Seat Post Clamp Handlebar Grip Brake Lever Stem Headlight Saddle Rear Carrier Front fork Mudguard Front Mudguard Rear Light Spokes Frame Mudguard support Brake Clamps Tire Cassette Battery Rear Derailleur Pedals Brake Disc Mid-drive Motor Chain Brake Clamps... - Page 6 INSTALL THE BATTERY INSTALL THE KICKSTAND INSTALL THE PEDALS REMOVE THE QUICK RELEASE FROM THE ADJUST THE HEIGHT OF THE SADDLE FRONT FORK AND PRE-INSTALL IT ON THE FRONT WHEEL INSTALL THE REFLECTORS INSTALL THE FRONT WHEEL 003 Assemble your TENWAYS e-bike...
-
Page 7: Assembly Steps
INSTALL THE HANDLEBAR Tools needed: No.4 Hex Key Hold down the front fork with one hand and turn the stem to the fron, then remove its front attachment with No.4 Hex Key. 004 Assemble your TENWAYS e-bike... - Page 8 INSTALL THE HANDLEBAR Tools needed: No.4 Hex Key Put the handlebar into the stem handlebar slot, then align their centers. Use the No.4 Hex Key to tighten the screws in diagonal order (with 5–6 Nm torque). 005 Assemble your TENWAYS e-bike...
- Page 9 (with 5–6 Nm torque). Match the colors of the cable connectors, and connect the display cables. Attention: Only connect cable connectors of the same color. Connection between cable connectors of different colors could potentially damage the bike. 006 Assemble your TENWAYS e-bike...
- Page 10 Detach the front wheel and remove the plastic protective covers on both sides of the wheel. Attention: You must remove the front wheel in the direction of the spokes to avoid scratching them. Removable Plastic Covers 007 Assemble your TENWAYS e-bike...
- Page 11 No.5 Hex Key; the torque should be 9-12Nm. Adjust the length of the kickstand with the No.4 Hex Key ( it is recommended to adjust the length of the kickstand to the maximum ); the torque should be 5-7Nm. Assemble your TENWAYS e-bike...
- Page 12 figure, and then tighten the nut. Note: There is no need for you to fully tighten the nut at this time. Note: When installing the quick release spring, ensure that the direction is the same as when it was removed. Assemble your TENWAYS e-bike...
- Page 13 Tighten the quick release nut, and then turn it to the closed position as shown in the figure. Assemble your TENWAYS e-bike...
- Page 14 Turn the front wheel by hand and check if there are any signs of scraping. Note: This step is very important. Please follow the instructions care- fully. (Keep the brakes’ protective sheets in a safe place for future use. ) Assemble your TENWAYS e-bike...
- Page 15 If the friction source can be heard, loosen the ▪ mounting screws of the brake clamps. Manually adjust the position of the brake ▪ clamps to center the disc, and tighten the screws again. 012 Assemble your TENWAYS e-bike...
- Page 16 No.5 Hex Key to fix the mudguard lug to the front fork. The torque should be 8-10 Nm. Use the No.4 Hex Key to fix the mudguard supports. The torque should be 3-4 Nm. Side View 013 Assemble your TENWAYS e-bike...
- Page 17 Battery Pack Right Tilt and slide the lower end of the battery into the battery slot, and then press the upper end upwards by hand. You will hear a click when the battery is firmly seated. 014 Assemble your TENWAYS e-bike...
- Page 18 Note: Do not install the pedals Tighten the right pedal clockwise and forcibly if you feel great resistance. the left pedal counterclockwise. If you feel great resistance, stop tightening the pedals. Then, realign and install the pedals again. 15mm Wrench 015 Assemble your TENWAYS e-bike...
- Page 19 Note: a. The height of the seat post should not exceed the marked safety line. b. The height of the seat post is set to the minimum when fully inserted. Assemble your TENWAYS e-bike 016...
- Page 20 The rear reflector is red, while the front one is white. Use the Phillips Head Screwdriver to install the rear reflector to the seat post and the front one to the handlebar. Front Reflector Rear Reflector Phillips Head Screwdriver Assemble your TENWAYS e-bike...
-
Page 21: Display Operations
DISPLAY OPERATIONS DISPLAY SIZE OPERATION METHODS FEATURES AND PARAMETERS USER MENU BUTTONS 018 Display operations... -
Page 22: Display Size
DISPLAY SIZE Top view Side view Front view 67.98 67.98 019 Display operations... -
Page 23: Features And Parameters
FEATURES AND PARAMETERS The display shows common riding data and statistical results and provides the following features: ▪ Real-time speed, maximum speed, and average speed ▪ Battery power ▪ Assistance mode ▪ ODO and TRIP ▪ Trip time ▪ Calories burned ▪... -
Page 24: Buttons
BUTTONS Button Name Functions 1. Turn the display on/off. [ Power ] button 2. Confirm the function. 1. Adjust parameters. [ + ] button 2. Turn the light on/off 3. Menu operations 1. Adjust parameters. [ - ] button 2. Enable/disable the assistance function. 3. -
Page 25: Operation Methods
Note: Please only take the display operations mentioned in this manual as a reference, as the actual interface may be slightly different if the software gets updated later. If you have any questions, please email support@tenways.com. 4.1 Turn the display on/off If the display has been configured witha... - Page 26 OPERATION METHODS 4.2 Riding interface Battery power Riding parameters are displayed on this interface: 21% ~ 100% Bluetooth indicator Headlight indicator 6% ~ 20% < = 5% Time in HH:MM 100% Assistance mode Power bar Avg Speed CO Avoided Gear of assistance Motar Pawer mode (0 to 5) km/h...
- Page 27 OPERATION METHODS 4.3 Changing the PAS levels Click the [ + ] or [ - ] button to change between PAS levels. [ - ] Press and hold the button to enter the 6km/h walking mode, and release this button to exit km/h the mode.
- Page 28 OPERATION METHODS 4.6 Error codes Common error codes ( The following information is only for reference. If you see an error code, please contact TENWAYS at support@tenways.com ): Description Error code The current is abnormal or the MOS tube is damaged...
-
Page 29: User Menu
USER MENU 5.1 Clear the trip mileage 5.3 Display backlight brightness 5.2 Unit settings settings After entering the menu preview interface, After entering the menu preview interface, After entering the menu preview inter- press the [ Power ] button to enter this menu face, press the [ Power ] button to enter this press the [ Power ] button to confirm clearing the trip data. - Page 30 USER MENU 5.4 Set the auto power-off time 5.5 Auto headlight settings After entering the menu preview interface, After entering the menu preview interface, press the [ Power ] button to enter this menu press the [ Power ] button to enter this menu item, and then click the [ + ] or [ - ] button to set item, and then click the [ + ] or [ - ] button to the auto power-off time to a value ranging from 0...
- Page 31 USER MENU 5.6.User password settings (configurable) 100% After entering the menu preview interface, press the [Power] button to enter Password this menu item, click the [ + ] or [ - ] button to select the Password option, and press the [ Power ] button to enter the Password item and select ON or OFF.
- Page 32 USER MENU 5.7 System information The system information such as the software version will be displayed after you enter the menu preview interface. 5.8 Time settings After entering the menu preview interface, press the [ Power ] button to enter this menu item. Click the [ + ] or [ - ] button to select a value ranging from 00 to 23 after the hour flashes.
-
Page 33: Bike Usage
BIKE USAGE CONNECT TO THE TENWAYS APP BEFORE YOUR FIRST RIDE ROUTINE MAINTENANCE FRAME CODE Bike usage... -
Page 34: Connect To The Tenways App
4. Fill in the color and seat post height of your e-bike, and give your e-bike a name. 5. Turn on the display of your e-bike and enter the passcode. 6. Your e-bike is connected to the TENWAYS app automatically 10s later. Bike usage... -
Page 35: Before Your First Ride
2. Use only the TENWAYS charger to charge the bike. ▪ The brake settings vary by country / region. Check which brake lever acts 3. -
Page 36: Routine Maintenance
BEFORE YOUR FIRST RIDE Daily inspection Daily cleaning Before riding, check that screws in the following key parts are properly tightened: ▪ Use a rag or large brush to clean off dust when there is not much mud on your e-bike. 1. - Page 37 BEFORE YOUR FIRST RIDE How to maintain the battery How to maintain the brakes Operating and storage temperatures of the battery. The working temperature of the lithium battery is 0°C to 30°C. The new brake blocks and discs feature relatively smooth surfaces, It is recommended that the lithium battery be stored in an environment so the braking effect will improve after you ride 100 km or brake on long where the temperature is 0°C to 25°C with 65±20% RH.The performance of...
- Page 38 BEFORE YOUR FIRST RIDE Professional store maintenance It is recommended to go to a professional bike store for maintenance 2-3 times a quarter, or after every 1,000 km of riding. The following items should be checked / performed during such maintenance: ▪...
-
Page 39: Frame Code
FRAME CODE The frame code, which is in the form of a QR code, can be found near the bottom bracket at the bottom of the frame down tube. You can scan the QR code with your phone to see the 16-18-digit frame code. -
Page 40: Important Reminders
IMPORTANT REMINDERS WARRANTY WARNINGS Important reminders... -
Page 41: Warranty
Starting from the date of delivery, the warranty period for all original components is stipulated in TENWAYS’ warranty terms. Claims within the warranty must be made directly to TENWAYS and a proof of purchase is required. The warranty applies to original owners and is transferable to further owners. -
Page 42: Faq
This is the AGO X e-bike. It’s an urban commuter intended for urban pave- What is the model of this e-bike? Which terrains is this e-bike targeted at? ment or slightly potholed roads. Do not ride it on mountain roads. Otherwise, accidents may occur. -
Page 43: Warnings
▪ Your bike must comply with legal regulations for riding on public roads in all conditions, including inclement weather, at night, early morning or ▪ If you have any questions related to the battery, contact TENWAYS’ customer dusk. It is your responsibility to familiarize yourself with and comply with support team. - Page 44 ▪ Do not install a child seat in the AGO X. This may result in injury or death. ▪ Do not keep the motor running under high load for a long time.
- Page 45 ATTENTION ▪ The battery pack MUST be locked onto the frame battery mount before use. ▪ Ensure the battery and charger are not damaged before charging. ▪ Don't connect the positive and negative terminal of the battery pack. ▪ Don't expose the battery to high temperatures. ▪...
Need help?
Do you have a question about the AGO X and is the answer not in the manual?
Questions and answers
What buttons do use to imput passcode on tenways ago X e-bike ?