Advertisement
Quick Links
Support and E-Warranty Certificate https://www.vevor.com/support
WIRE STRIPPING MACHINE
INSTRUCTION MANUAL
We continue to be committed to providing you with tools at a competitive price. "Save Half",
"Half Price" or any other similar expressions used by us only represent an estimate of
savings you might benefit from buying certain tools with us compared to the major top brands
and do not necessarily mean to cover all categories of tools offered by us. You are kindly
reminded to verify carefully when placing an order with us if you are actually saving half
compared to the top major brands.
Advertisement

Subscribe to Our Youtube Channel
Related Manuals for VEVOR SD-002


Summary of Contents for VEVOR SD-002
- Page 1 Support and E-Warranty Certificate https://www.vevor.com/support WIRE STRIPPING MACHINE INSTRUCTION MANUAL We continue to be committed to providing you with tools at a competitive price. "Save Half", "Half Price" or any other similar expressions used by us only represent an estimate of savings you might benefit from buying certain tools with us compared to the major top brands and do not necessarily mean to cover all categories of tools offered by us.
- Page 2 CustomerService@vevor.com This is the original instruction, please read all manual instructions carefully before operating. VEVOR reserves a clear interpretation of our user manual. The appearance of the product shall be subject to the product you received. Please forgive us that we won't inform you again if there are any technology or software updates on our product.
- Page 3 This is the original instruction, please read all manual instructions carefully before operating. VEVOR reserves a clear interpretation of our user manual. The appearance of the product shall be subject to the product you received. Please forgive us that we won't inform you again if there are any technology or software updates on our product.
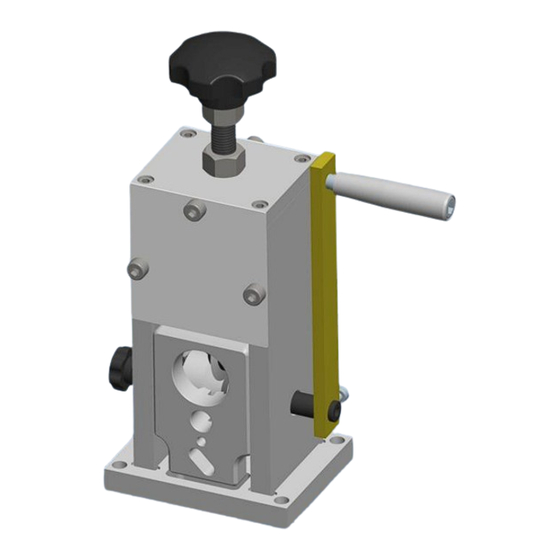
- Page 4 Parts List 1:M16 plastic nut for regulating blade up and down 2: M16 screw rod for regulating blade up and down 3: Nut for screw rod 4:Panel 5:Blade 6: Incoming panel 7:Screw for tightening incoming panel 8: Feeding hole 9:Handle - 3 -...
- Page 5 Accessories Details: 1、 One 4#allen key 5、Four M8 Screw nut 2、 One 5# allen key 6、Four M8*35 screw 3、 One 6# allen key 7、One M8*16 inner-hexagon screw、Five D8 gaskets 8、One 10#screw for connecting the electric drill - 4 -...
- Page 6 Operation Instruction 1.Select the appropriate feeding hole according to the wire diameter(As shown below). - 5 -...
- Page 7 2.During wire stripping, the center of the blade must be collinear with the center of the rolling gear (as shown below). - 6 -...
- Page 8 3.According to the thickness of the wire, adjust the height of the blade through the M16 screw nut above the machine so that the blade can cut the wire skin without damaging the copper core (as shown in the following figure).
- Page 9 4.When stripping, adjust the height of the feeding plate according to the thickness and hardness of the wire (generally, the feeding panel should be adjusted higher for thick and hard wires and lower for soft and thin wires). In this way, the wire is not easy to be eccentric when stripping. - 8 -...
- Page 10 5.When the diameter of the wire to be treated does not exceed 20mm, the two rolling gears need not be separated 6.When the wire diameter to be treated exceeds 20mm, the two rolling gears need to be separated by loosening the two screws in the gears. - 9 -...
- Page 11 7. If the machine cannot strip the wire, there may be several reasons: ①.The diameter of the stripped wire is too small (the diameter of the wire to be treated, including the outer skin, shall not be less than 1.5mm). ②.The blade's center is not on the same line as the rolling gear's center.
- Page 12 8.When the machine is operated by hand,install the handle (as shown in the above figure) Diagram of Removing Handle and Installing Electric Drill Screw - 11 -...
- Page 13 9.When the machine is driven by an electric drill, remove the handle first, then install the connecting screw for the drill (do not need to add a gasket), and use the electric drill last. Diagram of removing the electric drill screws 10.First, assemble the handle, then hold the handle with one hand and use the electric drill with the other hand to turn the drill counterclockwise to remove the screw.
- Page 14 - 13 -...
- Page 15 Manufacturer: Taizhou Senduo Environmental Protection Equipment Technology Co., Ltd. Address: Workshop B14, Xiaowufen Industrial zone, Luqiao Town, Taizhou City,Zhejiang,China Importer: WAITCHX Address: 250 bis boulevard Saint-Germain 75007 Paris Importer: FREE MOOD LTD Address: 2 Holywell Lane, London, England, EC2A 3ET EUREP UK LTD UNIT 2264, 100 OCK STREET, ABINGDON OXFORDSHIRE ENGLAND OX14 5DH...
- Page 16 Support and E-Warranty Certificate https://www.vevor.com/support...
Need help?
Do you have a question about the SD-002 and is the answer not in the manual?
Questions and answers