
Subscribe to Our Youtube Channel
Related Manuals for BSV BS POOL TOUCHEVO-15


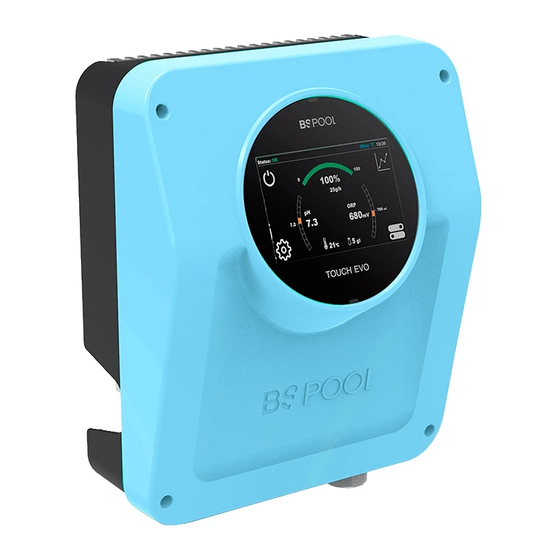
Summary of Contents for BSV BS POOL TOUCHEVO-15
- Page 1 CLORADOR SALINO SALT WATER CHLORINATOR TOUCHEVO MANUAL DE USUARIO USER MANUAL 1 / 77 Manual TOUCHEVO REV.0...
- Page 2 Español ..........3 English ........... 41 2 / 77 Manual TOUCHEVO REV.0...
- Page 3 ÍNDICE 1- DESCRIPCIÓN GENERAL 1.1-Equipo de cloración salina TOUCHEVO 1.2- Gama de equipos 1.3- Características técnicas 1.4- Recomendaciones y advertencias de seguridad 2- PREPARACIÓN DE LA PISCINA 2.1- Incorporación de sal en el agua 2.2 Equilibrio químico del agua 3- INSTALACIÓN DEL EQUIPO 3.1- Consideraciones generales: 3.2- Esquema de conexionado hidráulico 3.2.1- Equipos de la serie TOUCHEVO...
-
Page 4: Descripción General
ATENCIÓN Antes de instalar el clorador salino, lea detenidamente este manual. Si necesita alguna aclaración o tiene alguna duda póngase en contacto con su distribuidor. 1- DESCRIPCIÓN GENERAL 1.1-Equipo de cloración salina TOUCHEVO Le agradecemos la confianza al adquirir nuestro clorador salino, el cual le permitirá... -
Page 5: Características Técnicas
1.2- Gama de equipos Dentro de nuestra gama, encontrará diferentes modelos en función de su producción. 1.2.1 – Clorador TOUCHEVO Con producciones de HClO de 15, 20, 25 y 35g/h. Modos de funcionamiento manual, automático. Lectura y ajuste del ORP o “Cloro Libre”. Lectura y ajuste del pH mediante el kit AUTO. - Page 6 Asegúrese que el disipador de calor (en la parte trasera del equipo) no queda obstruido y el aire puede circular con facilidad a través del mismo. Los equipos BSV integran sistemas de protección contra cortocircuito en la célula, detección de falta de agua y otros sistemas de seguridad que mostrarán una señal acústica y luminosa en caso de que se produzca...
-
Page 7: Preparación De La Piscina
2- PREPARACIÓN DE LA PISCINA 2.1- Incorporación de sal en el agua Para que el clorador funcione correctamente deberá incorporarse una pequeña cantidad de sal y asegurarse de que el nivel de pH del agua sea el adecuado. Los niveles de sal y pH recomendados son los siguientes: CONCENTRACIÓN DE SAL (g/L) 7,1 a... - Page 8 Es aconsejable añadir sal a la piscina de forma progresiva, en 2 ó 3 veces para no excederse de la cantidad recomendada; un exceso de sal podría sobrecargar clorador desconectaría automáticamente, en cuyo caso se debería agregar agua para disminuir la concentración.
-
Page 9: Instalación Del Equipo
3- INSTALACIÓN DEL EQUIPO 3.1- Consideraciones generales: Colocar la célula de cloración en posición vertical con las conexiones eléctricas hacia arriba. De no ser posible, pude montarse en posición horizontal, cuidando que el pequeño electrodo auxiliar quede situado hacia arriba. Sitúe la célula de cloración en la posición más elevada posible del circuito de depuración y siempre después del filtro y cualquier otro elemento que pueda tener la piscina. - Page 10 3.2- Esquema de conexionado hidráulico 3.2.1- Equipos de la serie TOUCHEVO 1. De la piscina. 2. Filtración. 3. Cuadro eléctrico. 4. Bypass. 5. Interruptor de flujo (Opcional). 6. Sonda de temperatura (Opcional). 7. Sonda de pH, incluida en el kit Auto (Opcional) 8.
- Page 11 3.2.2- Kit AUTO El kit AUTO (medida y regulación del pH) puede adquirirse de forma opcional en todos los equipos TOUCHEVO. Las siguientes figuras le muestran el despiece de dicho kit, junto al esquema de instalación. 3.2.2.1- Despiece 1- Equipo TOUCHEVO 2- Tubo de aspiración (flexible) 3- Tubo de Inyección (rígido) 4- Filtro de aspiración (colocar en vertical en el fondo del recipiente de...
- Page 12 3.2.2.2- Conexión del kit AUTO Una vez instalado el equipo (1), debemos realizar las siguientes conexiones. 1- Colocaremos la brida (10) en la tubería tal y como se indica en el dibujo de conexión hidráulica. La brida (10) corresponde al inyector y se debe conectar después de la célula de electrólisis.
- Page 13 3.2.3- Kit ADVANCED (Redox) Mediante esta sonda, el equipo mide continuamente el nivel bactericida del agua por medio de una sonda “Redox”. Sólo es necesario ajustar el nivel requerido y el equipo mantiene automáticamente el nivel de desinfección, ajustando la producción de cloro a las necesidades reales de la piscina.
- Page 14 ácido isocianúrico, así como la posibilidad de instalarse en piscinas de agua de mar (opción que debe solicitar previamente a BSV Electronic). Por favor, siga cuidadosamente las instrucciones de instalación, calibración y mantenimiento para asegurar un perfecto funcionamiento del kit.
- Page 15 3.2.5- Kit sonda NTC/1 para la medida de la temperatura del agua en los equipos TOUCHEVO El kit sonda NTC/1 le permite la lectura de la temperatura del agua. Una vez conectada la sonda, se mostrará la temperatura en la pantalla principal.
- Page 16 La indicación de sal aparecerá únicamente si dispone de un kit NTC/1 que lee la temperatura del agua. La lectura se actualiza únicamente cuando el equipo alcanza el 100% de producción. Cuando la producción es inferior al 100%, el equipo muestra la última lectura de sal, hasta que se alcance nuevamente la producción.
- Page 17 3.3- Esquema de conexionado eléctrico 3.3.1- Equipos serie TOUCHEVO Conexión tierra L, N: Alimentación 220v Interruptor Encendido / Apagado Conexión bomba de pH (Sólo en modelos con kit AUTO) FILTER: Conexión filtro para el modo Paro / Marcha Regleta conexión célula 1-(amarillo) SIN USO 8-(azul) Sonda Temperatura 2-(amarillo) SIN USO...
- Page 18 3.3.2- Funciones Avanzadas TOUCHEVO dispone además de 4 relés libres de potencial, en el que se podrán conectar diferentes dispositivos. Para controlar manualmente el funcionamiento ON/OFF o un modo de programación automática, se deberá acceder al menú relés en la parte derecha del menú...
- Page 19 3.3.2.2– Programación de los focos de la piscina a través de los relés programables. En la siguiente figura se muestra un ejemplo de uso de los relés programables que incorporan los equipos de la serie TOUCHEVO. Puede programar el encendido y apagado de la iluminación de su piscina basándose el esquema siguiente: Atención: No superar nunca los 5A cuando utilice los relés programables.
- Page 20 3.3.2.3- Control de la filtración través de los relés programables Puede controlar la bomba de filtración a través de los relés programables. Habrá que realizar dos tipos de conexionado. El primero será conectar Vivo (Live) y Neutro a la entrada FILTER de la regleta tal y como se observa en la siguiente figura.
- Page 21 4- PUESTA EN MARCHA Y AJUSTES Una vez haya instalado el equipo, ya puede ponerlo en marcha. Siga con atención las instrucciones, donde se detalla su funcionamiento. 4.1- MENÚS USUARIO TOUCHEVO 4.1.1- Operación Los equipos de la serie TOUCHEVO disponen de una pantalla táctil TFT mediante el cual podrá...
- Page 22 Para acceder a los diferentes menús del equipo, pulse sobre el parámetro que desea modificar. Observará que se despliega un submenú donde podrá hacer los ajustes deseados. Para volver a la pantalla principal, pulse Salir. 4.1.2- Pantalla principal Al arrancar, el equipo muestra una pantalla con los parámetros principales En la línea superior se muestra una visualización del estado del equipo.
- Page 23 En la parte inferior central de la pantalla, se muestran los valores de temperatura y concentración de sal en el agua. Ver el apartado 3.2.6 para más detalles. En las esquinas de la pantalla, se encuentran los accesos directos a las siguientes funciones: Stand-by, Registro de datos, Configuración y Relés.
- Page 24 nuestro clorador, y en blanco cuando no hay comunicaciones con otro dispositivo. 4.1.2.2- Menú Producción Acceda al menú de producción de cloro pulsando sobre el valor del arco superior, en la pantalla principal. Configuración de la consigna de producción: Desde 0% hasta 100%. Utilice + o - para cambiar el valor.
- Page 25 detendrá al llegar a la misma, poniéndose en marcha de nuevo de forma automática cuando exista una demanda de cloro. Seguidamente en la parte inferior de la pantalla del Menú Producción se encuentra un botón CL+ORP, por defecto aparecerá en ON. Esto indica que ambas medidas se mostrarán por pantalla en caso de disponer de cada una de las sondas.
- Page 26 Pulse el botón “OK” para confirmar el ajuste. No obstante, se recomienda determinar el valor de consigna más adecuado para su piscina analizando la correspondencia entre el valor ORP y la concentración de cloro, ya que pueden existir diferencias de lectura entre diferentes tipos de agua para una misma concentración de cloro.
- Page 27 4.1.2.5- Menú pH 4.1.2.5.1- Ajuste de la consigna Ajuste el valor de consigna de pH deseado a través de los botones + / - Los límites de ajuste superior e inferior son 8.0 y 6.5 respectivamente. No obstante, el valor óptimo recomendado es de 7.2 ó 7.3 4.1.2.5.2- Activar –...
- Page 28 Una vez finalizada la cuenta atrás, retire la sonda de la solución pH7, y séquela con un papel absorbente. Sumérjala en la solución pH4 y pulse OK para continuar Tras una nueva cuenta atrás, el equipo puede mostrar los siguientes mensajes: Calibración OK: La calibración se ha realizado correctamente y puede seguir utilizando su sonda con normalidad.
- Page 29 4.1.3- Menú Relés El equpo dispone de 4 relés libres de potencial, que pueden ser programados de forma independiente. Puede seleccionar cada uno de ellos de forma individual, pulsando sobre los botones R1, R2 R3 o R4 situados en la parte superior de la pantalla. Cada uno de los relés puede ser configurado según los siguientes estados: OFF: El relé...
- Page 30 4.1.4.1- Idioma Desde el menú configuración seleccione “IDIOMA”, se desplegará una lista de los idiomas disponibles para la selección. Para la navegación, utilice las flechas , luego el botón OK y SALIR. 4.1.4.2 - Hora Ajuste la hora actual, que se utilizará para la programación horaria de los relés.
- Page 31 El valor por defecto es de 4 horas, siendo posible un ajuste de 1 a 8 horas. 4.1.4.6 – Info equipo Esta opción le muestra algunas de las características de su equipo, tales como la versión de software, horas de funcionamiento, horas trabajadas en condiciones de falta de sal, entre otras.
- Page 32 4.1.5.2 – Cubierta: Este equipo dispone de un sistema para la detección de cubiertas motorizadas. Activando esta opción, el equipo detectará si su piscina tiene puesto el cobertor, y limitará la producción de cloro al 20% de la consigna de producción que tenga configurada. Para activar la detección automática, deberá...
- Page 33 4.1.5.4 – Modo pH (Ácido / Alcalino) Esta opción le permite seleccionar el tipo de corrector de pH que va a utilizar en su piscina. Atención: Debe seleccionarlo correctamente, de no ser así, el sistema de dosificación funcionará de la forma contraria a la esperada.
- Page 34 4.2- Mensajes de avisos y alarmas Existen dos tipos de mensajes mediante los cuales el equipo le notificará de cualquier incidencia que pueda producirse: Avisos: El equipo le informa de una incidencia que debe corregirse cuanto antes, pero que no impide seguir con la producción de cloro. Se le mostrará...
- Page 35 4.2.1- Avisos de TOUCHEVO Mensaje: Causas: Acción a realizar: “SIN SONDA ORP” Sonda no conectada. Revisar sonda está conectada correctamente Falta sal en el agua. Introducir sal a la piscina. “FALTA SAL” Limpiar la célula. Incrustaciones u objetos en la célula de electrolisis, que causen falta de corriente en la célula.
- Page 36 “TEMPERATURA Exceso de la temperatura Revisar el lugar de la instalación INTERNA” interna del clorador. clorador. Inspeccionar existe una buena ventilación a través del disipador de la parte trasera del mismo. * “ALARMA pH” Suciedad incrustada en la Revisar el estado de la sonda sonda sonda mediante una calibración.
- Page 37 4.3- Vida de la célula de electrolisis Las células de electrolisis de los equipos BSPOOL están diseñadas para alcanzar una vida útil de 10.000 horas (modelos 10K) y 5.000 horas (modelos 5K). Sin embargo, esta duración está directamente relacionada con la calidad del agua, y especialmente con el buen uso del equipo. A continuación, se enumeran una serie de consejos que deberá...
-
Page 38: Mantenimiento
5- MANTENIMIENTO Siga de manera muy atenta las recomendaciones y advertencias de seguridad, detalladas en el apartado 1.4 de este mismo manual. El clorador dispone de un sistema de autolimpieza de la célula de cloración que reduce de forma considerable el mantenimiento. De todos modos, es aconsejable, al inicio de cada temporada, limpiar la célula y comprobar la sonda de cloro (Redox), cloro libre o pH si dispone de ellas. - Page 39 5.2- Comprobación y mantenimiento de la sonda REDOX Kit ADVANCED (OPCIONAL) Seleccione Menú Producción, y el modo de funcionamiento manual. Ajuste el cloro a 0%. Vuelva a la pantalla de visualización. Enjuague bien la sonda en agua limpia. Introduzca la sonda en una solución patrón de 465mV removiendo suavemente.
-
Page 40: Garantía Y Servicio
Los gastos de envío correrán a cargo del propietario del equipo. Debe tenerse en cuenta que todas las reparaciones en garantía se realizarán en fábrica, o bien por un servicio técnico autorizado por BSV Electronic. 40 / 77 Manual TOUCHEVO REV.0... - Page 41 1- GENERAL DESCRIPTION ................42 1.1-TOUCHEVO salt water chlorination equipment ......... 42 1.2- Product range ..................43 1.3- Technical specifications ................. 43 1.4- Recommendations and safety precautions ..........44 2- PREPARING THE SWIMMING POOL ............45 2.1- Adding salt to the water ................ 45 2.2 Chemical balance of the water ..............
-
Page 42: General Description
ATTENTION Before installing the salt water chlorinator, please read this manual carefully. If you need to clarify any point or have any questions, please contact your distributor. 1- GENERAL DESCRIPTION 1.1-TOUCHEVO salt water chlorination equipment Thank you for purchasing our domotic salt water chlorinator, you will enjoy your swimming pool in perfect conditions, without adding any chemical disinfectants. -
Page 43: Product Range
1.2- Product range You will find various models within our range, depending on its features and chlorine production rate. 1.2.2- TOUCHEVO HClO production from 10 to 35g/h Operating modes: manual, automatic. ORP and “Free chlorine” reading and adjustment. pH reading and adjustment through the AUTO kit. Conductivity of the water monitoring and adjustment. - Page 44 Ensure that the heatsink fins (at the rear of the equipment) are not blocked and there is a good air flow through them. All BSV products incorporate protection systems against short circuits in the cell, absence of water detection and other unwanted behaviors, which will fire a visual and acoustic alarm once any abnormal performance is detected.
- Page 45 2- PREPARING THE SWIMMING POOL 2.1- Adding salt to the water To ensure the chlorinator works correctly, a small amount of salt should be added and the pH level should be suitable. The recommended salt and pH levels are the following: Salt Concentration (g/l)
- Page 46 If this happens, water has to be added in order to reduce the concentration. We also recommend not adding salt near the drain, to avoid undissolved salt circulating through the hydraulic circuit. 2.2 Chemical balance of the water The effectiveness of chlorination and the quality of water for healthy bathing, depends largely on the pH of the water.
-
Page 47: Installation Of The Equipment
3- INSTALLATION OF THE EQUIPMENT 3.1- General considerations: Place the chlorine cell in a vertical position with electrical connections wired upwards. If this is not possible, it can be assembled in a horizontal position, ensuring that the small auxiliary electrode faces upwards. Place the chlorination cell in the highest position possible of the purification circuit and always after the filter or any other element of the water circuit (probes, flow switch, …). -
Page 48: Hydraulic Connection Diagram
3.2- Hydraulic connection diagram 3.2.1- TOUCHEVO Series Equipment 1. From the swimming pool. 2. Filtration 3. Electrical Panel 4. Bypass 5. Flow Switch (optional) 6. Temperature probe (optional) 7. pH probe, included in AUTO kit (optional) 8. Redox probe, included in ADVANCED kit (optional) 9. - Page 49 3.2.2- AUTO kit The AUTO kit (pH measure and regulation) can be added to any TOUCHEVO series. The following pictures show the parts of the kit and installation diagram. 3.2.2.1- Parts 1- TOUCHEVO Equipment 2- Suction Tube (flexible) 3- Injection Tube (rigid) 4- Suction filter (place vertically on the bottom of the acid container) 5- pH Probe 6- Probe Holder...
- Page 50 3.2.2.2- Connection of pH kit Once the equipment (1) is installed, the following connections should be done. 1- Place the flange (10) on the pipe as indicated in the hydraulic connection diagram. The flange (10) belongs to the injector and should be connected after the electrolysis cell.
- Page 51 3.2.3- ADVANCED kit (Redox) The equipment continuously measures the bactericidal level of water by means of a "Redox" probe. Simply adjust the required level and the equipment automatically maintains the level of disinfection by adjusting the production of chlorine to the real needs of the swimming pool. The screen shows the "Redox"...
- Page 52 (this option to be asked to BSV Electronic). Please follow carefully the installation, calibration and maintenance instructions to ensure a perfect setup of the kit.
- Page 53 3.2.5- NTC/1 Kit temperature water measure on TOUCHEVO equipment The temperature probe kit provides readings of the water temperature. Once the probe has been connected, the temperature will be displayed in the main screen. 3.2.6- Measurement of salt concentration in the TOUCHEVO systems When an NTC/1 probe kit is installed in the chlorinator, the salt concentration measurement feature is enabled automatically.
- Page 54 This value gets updated once the chlorine production percentage reaches 100%. When this percentage is less than 100%, the chlorinator will show the latest salt concentration value calculated and that value will remain until the production reaches 100% again. If the production setpoint is lower than 100%, the system will update the salt concentration measurement during the automatic cleaning cycles, where production will eventually reach 100%.
-
Page 55: Electrical Wiring Diagram
3.3- Electrical wiring diagram 3.3.1- TOUCHEVO series equipment Earth connection L, N: Supply 220v On / Off Switch pH pump connection (For units with the AUTO kit) FILTER: Filter connection for Stop / Start mode Terminal block of cell 1- (yellow) Not USED 8-(blue) Temperature probe 2- (yellow) Not USED 9-(brown) ORP-... - Page 56 3.3.2 - Advanced Functions TOUCHEVO has four potential free relays available. User can control these manually (ON or OFF) or by setting a program. Each relay has 4 programming cycles during the day. It will perform as automatic mode. When clock match start time, relay will turn on until clock reaches stop time.
- Page 57 3.3.2.2- Programming the spotlights of the pool through programmable relays The following figure gives an example of use of the auxiliary relay incorporated in the TOUCHEVO series equipment. Lighting of your swimming pool can be programmed to switch on and off, following this diagram: Attention: Never exceed 5A when using the programmable relay.
- Page 58 3.3.2.3- Filtering control through programmable relays The filtering pump can be controlled through the auxiliary relay, following this diagram: Second wiring to be done, it includes 3 extra elements: Circuit breaker, motor protection and contactor. These must be used to protect TOUCHEVO equipment and filtering pump.
-
Page 59: Start-Up And Adjustments
4- START-UP AND ADJUSTMENTS Once the chlorinator is installed, you can start using it. Please follow the instructions for a correct operation of the system. 4.1- TOUCHEVO 4.1.1- Operation The TOUCHEVO series equipment has an LCD touch screen, in which you can view and configure all operations of the equipment. - Page 60 Configuration Menu 2 is available by tapping on MORE bottom when the user is in Configuration Menu 1. It is the same procedure to go back from Configuration Menu 2 to Configuration Menu 1 by pressing BACK, in this case. 4.1.2- Main screen On starting up the equipment, a screen will be displayed with the main parameters.
- Page 61 At the bottom of the screen, you can see at the center the measurements of temperature and salt concentration (in case you have installed the temperature probe). Feel free to read section 3.2.5 for further information. The four corners of the screen provide direct access to the following features: Stand-by, data record, settings and relay menu.
- Page 62 If the “Modbus” communications mode was selected in the Advanced Settings menu: We will see the text “MB” in the display status bar. The text will be displayed in blue when the Master device is communicating with our chlorinator, and in white when there is no communication. 4.1.2.2- Production Menu Production Menu is located on the second line of the Main Screen.
- Page 63 Automatic Select this mode only if you have an ADVANCED probe Kit (Redox) or PRO/2 amperometric kit. If you do not have a probe, the equipment will have a random behaviour and end up by stopping and showing an error. This mode has an automatically adjust chlorine level of your swimming pool.
- Page 64 To Access the ORP Menu, touch the ORP measurement value on the Main screen. The ORP Menu is used when the ORP probe is installed (OPTIONAL). In this case, adjust the oxidation potential to the required level. For private swimming pools that are not used frequently, 650 mV is a sufficient value.
- Page 65 In this case, the ppm value can be adjusted within a 0-10ppm range. The optimum range is from 1ppm to 2ppm. NOTE: When Automatic mode is selected, production set point can be changed. NOTE: if working in automatic, you can also adjust the production percentage from 0% to 100% 4.1.2.5 pH Menu 4.1.2.5.1- Setpoint adjustment...
- Page 66 4.1.2.5.4- pH Probe Calibration For the pH probe calibration process, you should extract the probe from the probe holder and have at hand the following materials: pH7.0 reference solution pH4.0 reference solution Paper towel Press “CAL” to proceed with the calibration. A prompt will appear on screen asking you to dip the probe in the pH7.0 reference liquid.
- Page 67 ATTENTION: It is required to do a pH probe calibration during the equipment installation. New calibration should be done on changing or cleaning the probe. 4.1.3 Relays Menu This unit has a set of 4 relays with dry contact, which can be programmed individually.
- Page 68 4.1.4 Configuration Menu 4.1.4.1 Language selection From Configuration Menu, It is possible to select the most suitable language. Click on the language displayed and a list of languages available will appear. Use arrows button to go up or down on the selection.
- Page 69 Off The buzzer will not produce any sound even if an alarm is fired. --/-- Pressing this option, you will be able to set a time frame so that the buzzer will produce a sound upon an alarm only if the alarm is fired inside this time frame.
- Page 70 4.1.5.1 Flow switch The "Flow Kit" (optional) is necessary to activate the flow sensor, which is done by pressing Flow Switch = ON. 4.1.5.2- Cover On placing the cover, the chlorinator automatically reduces production to 20%, C letter will appear to it, it means cover is activated. This variation will be reflected in the production %.
- Page 71 4.2.5.3- pH Alarm The pH adjustment system will produce an alarm and the dosing pump will stop operating when the pump works continuously for more than 2 hours, This could occur for the following reasons: The acid tank is empty and therefore pH corrector is not being injected into the swimming pool.
- Page 72 4.1.5.6- Information Menu Inside the information menu you can find relevant information about the system model and the software version, as well as the accumulated working hours of your system. If you press the RESET button, the system will return to its factory default parameters.
-
Page 73: Internal Temperature
4.2.2- TOUCHEVO Alarms In the following cases, the chlorinator shuts down and the alarm and acoustic alarm LED is activated (automatic reset once the fault is solved): *Except pH Alarm "NO WATER FLOW" Excess The piping should be drained to electrolysis cell. - Page 74 "OPEN CIRCUIT" Cell incorrectly Check the cell connection and connected. ensure that cables connection terminals good condition. Check the condition of the cell Cell damaged electrodes, and replace it if any completely worn down. damage is observed. Swimming pool water Ensure that the water has salt with very...
-
Page 75: Maintenance
5- MAINTENANCE Carefully follow the recommendations and safety warnings detailed in section 1.4 of this manual. The chlorinator has a self-cleaning system of the chlorination cell, which reduces maintenance considerably. In any event, it is advisable to clean the cell and check the chlorine (Redox), free chlorine or pH probe if available. - Page 76 5.2- Checking and maintenance of the Redox probe (OPTIONAL) Select Menu, and Man. Chl. Adjust the chlorine to 0%. Go back to the display screen. Rinse the probe carefully in clean water. Insert the probe into a 465mV standard solution and stir gently. Observe the voltage on the label, which corresponds to the ambient temperature at that time.
-
Page 77: Guarantee And Service
Transport costs will be covered by the equipment owner. It is important to bear in mind that all repairs under guarantee are performed at the factory, or by an authorized BSV Electronic technical service. 77 / 77...
Need help?
Do you have a question about the BS POOL TOUCHEVO-15 and is the answer not in the manual?
Questions and answers