Table of Contents
Advertisement
Available languages
Available languages
Quick Links
Küppersbusch Vertriebsgesellschaft mbH
Postfach 10 01 32, D-45801 Gelsenkirchen, Küppersbuschstraße 16, D-45883 Gelsenkirchen
Telefon (02 09) 4 01-0, Telefax (02 09) 4 01-3 03
BEDIENUNGSANWEISUNG
mit Montageanweisungen
Instructions for use and installation instructions
GB
Instructions d'utilisation e avis de montage
F
Gebruiksaanwijzing en montagehandleiding
NL
Istruzioni di uso e di montaggio
I
Instrucciones de Uso e Instrucciones de Montaje
E
Bruksanvisning i monteringanvisningar
S
Instruções de uso com indicações para montagem
P
KD 906.3 - KD 1206.3
Advertisement
Table of Contents

Subscribe to Our Youtube Channel
Related Manuals for Kuppersbusch KD 906.3


Summary of Contents for Kuppersbusch KD 906.3
- Page 1 Instrucciones de Uso e Instrucciones de Montaje Bruksanvisning i monteringanvisningar Instruções de uso com indicações para montagem KD 906.3 - KD 1206.3 Küppersbusch Vertriebsgesellschaft mbH Postfach 10 01 32, D-45801 Gelsenkirchen, Küppersbuschstraße 16, D-45883 Gelsenkirchen Telefon (02 09) 4 01-0, Telefax (02 09) 4 01-3 03...
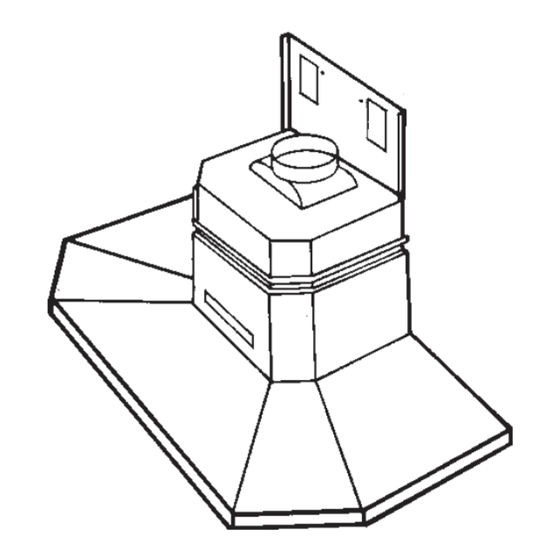
- Page 2 FIG. 1 FIG. 2 FIG. 6 FIG. 7 FIG. 4 FIG. 9 FIG. 3 FIG. 8 FIG. 5 FIG. 11 FIG. 10...
-
Page 3: Montage Und Gebrauchsanweisung
Arbeitsplatte montiert. Hierzu wird der untere GERÄTEAUSFÜHRUNG versehen ist, so müssen die entsprechen- hintere Rand der Rückwand hinter die Arbeits- den Trennvorrichtungen bei der festen -------------------------------------------------------- Deutsch platte eingeführt, bis die Rückwand fest auf Installation vorgesehen werden Das Gerät wird in einer Ausführung geliefert, Arbeitsplatte aufsitzt (Abb. -
Page 4: Schaltung Des Geräts
befestigungsteil geschoben, so daß es von INSTALLATION connection and that the voltage values diesem gehalten wird (Abb. 9). correspond to those indicated on the data -------------------------------------------------------- English Nun wird das Kaminunterteil bis auf die Glas- plate inside the appliance itself. This appliance consists of (Fig. -
Page 5: Operation
by tightening screws 5A and inserting screws 3. Connect the draft pipe to the hood flange branchez l’appareil. (Fig. 9). Français 4. Insert the transparent plastic washers onto Installation with the rear panel the glass as indicated in Fig. 8. The rear metal panel must be fixed to the wall UTILISATION 5. - Page 6 réglage de l’appareil en hauteur se fait au ces mêmes opérations en le sens inverse INSTALLATION moyen des vis des étriers (Fig. 5B). (Fig. 4). -------------------------------------------------------- Version recyclage Après ce réglage, précédez à la fixation en Pour la version Filtrante, les grilles d’évacuation Si vous utilisez l'appareil en version recyclage, L’appareil est composé...
-
Page 7: Het Gebruik
de hiervoor bestemde schroeven op de HET GEBRUIK INSTALLATIE beugels aan te draaien (Fig. 5B). Na de -------------------------------------------------------- -------------------------------------------------------- Nederlands afstelling, overgaan tot de bevestiging door de Het aanwezige apparaat bestaat uit (Fig. 1): Vermijd het gebruik van materiaal dat schroeven 5A aan te draaien en de schroeven steekvlammen kan veroorzaken in de –... -
Page 8: Manutenzione
door middel van de twee bevestigings- zes maanden te vernieuwen. Om de filter F schroeven aan de zijkant B (Fig. 9). te demonteren, moet men de knop P -------------------------------------------------------- Italiano losschroeven en profil C wegnemen (Fig. 11). Filtrerende versie Evitare l’uso di materiali che causano fiam- Moeten de roosters voor de af te voeren lucht Voor de vervanging van de halogeen lampen mate (flambè) nelle immediate vicinanze... -
Page 9: Installazione
delle staffe (Fig. 5B). A regolazione avvenuta, S tramite le viti apposite (Fig. 9). INSTALLAZIONE procedere al fissaggio stringendo le viti 5A ed 2. Collegare un tubo flessibile adatto al rac- -------------------------------------------------------- Español inserendo le viti 5C. cordo deviatore. Il presente apparecchio è composto da (Fig. 1): 3. -
Page 10: Mantenimiento
5). Siendo los ojales de enganche de 6. Hacer descender el tubo inferior y INSTALACIÓN dimensión mayor respecto a los soportes, apoyarlo a la campana. -------------------------------------------------------- -------------------------------------------------------- regular la posición horizontal del aparato 7. Fijar el tubo superior al estribo mediante El presente aparato está... - Page 11 y girándolos hacia abajo hasta desinserirlos ANVÄNDNING de los soportes. Para colocarlos nuevamente -------------------------------------------------------- Svenska proceder de manera inversa (Fig. 4). Undvik användning av material som Si se usa el aparato en la versión filtrante, framkallar gnistror (flambè) i närheten av será...
- Page 12 genom att flytta den åt höger eller vänster allt 7. Fäst det övre röret på haken med hjälp av Filtret F tas bort genom att lossa knoppen P INSTALLATION efter behov tills den når den parallella vinkeln de två sidolåsskruvarna B (Fig. 9). och ta bort profilen C (Fig.
- Page 13 (Fig. 5). Os ganchos são dimensionalmente INSTALAÇÃO desligar o aparelho da corrente eléctrica. maiores do que as presilhas, por isso é -------------------------------------------------------- Português necessário regular a posição horizontal do Este aparelho é formado por (Fig. 1): aparelho deslocando-o à direita ou à esquerda –...
- Page 14 na parede (Fig. 9). metálicos, destravar a tranqueta específica, 6. Descer o tubo inferior e apoiá-lo no empurrá-los para dentro e rodá-los, então, exaustor. para baixo até os soltar dos respectivos 7. Fixar o tubo superior na presilha utilizando suportes. Para montar de novo os filtros, dois parafusos de fixação laterais, B (Fig.
Need help?
Do you have a question about the KD 906.3 and is the answer not in the manual?
Questions and answers