Table of Contents
Advertisement
Quick Links
Contents
Safety ············································································································ 1
Safety information ·············································································································································· 1
General operating safety ···························································································································· 1
Electrical safety ·········································································································································· 1
Safety precautions ············································································································································· 1
ESD prevention ·················································································································································· 1
Preventing electrostatic discharge ············································································································· 1
Grounding methods to prevent electrostatic discharge ·············································································· 2
BX1020B IB switch module ············································································ 1
Module view ······················································································································································· 1
Technical specifications ····································································································································· 1
Ports ··································································································································································· 2
External ports ············································································································································· 2
Internal ports ·············································································································································· 3
LEDs and buttons··············································································································································· 3
Logical structure ················································································································································· 5
Installation guidelines ········································································································································· 6
Internal networking ························································································ 1
Connections between switch modules and mezzanine network adapters ························································· 1
Hardware compatibility ·················································································· 2
Compatibility between the switch module and mezzanine network adapters ···················································· 2
Compatibility between the switch module and transceiver modules/cables······················································· 3
Replacing the switch module ········································································· 1
Installation tools ················································································································································· 1
Preparing for the replacement···························································································································· 2
Replacing the switch module ····························································································································· 2
Powering on and powering off the switch module ·········································· 1
Powering on the switch module ························································································································· 1
Supported power-on methods ···················································································································· 1
Procedure ··················································································································································· 1
Powering off the switch module ························································································································· 2
Supported power-off methods ···················································································································· 2
Procedure ··················································································································································· 3
Configuring the switch module ······································································· 1
Configuring commonly used commands ············································································································ 1
Commonly used operations ··········································································· 1
Logging in to the OM from the Web interface ···································································································· 1
Logging in to the OM from the CLI ····················································································································· 2
Collecting logs ···················································································································································· 3
Upgrading the switch module ········································································· 1
i
Advertisement
Table of Contents

Related Manuals for H3C BX1020B IB


Summary of Contents for H3C BX1020B IB
-
Page 1: Table Of Contents
Safety precautions ············································································································································· 1 ESD prevention ·················································································································································· 1 Preventing electrostatic discharge ············································································································· 1 Grounding methods to prevent electrostatic discharge ·············································································· 2 BX1020B IB switch module ············································································ 1 Module view ······················································································································································· 1 Technical specifications ····································································································································· 1 Ports ··································································································································································· 2 External ports ············································································································································· 2 Internal ports ··············································································································································... -
Page 2: Safety
General operating safety • Only H3C authorized or professional engineers are allowed to operate the device. • Keep the device clean and dust-free. Do not place it in a humid place or allow liquids to enter it. -
Page 3: Grounding Methods To Prevent Electrostatic Discharge
Grounding methods to prevent electrostatic discharge When removing or installing the device, you can use one or multiple of the following grounding methods to prevent electrostatic discharge: • Wear an ESD wrist strap and ensure that it is reliably grounded. Ensure that the ESD wrist strap makes good skin contact and can be flexibly stretched out and draw back. -
Page 4: Bx1020B Ib Switch Module
ICM modules supported by the blade enclosure include switch modules and straight-through modules (also known as cascading modules in some manuals). The BX1020B IB is a type of switch module. Both ICM and switch modules in this document refer to the BX1020B IB. -
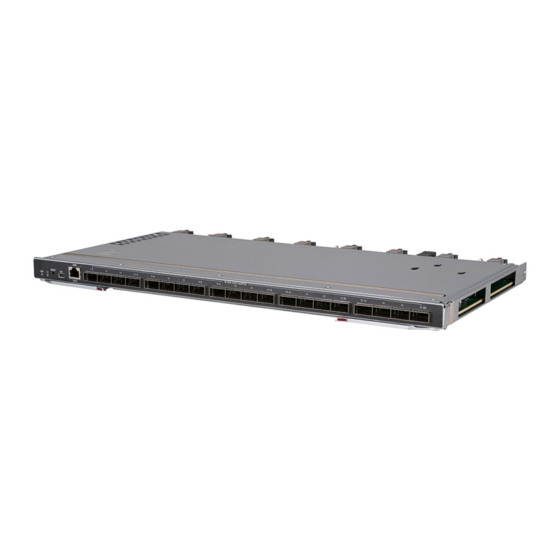
Page 5: Ports
Ports This section describes positions, quantity, and other information about the ports of the switch module. External ports Figure 2 shows the external ports provided by the switch module. Table 2 describes the external ports. Figure 2 External ports (1) I2C port (2) AMC serial port (3) 100G EDR IB ports Table 2 Description for external ports... -
Page 6: Internal Ports
The port numbers are 21 to 40. For more iblinkinfo 100G EDR IB ports QSFP28 information, see the command in H3C UniServer BX1020B IB Switch Module Configuration Guide. Internal ports Table 3 shows the internal port provided by the switch module. - Page 7 Figure 3 LEDs and buttons (1) UID LED (2) Health LED (3) Reset button (4) Port LED Table 4 LED description Name Color Status • Steady on: The UID LED is activated (through the OM module). UID LED Blue • Off: The UID LED is not activated.
-
Page 8: Logical Structure
Name Color Status 50% of the maximum transmission rate. 2 Hz: The current data transmission rate is 50% to 75% of the maximum transmission rate. 4 Hz: The current data transmission rate is 75% to 100% of the maximum transmission rate. •... -
Page 9: Installation Guidelines
Figure 5 Port assignment Installation guidelines • As shown in Figure 6, up to six switch modules can be installed in slots ICM1 through ICM6 at the rear of the blade enclosure. • The IB switch module is hot swappable. - Page 10 Figure 6 Guidelines for installing the switch module (1) ICM1 slot (2) ICM2 slot (3) ICM3 slot (4) ICM4 slot (5) ICM5 slot (6) ICM6 slot...
-
Page 11: Internal Networking
Table 5 Connections between switch modules and mezzanine network adapters Max number of Blade server model supported mezzanine Internal connections network adapters H3C UniServer B5700 G5 Figure 1 The figures show only the mapping between mezzanine H3C UniServer B5700 G3 Figure 1 network adapter slots and switch module slots. -
Page 12: Hardware Compatibility
Compatibility between the switch module and mezzanine network adapters Table 6 describes the compatibility between the BX1020B IB switch module and mezzanine network adapters. Table 6 Mezzanine network adapter compatible with the switch module Mezzanine network adapter... -
Page 13: Compatibility Between The Switch Module And Transceiver Modules/Cables
Compatibility between the switch module and transceiver modules/cables The following are the transceiver modules/cables compatible with the BX1020B IB switch module: • MCP1600-E003E26—IB EDR DAC passive cable (100G) • MFA1A00-E005—IB EDR AOC active cable (100G) For installation methods and guidelines, see the user guide that comes with the transceiver modules... -
Page 14: Replacing The Switch Module
Replacing the switch module You can replace the switch module when it is faulty or when you want to use a switch module of another model. Installation tools The following tools or equipment might be required when you install, use, or maintain the device. Table 7 Required tools Image Name... -
Page 15: Preparing For The Replacement
Image Name Description Ladder Used for high-altitude operations Interface cable (such Used to connect the equipment with the external as an Ethernet cable or network optical fiber) Login device (such as Used to log in to the equipment a PC) Preparing for the replacement •... -
Page 16: Powering On And Powering Off The Switch Module
Powering on and powering off the switch module This section describes how to power on and power off the switch module. Powering on the switch module This section describes how to power on the switch module. Supported power-on methods Table 8 describes power-on methods supported by the switch module. -
Page 17: Powering Off The Switch Module
Figure 3 Powering on the switch module Figure 4 The switch module has been powered on Powering on the switch module from the OM CLI Log in to the OM CLI. For more information, see "Logging in to the OM from the CLI." Execute the command in user view to power on the switch module in slot psu-io on io 1... -
Page 18: Procedure
Power-off method Application scenario Powering off the switch module from the OM Web interface Both the blade enclosure and switch module have been powered on and the switch module is operating correctly. Powering off the switch module from the OM Procedure After the switch module is successfully powered off, the Health LED is off. - Page 19 <OM>display io list Slot : 1 Running status : Normal UID LED : Off : On Product name : BX1020B CPU usage : N/A...
-
Page 20: Configuring The Switch Module
For more information, see "Prerequisites" in H3C UniServer BX1020B IB Switch Module Configuration Guide. Configuring commonly used commands For more information, see "Common commands for IB switch module (BX1020B)" in H3C UniServer BX1020B IB Switch Module Configuration Guide. -
Page 21: Commonly Used Operations
Commonly used operations Logging in to the OM from the Web interface Power on the enclosure. As shown in Figure 7, connect the Ethernet port on the PC to the MGMT port on the primary and backup Oms over the LAN. Make sure the PC and the management networks on the OMs are reachable to each other at Layer 3. -
Page 22: Logging In To The Om From The Cli
Figure 8 Logging in to the OM from the Web interface Logging in to the OM from the CLI Power on the enclosure. As shown in Figure 9, connect the Ethernet port on the PC to the MGMT port on the primary and backup Oms over the LAN. -
Page 23: Collecting Logs
<OM> Collecting logs Log in to the operating system of the device where the subnet manager is installed. For more information about subnet managers, see "Prerequisites" in H3C UniServer BX1020B IB Switch Module Configuration Guide. Execute the mlxdump -d <IB device> snapshot --mode full -o <log name>... -
Page 24: Upgrading The Switch Module
Upgrading the switch module For more information, see BX1020B IB switch module upgrade in H3C UniServer B16000 Blade Server Upgrade Guide.
Need help?
Do you have a question about the BX1020B IB and is the answer not in the manual?
Questions and answers