Table of Contents
Advertisement
Quick Links
Step 8:
After replacing the failed disk, the green and red LED of the new disk will start to
blink and the audible alarm will be silenced which indicates that the mirror is rebuilding.
If one were to reboot and enter the RAID firmware they would see the current percentage
of the rebuild.Once the rebuild has completed, the RAID will be marked as "Optimal" in the
firmware utility and the red led will be off. The front bezel can now be replaced.
Step 5:
While the system is running
you can insert the replacement
disk in the empty slot. Insert the
replacement drive into the disk bay
and slide the disk straight in until
it stops.
Step 6:
Swing the handle in toward
the appliance. Continue pushing the
handle in until you feel it lock in
place.
Step 7:
Press firmly on the both
the left and right edges of the drive
with both thumbs. Applying this
pressure will ensure that the drive is
fully engaged, even if no movement
of the drive is felt.
S-1600 R4 Single 10 HDD
Replacement / Installation Instructions
BEFORE YOU BEGIN, READ THIS!
The replacement of a single FAILED drive can be done while the application is still
running. It does not require the appliance to be turned OFF or the operating system
(OS) to be shutdown. These are hot swappable hard disk drives that can be removed
and re-installed while power is ON. The appliance will automatically detect the
removal of a FAILED or defective drive and the installation of its replacement.
This is an appliance with RAID storage. Single hard drive failures do not result in an
appliance failure. It will operate in the DEGRADED state until a replacement drive is
installed and a REBUILD of that drive's data is complete. When the REBUILD is done,
the appliance returns to the OPTIMAL state.
Hardware Configuration
It is possible that one or two disks, depending on the RAID type, could be marked as
bad and the RAID marked as degraded, but this will not affect the appliance's ability to
operate.
CAUTION
Removal of any other drives during this procedure or
during the REBUILD will result in system failure.
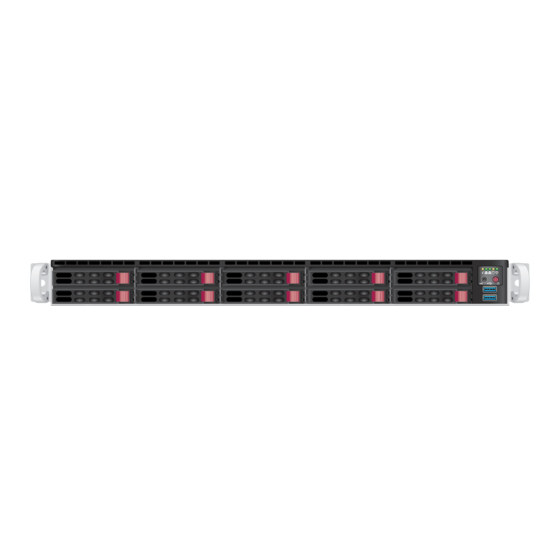
HDD1
HDD3
HDD0
HDD2
Front View -
HDD9
HDD5
HDD7
7
NVMe PCIe
HDD4
HDD6
6
HDD8
NVMe PCIe
RAID Disk Bays
PAGE 1
2
1
UID
Advertisement
Table of Contents

Related Manuals for Supermicro S-1600 R4


Summary of Contents for Supermicro S-1600 R4
- Page 1 S-1600 R4 Single 10 HDD Step 5: While the system is running Replacement / Installation Instructions you can insert the replacement disk in the empty slot. Insert the BEFORE YOU BEGIN, READ THIS! replacement drive into the disk bay and slide the disk straight in until it stops.
- Page 2 Static-Sensitive Devices Step 2: Press in on the colored release button located beside the Electrostatic discharge (ESD) can damage electronic components. To prevent damage to any drive’s LEDs on the failed drive to printed circuit boards (PCBs), it is important to handle them very carefully. The following unlock the handle.
Need help?
Do you have a question about the S-1600 R4 and is the answer not in the manual?
Questions and answers