Table of Contents
Advertisement
Quick Links
Advertisement
Table of Contents

Related Manuals for 3D Systems Allevi 3


Summary of Contents for 3D Systems Allevi 3
- Page 1 Allevi 3 User Guide - 1.1.2...
- Page 2 BUILD WITH LIFE...
-
Page 3: Table Of Contents
Table of Contents WELCOME SPECIFICATIONS WARNINGS GETTING STARTED WHAT`S IN THE BOX PRINT BED DIMENSIONS ALLEVI 3 DIAGRAM SETTING UP YOUR PRINTER SETTING UP YOUR SOFTWARE CONNECTING TO YOUR PRINTER START PRINTING YOUR FIRST BIOPRINT MAINTENANCE & TROUBLESHOOTING TROUBLESHOOTING AND CONTACT US... -
Page 4: Welcome
WELCOME... -
Page 5: Specifications
Supply Voltage: 24V DC, 16.7A SOFTWARE BUILD PLATE Bundle: Allevi Bioprint Online Max Temp: 60ºC Connectivity: WiFi, Ethernet, Min Temp: Room temperature Allevi Wireless Adapter Supported File Types: STL, gcode Operating System: Windows, MacOSX, Linux Allevi 3 | User Guide... -
Page 6: Warnings
WARNINGS HOT SURFACE WARNING This symbol indicates potential hot surfaces. The Allevi 3 and its extruder(s) can become hot during the printing process, whether heating or cooling. Always allow time for the extruder to cool before handling. WASTE ELECTRICAL AND ELECTRONIC EQUIPMENT This symbol indicates that when the end-user wishes to discard this product, it must be sent to separate collection facilities for recovery and recycling. - Page 7 • Humidity: 20- 80% (up to 31ºC), decreasing linearly to 50% at 40ºC • WARNINGS • The Allevi 3 includes moving parts that can cause injury. Never reach inside the printer while it is in operation. • Do not leave the printer unattended while it is in operation.
-
Page 8: Getting Started
GETTING STARTED... -
Page 9: What`s In The Box
WHAT’S IN THE BOX Starter bioink kit Allevi 3 bioprinter Power supply Air compressor* Compressor hose *Air compressor arrives separately Allevi 3 | User Guide... -
Page 10: Print Bed Dimensions
PRINT BED DIMENSIONS 77.50mm Diameter 88.30mm Allevi 3 | User Guide... -
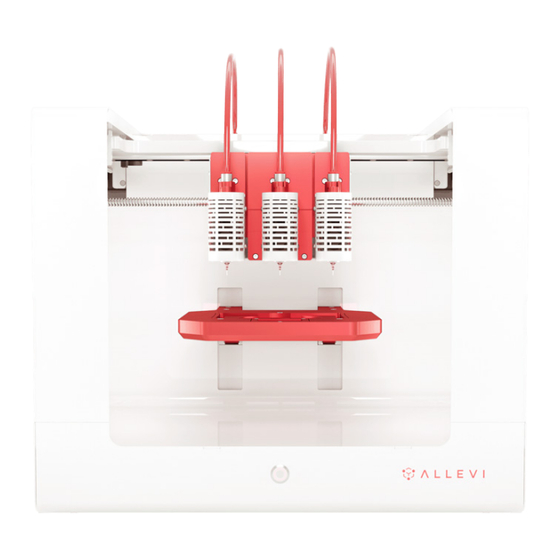
Page 11: Allevi 3 Diagram
ALLEVI 3 DIAGRAM Air Compressor Lines CORE™ printhead (heating and cooling) Autocalibration pad Build Plate (heating) Power On/Off Allevi 3 | User Guide... -
Page 12: Setting Up Your Printer
We recommend holding onto the packaging for future moving or shipping the printer. CAUTION: The Allevi 3 weighs ~ 40 lbs (18.1 kg). Two people may be required to safely lift it. Always carry the printer by the frame/bottom. - Page 13 Note: The air compressor needs to be periodically drained to eliminate any condensation inside. To do so, refer to the air compressor manufacturer manual. This should be done following every day of use. Please refer to the air compressor manufacturer manual for all preventative maintenance. Allevi 3 | User Guide...
-
Page 14: Setting Up Your Software
To register your printer, scroll down in your printer list and click ‘Add printer’. If you’re planning on having multiple users work with your printer, we would recommend that you first make a Team and add the printer to your Team. A guide to do this can be found here. Allevi 3 | User Guide... - Page 15 Note: The serial number has 7 characters and should be limited to letters between a-f and numbers. Step 5 Once your printer is registered, it will appear as an available printer in your printer list. Allevi 3 | User Guide...
-
Page 16: Connecting To Your Printer
Allevi Adapter. Step 1 Download the official driver here. Extract the downloaded .zip file and run the installer. This allows your computer to connect to two Wi-Fi networks at the same time. Allevi 3 | User Guide... - Page 17 Download the Allevi Client app here. Extract the downloaded .zip and run the application. You’ll need to keep this open whenever you are using your Allevi bioprinter. Step 2 Plug your Allevi Adapter into your computer’s USB port. Step 3 Turn your printer on.
-
Page 18: Start Printing
START PRINTING... -
Page 19: Your First Bioprint
Remove the middle and right-most CORE extruders from the gantry. This print will only utilize one extruder so we only need the left-most extruder. In future prints, you will be required to calibrate all connected extruders, so we recommend only having as many extruders attached as you want to use. Allevi 3 | User Guide... - Page 20 This will bring you to your printer Status section. Here you can get an overview of your print settings. We recommend always autocalibrating first. Always autocalibrate with a syringe and needle loaded in the printhead. Do NOT autocalibrate with a dish on the bedplate. Allevi 3 | User Guide...
- Page 21 “Allevi Files”. Step 8 Next, choose your dish in the Build Plate section. For your first bioprint, we’ll be using a petri dish. For wellplates, print files will automatically be replicated in all wells. Allevi 3 | User Guide...
- Page 22 Step 10 In the Extruder section, you can also set extruder temperature, pressure, and test extrude by hol- ding the button. For pluronic, set the pressure to 80 PSI and leave it at room temperature. Allevi 3 | User Guide...
- Page 23 On, During Print, and Post Print. They use variables such as light intensity, layer frequency, and duration. For this print, leave these off. Step 13 Once everything is ready to go, ‘Print’ to start building with life! Allevi 3 | User Guide...
- Page 24 Allevi 3 | User Guide...
-
Page 25: Maintenance & Troubleshooting
MAINTENANCE & TROUBLESHOOTING... -
Page 26: Troubleshooting And Contact Us
Allevi YouTube channel You can also visit the for video instructions. Have more questions or need help? Visit us on the Allevi Support page or email us at support.allevi3d@3dsystems.com Allevi 3 | User Guide... - Page 27 EC DECLARATION OF CONFORMITY (DoC) Manufacturer: 3D Systems, Inc. Address: 333 Three D Systems Circle Rock Hill, SC 29730 declare under sole responsibility for issuing this declaration of conformity in relation to the following Product(s): Product Description: 3D Bioprinter Model:...
- Page 28 Allevi, Inc | 2929 Arch St | 17th Floor | Philadelphia PA | 19104 Copyright Allevi, Inc 2022...
Need help?
Do you have a question about the Allevi 3 and is the answer not in the manual?
Questions and answers