iHome iPL10 - Stereo Alarm Clock to Charge for iPhone / iPod Manual
- User manual (16 pages) ,
- User manual (20 pages)
Advertisement
- 1 WELCOME
- 2 GETTING STARTED
- 3 FEATURES & FUNCTIONS
- 4 CONNECTING TO AC POWER
- 5 BACKUP BATTERY
- 6 SETTING THE TIME: TIME SYNC & MANUAL TIME SETTING
- 7 SETTING AND USING THE ALARM
- 8 CHARGING YOUR iPHONE OR iPOD
- 9 LISTENING TO YOUR iPHONE/iPOD
- 10 LISTENING TO FM RADIO
- 11 USING THE UNIT IN OTHER COUNTRIES
- 12 SNOOZE/DIMMER OPERATION
- 13 SLEEP MODE
- 14 MAINTENANCE
- 15 TROUBLESHOOTING
- 16 Documents / Resources
WELCOME
This user guide will get you up and running quickly and provide helpful hints to maximize enjoyment. For more information about this and other iHome products, please visit www.ihome.com ; Note that details on using iHome apps with this unit are not covered in this booklet. For information on using iHome apps, please visit www.ihome.com/apps
GETTING STARTED
This unit ships with the following items. Please check to see that all items are present.
- iPL10 speaker system
![]()
- 100-240V Universal AC power adaptor
![]()


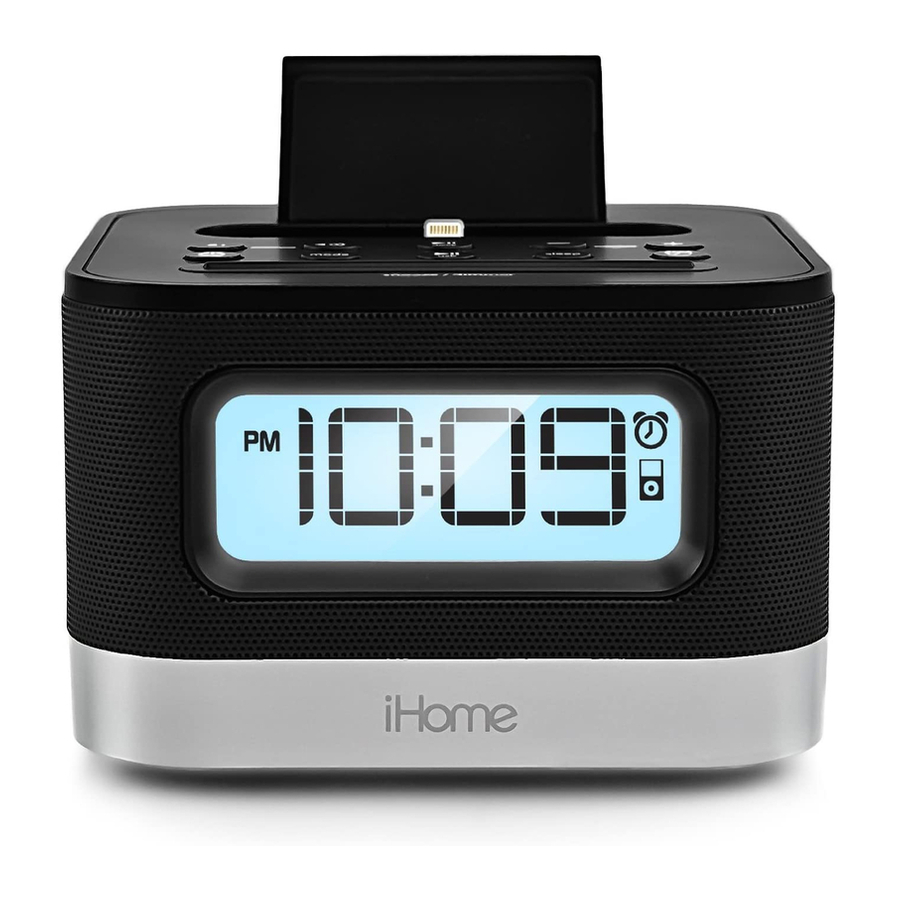
FEATURES & FUNCTIONS

CONNECTING TO AC POWER
This unit operates on AC power using the included 100V-240V universal AC adaptor for charging and playing your iPhone or iPod. Place unit on a stable surface. Plug the power adaptor into the DC jack on back of the unit and the other end into a working wall socket. You can now charge your iPhone or iPod.

BACKUP BATTERY
The iPL10 ships with a CR2450 battery installed for backup to provide continuous alarm operation and clock settings in the event of a power failure. Remove the pull tab from the battery compartment on the bottom of the unit before use. If a power failure occurs or the AC cord is accidentally disconnected, the display backlight will not remain lit, but current time and alarm time settings will be temporarily maintained. Otherwise, you must reset the time and alarm settings.
Note: The  Battery Low icon is located at the right side of clock display. When the backup battery is low and needs to be replaced, the Battery Low icon will flash. To replace, follow steps below:
- Please make sure the AC adaptor is connected. Otherwise all settings may be lost during battery replacement.
- Use a Phillips screwdriver to open the backup battery compartment door located on the bottom of the unit.

- Remove the exhausted battery. Insert a new CR2450 battery by easing it under the tabs in the battery well and pressing down. Make sure the side marked + is facing up.
- Close the battery compartment door and tighten the battery door screw. Note: Make sure you dispose of battery properly (see your local regulations).


Lithium batteries can explode or cause burns if disassembled, shorted, recharged, exposed to water, fire, or high temperatures. Do not place loose batteries in a pocket, purse, or other container containing metal objects, mix with used or other battery types, or store with hazardous or combustible materials. Store in cool, dry, ventilated area. Follow applicable laws and regulations for transport and disposal.
SETTING THE TIME: TIME SYNC & MANUAL TIME SETTING
TIME SYNC
This unit is equipped with auto sync. By default, the unit will sync to the time on your iPhone or newer iPod (iPod touch, iPod nano and iPod Classic; older iPod models such as iPod mini do not support this feature) whenever you dock it in the Lightning dock OR connect via the USB port located on back of the unit. When successful, the updated time will appear on the display. If sync is unsuccessful, try to sync again using a different iPhone or iPod. If sync still doesn't work, set the time manually (see below).
SETTING THE TIME MANUALLY
- Press and hold the Time Set Button until "MAN" or "SYNC" flashes in the display with one beep. If "SYNC" is displayed, press the + or – Buttons so "MAN" appears in the display, indicating manual time setting mode.
- Press and release the Time Set Button. The time will flash in the display.
- Press the + or – Buttons to set the correct time (hold for rapid adjustment. Make sure you are setting the time to the correct AM or PM time. The PM indicator appears at the upper left of the display; there is no AM indicator.
NOTE: The time can be set to standard 12 hour time (AM and PM) or to 24 hour time (sometimes called "military time"). To toggle between 12 and 24 modes, press and release the![]() Alarm Button located on top of the unit at any time during manual time setting mode.
Alarm Button located on top of the unit at any time during manual time setting mode. - Press and release the Time Set Button to confirm the current time setting (two beeps will sound) and exit time setting mode.
SETTING AND USING THE ALARM
SETTING THE ALARM
This unit lets you wake to your docked iPhone, iPod (iPod), USB-connected device (USB), FM radio or to the built-in buzzer alarm. The alarm will sound for 60 minutes or until reset/turned off.
- Press and hold the
![]() Alarm Button until the alarm time display flashes with one beep.
Alarm Button until the alarm time display flashes with one beep. - Press the + or – Buttons to adjust the display to the desired alarm time (hold for rapid adjustment). Remember to set the correct AM or PM alarm time.
- Press the
![]() Alarm Button to confirm the alarm time. The WAKE-TO indicator will flash on the display. Press the + or – Buttons to toggle among wake to Lightning dock, USB, FM radio or buzzer, then press the
Alarm Button to confirm the alarm time. The WAKE-TO indicator will flash on the display. Press the + or – Buttons to toggle among wake to Lightning dock, USB, FM radio or buzzer, then press the ![]() Alarm Button to access volume setting for the selected alarm source.
Alarm Button to access volume setting for the selected alarm source.
| Wake to iPod: | If wake to dock (iPod) is selected, press the + or – Buttons to set the Lightning dock volume (can be set from 5- 40). The alarm will wake you to the last track played on your docked iPhone or iPod. |
| Wake to USB: | If wake to USB is selected, press the + or – Buttons to set the USB dock volume (can be set from 5- 40). The alarm will wake you to the last track played on the iPhone or iPod connected to the USB dock. |
| Wake to radio: | If wake to FM is selected, press the + or – Buttons to select a radio station to wake to, then confirm your selection by pressing the  Alarm Button. Press the + or – Buttons to set the FM radio alarm volume (can be set from 5- 40). Alarm Button. Press the + or – Buttons to set the FM radio alarm volume (can be set from 5- 40). |
| Wake to Buzzer: | If wake to Buzzer is selected, press the + or – Buttons to choose HI or LO buzzer alarm volume. |
- Press the
![]() Alarm Button to exit and confirm alarm settings. An alarm
Alarm Button to exit and confirm alarm settings. An alarm ![]() icon will appear on the display, indicating that the alarm is set and armed.
icon will appear on the display, indicating that the alarm is set and armed.
REVIEWING AND RESETTING THE ALARM
Press and release the  Alarm Button at any time to review the current alarm settings. To toggle the alarm on or off, press the Alarm Button as needed. When the alarm icon is displayed, the alarm is armed/on. Press the Power Button or Alarm Button when the alarm is sounding to reset it to come on again at the same time the next day. Press the Alarm Button again to turn off/disarm the alarm. The alarm icon will disappear.
CHARGING YOUR iPHONE OR iPOD
- Gently dock your iPhone or iPod into the flexible Lightning dock located on the top of the unit OR connect an iPhone or iPod to the USB dock on back of unit using the cable that came with your device. While your iPhone/iPod is docked in the unit and/or connected via the USB dock and the unit is connected to AC power, it recharges (until fully charged). The unit will not overcharge your iPhone/iPod. Note that non-docking iPod models will NOT charge.
Note: Please make sure your iPhone/iPod is properly docked into the unit. Failure to do so may damage your iPhone/iPod.
LISTENING TO YOUR iPHONE/iPOD
USING THE LIGHTNING DOCK OR USB DOCK
USING THE LIGHTNING DOCK
- Dock your already playing iPhone/iPod. The unit will automatically turn on and you will hear the music playing from your iPhone/iPod. The iPhone/iPod Icon will appear at the right side of the display, indicating iPhone/iPod playing mode.
- Press the
![]() or
or ![]() Buttons on the unit to adjust the system volume.
Buttons on the unit to adjust the system volume.
Note: If the volume is too low on the iPhone/iPod, the unit may not detect that the iPhone/iPod is in play mode. Press the![]() Dock Button to play it. Press again as needed to pause and resume play.
Dock Button to play it. Press again as needed to pause and resume play. - Press the + or – Buttons to go to the next or previous track (hold to scan backwards or forwards within a track).
- Press the
![]() Power Button to turn off the unit. You can also turn the unit off by undocking a playing device.
Power Button to turn off the unit. You can also turn the unit off by undocking a playing device.
NOTE: Press the Mode Button to cycle from iPod (Lightning dock) to USB to FM radio modes.

USING THE USB DOCK
- Connect your already playing iPhone/iPod to the USB dock on back of the unit using the cable that came with your device. The unit will automatically turn on and you will hear the music playing from your iPhone/iPod. The iPhone/iPod Icon will appear at the right side of the display, indicating iPhone/iPod playing mode.
- Press the
![]() or
or ![]() Buttons on the unit to adjust the system volume.
Buttons on the unit to adjust the system volume.
Note: If the volume is too low on the iPhone/iPod, the unit may not detect that the iPhone/iPod is in play mode. Press the![]() USB Button to play it. Press again as needed to pause and resume play.
USB Button to play it. Press again as needed to pause and resume play. - Press the + or – Buttons to go to the next or previous track (hold to scan backwards or forwards within a track).
- Press the
![]() Power Button to turn off the unit. You can also turn the unit off by disconnecting a device playing through the USB dock.
Power Button to turn off the unit. You can also turn the unit off by disconnecting a device playing through the USB dock.
NOTE: Press the Mode Button to cycle from Lightning dock (iPod) to USB to FM radio modes.
LISTENING TO FM RADIO
Tuning and Playing the Radio
Extend FM wire antenna fully for best reception. Do not strip, alter or attach to other antennas.
- Press and release the
![]() Power Button to turn on the unit, then press and release the Mode Button as needed to cycle through dock, USB, and FM radio modes.
Power Button to turn on the unit, then press and release the Mode Button as needed to cycle through dock, USB, and FM radio modes. - When FM mode is selected, press the + or – Buttons to tune the radio to a desired station. The current radio frequency appears in the bottom of the display. Press the + or – Buttons for a few seconds to scan for the next clear station.
- To memorize a station as a preset:
- Press the
![]() Dock Button as needed to step through the 6 presets (P1 - P6) to the number you wish to assign, and then hold the
Dock Button as needed to step through the 6 presets (P1 - P6) to the number you wish to assign, and then hold the ![]() Dock Button until the selected preset number begins flashing in the display.
Dock Button until the selected preset number begins flashing in the display. - Press the + or – Buttons to tune the radio to a desired station. Hold briefly to have the radio autoscan/search for the next clear station.
- Press the
![]() Dock Button to confirm the setting, two confirmation beeps will confirm the setting and the preset number you wish to assign. Repeat steps A-C to preset up to 6 stations.
Dock Button to confirm the setting, two confirmation beeps will confirm the setting and the preset number you wish to assign. Repeat steps A-C to preset up to 6 stations.
- Press the
- To listen to a preset station, use the Mode Button to select FM mode, then press the
![]() Dock Button to choose the desired preset.
Dock Button to choose the desired preset. - Press the
![]() or
or![]() Button on the unit to adjust the system volume.
Button on the unit to adjust the system volume.
USING THE UNIT IN OTHER COUNTRIES
Different regions of the world use different FM radio frequency steps and ranges. You will need to select the one that matches the standards in your region (USA, EUROPE, JAPAN, AUSTRALIA, or CHINA). The default setting is USA; if you live in the US, you may skip this section.
- Press and release the
![]() Power Button to turn on the unit, then press and release the Mode Button as needed to cycle to FM radio mode.
Power Button to turn on the unit, then press and release the Mode Button as needed to cycle to FM radio mode. - Press and hold the Mode Button for about 5 seconds until the region flashes in the lower part of the display and a beep sounds.
- Press the + or – Buttons as needed to set the display to your region: USA, EU (Europe), JPN (Japan), AUS (Australia), or CHN (China).
- Press and release the Mode Button (or no button within 10 seconds) to exit the radio frequency setting mode. Two beeps will confirm radio frequency setting.
SNOOZE/DIMMER OPERATION
- To program a custom snooze duration, during normal operation (when alarm is not sounding) press and hold the Snooze/Dimmer Button until the display flashes, then press the + and – Buttons on the unit to adjust the snooze time to 1 - 29 minutes.
- Press the Snooze/Dimmer Button on the iPL10 after the alarm sounds. The alarm will be silenced and will come on again in about 9 minutes (default). You may repeat this cycle several times during the one hour alarm cycle.
- During normal operation (when alarm is not sounding), press the Snooze/Dimmer Button to control the brightness (high, medium, low and off settings) of the LCD display.
SLEEP MODE
Sleep mode lets you sleep to your playing docked or USB connected iPhone or iPod or to FM radio. Press the Sleep Button as needed to cycle to the desired sleep duration: 120, 90, 60, 30 or 15 minutes or OFF (turns sleep mode off). Press the  or
or Button on the unit to adjust sleep listening level. The unit will revert to normal volume level when sleep mode ends. Press the Sleep Button during sleep to view the remaining sleep time; press again to set sleep to next (lower) sleep duration.
MAINTENANCE
- Place the unit on a level surface away from sources of direct sunlight or excessive heat.
- Protect your furniture when placing your unit on a natural wood and lacquered finish. A cloth or other protective material should be placed between it and the furniture.
- Clean your unit with a soft cloth moistened only with mild soap and water. Stronger cleaning agents, such as Benzene, thinner or similar materials can damage the surface of the unit.
TROUBLESHOOTING
| Symptom | Possible reason | Solution |
Unit won't turn on | AC adaptor isn't plugged into a working wall socket or not plugged into the power jack on back of the unit | Plug the AC adaptor into a working wall socket and plug the connector into the supply jack on the unit. Make sure any associated wall switch that controls the outlet the is ON. |
| Device does not respond to the unit and/or device is playing but no sound comes out | Unit is not properly connected to power source and/or Power Button is not ON/device is paused | Make sure the unit is properly connected to AC power source. Check that the Power Button is lit up, indicating the unit is ON. Try adjusting volume on unit and audio device. Press the Mode Button to select the iPod (dock), USB or FM mode. Also try pressing the Play/Pause Button. |
Erratic performance | External interference | Move unit away from potential sources of external interference such as computers, modems, wireless devices (routers) or fluorescent light. |
No sound | Volume is too low | Turn volume up on your device |
Sound distorted | Volume is too high | Turn volume down on your device |
| Sound source is distorted | If the original sound file (MP3) is old or of poor quality, distortion and noise are easily noticed with high-power speakers. Try upgrading file from a trusted source such as iTunes. | |
Device doesn't charge up | Unit is not properly connected to AC power | Please make sure the unit is connected to a working power outlet. The unit will not charge while operating on backup battery |
QUESTIONS?
Visit www.ihome.com


Documents / Resources
References
Download manual
Here you can download full pdf version of manual, it may contain additional safety instructions, warranty information, FCC rules, etc.
Download iHome iPL10 - Stereo Alarm Clock to Charge for iPhone / iPod Manual
Advertisement


Need help?
Do you have a question about the iPL10 and is the answer not in the manual?
Questions and answers