Denver CRP-514 Alarm Clock Radio Manual
- Instruction manual (60 pages) ,
- Instruction manual (67 pages)
Advertisement
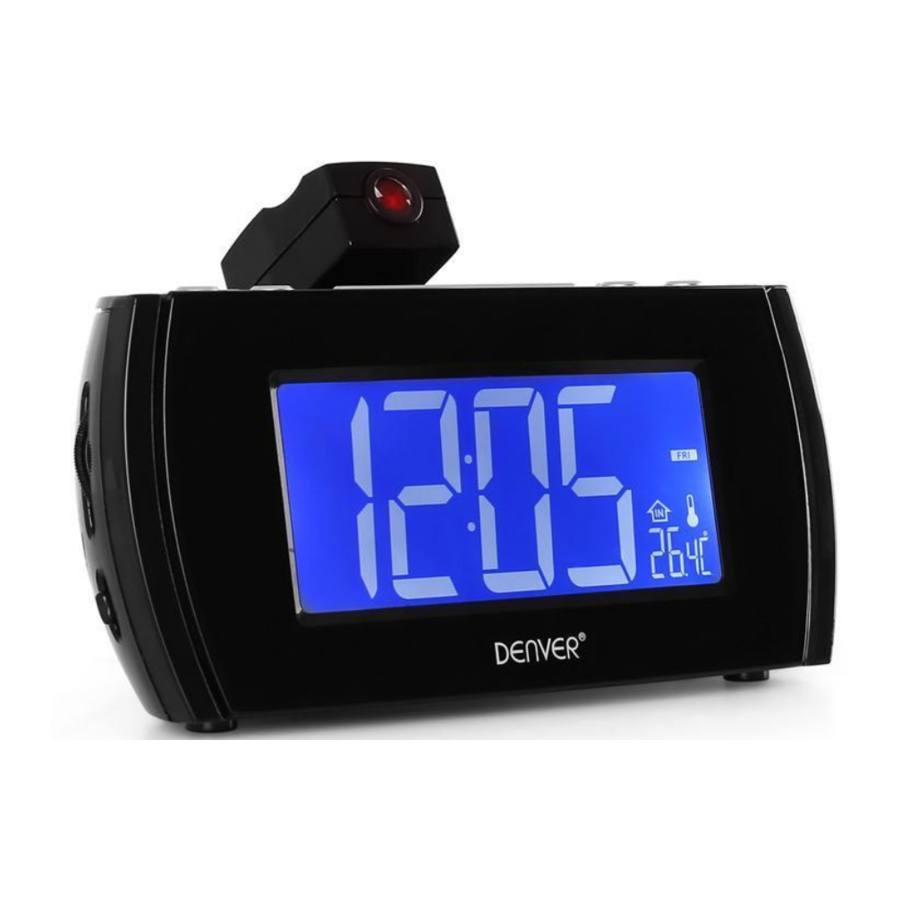
FUNCTION AND CONTROLS

- (AL1) ALARM 1 ON / OFF SET
- << / TUNE - /MONTH/DAY/DST
- PROJECTION ON/OFF
- PROJECTION UNIT
- PROJECTION TIME/TEMP 180°FLIP
- >> / TUNE +/ C-F/YEAR
- (AL2) ALARM 2 ON / OFF SET
- VOLUME DOWN
- VOLUME UP
- SNOOZE / SLEEP / DIMMER
- SET/MEM/M+
- ON / OFF RADIO / ALARM OFF
- DISPLAY
- BATTERY COMPARTMENT
- RATING LABEL
- SPEAKER
- TEMPERATURE SENSOR(IN DOOR)
- FM ANTENNA
- AC POWER CORD
- FOCUS ADJUSTMENT FOR PROJECTION UNIT
POWER CONNECTION
Plug the AC power cord to a household outlet AC source. This unit is equipped with a battery back up system, it requires a 3V CR2032 flat lithium battery (not included). Insert the battery in the battery compartment, making certain that the positive and negative (+ and -) battery terminals are attached to the corresponding terminals on the plate in the battery compartment. If an AC power failure occurs, the clock automatically switches to the battery power supply, the clock and timer memory continue running. When the AC power resumes, the clock switches back to AC again.
TIME AND CALENDAR MANUAL SETTING
Setting Time and Calendar
Press SET/MEM/M+ (11) button in standby mode and keep depress over 2 seconds to enter time set mode, after enter the setting mode, press SET/MEM/ M+ button (11) to change the mode cycle as follows:
Normal → Year → Month → Day → 12/24 H format → Real time Hour → Real time Min → Normal
Action (during data adjustment):
- Press << / Tune - button (2) to adjust data backward.
- Press >> / Tune + button (6) to adjust data forward.
- Keep depressed << or >> button for 2 seconds to enable auto forward.
- Use SET/MEM/M+ (11) button to confirm each setting.
ALARM SETTING
Setting Alarm 1 and Alarm 2
In standby mode, press the AL1 (1) or AL 2 (7) button once to preview the alarm time. The alarm time is displayed, press & hold the AL1 / AL2 buttons for 3 seconds and the hours will blink. Press AL1 / AL2 button (1/7) and keep depress over 2 seconds to enter alarm set mode. Once in the setting mode, press alarm set button (1/7) to change the mode cycle as follows:
Normal → AL 1 Hour → AL 1 Min → AL 1 weekday Alarm → AL 1 wake beep → AL 1 wake radio → AL 1 wake radio volume →Normal.
Normal → AL 2 Hour → AL 2 Min → AL 2 weekday Alarm → AL 2 wake beep → AL 2 wake radio → AL 2 wake radio volume →Normal.
Select alarm weekday mode as follows:
1-5: Monday to Friday
1-7: Whole week
6-7: Saturday & Sunday
1-1: One day of week
Action (during data adjustment):
- Press << / Tune - (2) button to adjust data backward.
- Press >> / Tune + (6) button to adjust data forward.
- Keep depressed << or >> button for 2 seconds to enable auto forward.
- Use AL1 / AL2 set button to confirm each setting.
ALARM
Beep alarm or radio alarm will ring for 30 minutes if no key is pressed, then it will stop automatically and wait for same alarm time on next day.
SNOOZE FUNCTION
- When Alarm rings, press Snooze button (10) to suspend the alarm & to activate the snooze function, Beep or Radio alarm will stop. 9 minutes later the alarm will ring again. Press SNOOZE key again, alarm will be suspended again, another 9 minutes later the alarm will ring again and so on until the next alarm rings.
Note: The interval time of the Snooze function is 9 minutes. - If you want to disable the SNOOZE function and stop alarm completely, press Radio ON/OFF button (10). If you don't press any button, the alarm will ring during 30 minutes & stop automatically.
- Icon of AL1 and AL2 will blink as long as Snooze function is still operating. Once Snooze is turned off icon of AL1 / AL2 stop blinking and lights on the display.
RADIO MODE
Note: Ensure that the FM antenna is completely unrolled and extended to have the best FM reception.
Press the Radio ON/OFF button (12) to turn the unit on.
Use the Tune - (2) or Tune + (6) button to select the desired radio station. If you press and hold the Tune – (2) or Tune + (6) button for one second, then release, the unit will automatically scan to the next broadcasting station. Press the ON/OFF button (12) to turn the radio OFF.
To preset radio station
Press the Radio ON/OFF button (12) to turn the unit ON.
Use the Tune - (2) or Tune + (6) button to select the desired radio station.
Press the MEM.SET/M+ (11) button; "P01" will blink in the display.
Press the 'MEM.SET / M+' (11) button again to set the preset.
Repeat steps 2 through 4 to set more presets.
The unit can preset 10 stations totally for FM.
When "P01-P10" blinks, press Tune – (2) or Tune + (6) button to select the preset number.
To recall the radio preset
To recall a preset station, press MEM.SET/M+ (11) button to select the desired preset number.
SLEEP OPERATION
When you listen to the radio, press the SNOOZE/SLEEP/DIMMER (10) button to enter into the sleep mode. You can adjust the sleep timer from 90 minutes to 15 minutes by pressing repeatedly the SNOOZE/SLEEP/DIMMER button (10).
When sleep timer is selected, the unit will automatically turn off once time is up.
DIMMER CONTROL
In standby mode, press the SNOOZE/SLEEP/DIMMER (10) button allows you to set the brightness of the LCD display to high, low and off 3 levels.
DAYLIGHT SAVING TIME (DST) MODE
For countries with daylight saving time (DST) (one hour of difference between summer time and winter time), this clock radio offers you DST option to adjust summer time.
In standby mode press and hold for 2 seconds the <</TUNE-/YEAR-MONTHDAY/DST button (2).
The clock advances by one hour. To exit DST mode, repeat the above operation.
PROJECTION UNIT
- Focus setting: Adjust the projection clock brightness/focus by turning the brightness/focus adjustment wheel unit the projected time is clearly shown on the ceiling or wall.
- Adjust projected direction.
- To flip projected image by 180°, press 180° flip button (5).
- Converted the projection time or temperature, press keep depress over 2 seconds to enter PROJECTION TIME 180°FLIP/TIME-TEMPERATURE button (5).
NOTE : PROJECTS TIME IMAGE ON THE CEILING OR WALL OF A DARKENED ROOM.
MAXIMUN PROJECTION DISTANCE IS 3-9 FEET.
SPECIFICATIONS
Frequency range: 87.5 – 108 MHz
Battery backup: 3V (CR2032 Flat Lithium battery x 1) not included
Power supply: AC230V 50Hz
Temperature range for Indoor: 0 to + 50°C or 32 to 122°F
RESETTING
If the system does not respond or exhibits erratic or intermittent operation, you may have experienced an electrostatic discharge (ESD) or a power surge that triggered the internal microcontroller to shut down automatically. If this occurs, simply disconnect the ac power cord and remove the system backup battery, wait for at least 3 minutes and then setup the unit again as if it is a brand new unit.

- No naked flame sources, such as lighted candles, should be placed on the apparatus.
- Do not place the product in closed bookcases or racks without proper ventilation.
- Where the mains plug is used as the disconnect device, the disconnect device shall remain readily operable.
- The ventilation should not be impeded by covering the ventilation openings with items, such as newspapers, table-cloths, curtains, etc.
- It shall not be exposed to dripping or splashing and that no objects filled with liquids, such as vases, shall be placed on the apparatus.
- Do not connect FM antenna to outside antenna.
- The unit should not be exposed to direct sunlight, very high or low temperature, moisture, vibrations or placed in dusty environment.
- Do not use abrasive, benzene, thinner or other solvents to clean the surface of the unit. To clean, wipe it will mild non-abrasive detergent solution and clean soft cloth.
- Never attempt to insert wires, pins or other such objects into the vents or opening of the unit.
- Disconnect device warning: Mains plug is used as the connection, so it should always remain ready operate.
- Batteries shall not be exposed to excessive heat such as sunshine, fire or the like.
- Class I LED product.

Danger of explosion if battery is incorrectly replaced
Replace only with the same or equivalent type

Documents / ResourcesDownload manual
Here you can download full pdf version of manual, it may contain additional safety instructions, warranty information, FCC rules, etc.
Advertisement


Need help?
Do you have a question about the CRP-514 and is the answer not in the manual?
Questions and answers