Denver MIR-260 - Radio Manual
- Instruction manual (123 pages) ,
- Quick start manual (3 pages) ,
- Instruction manual (9 pages)
Advertisement
- 1 Product Overview
- 2 Power connection
- 3 Network setting
- 4 Adjusting the volume
- 5 Date & Time Setting
- 6 Internet Radio Mode
- 7 Listen to DAB radio stations
- 8 Listen to FM Radio stations
- 9 My Favorite FM stations
- 10 CD Player mode
- 11 Media Centre
- 12 AUX-in
- 13 Bluetooth mode
- 14 Sleep timer
- 15 Alarm setting
- 16 Backlight Setting
- 17 Language setting
- 18 Factory reset
- 19 Technical specification
- 20 Documents / Resources
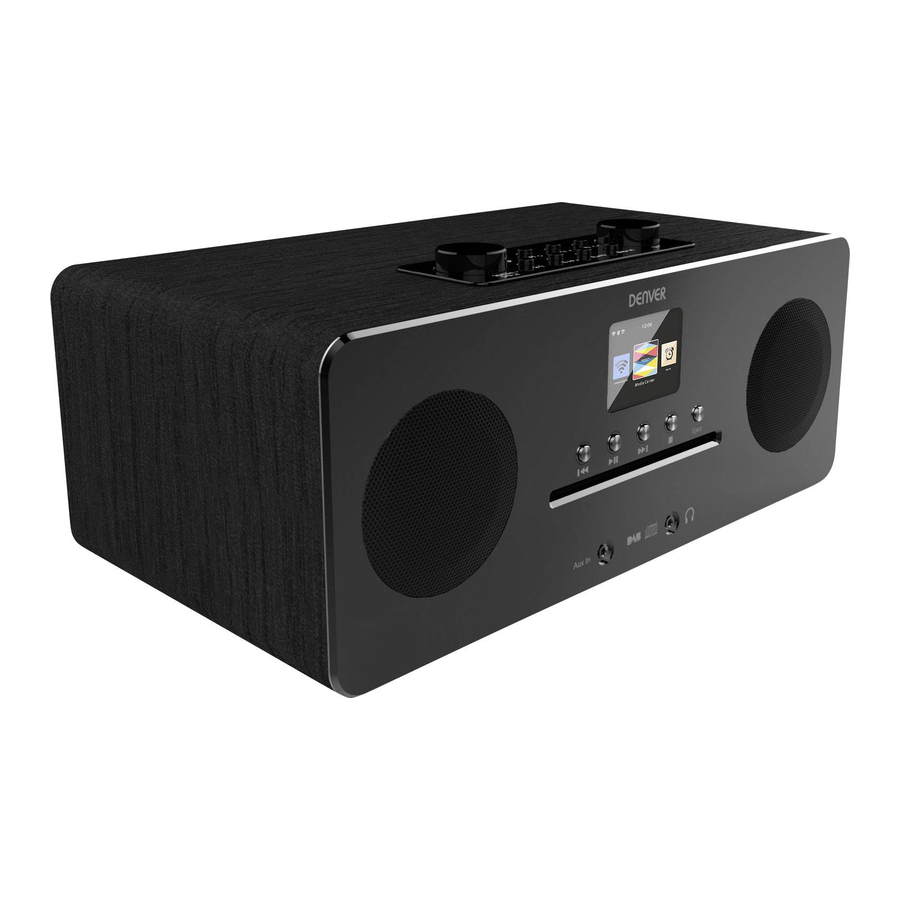
Product Overview
Top view

Rear view

Front view

| 1 | SCROLL + / - knob; OK/SNOOZE button | 12 | DC IN socket |
| 2 | LEFT button | 13 |  Previous button Previous button |
| 3 | STANDBY/ON button | 14 | AUX IN |
| 4 | MENU button | 15 |  Next button Next button |
| 5 | RIGHT button | 16 | Headphone socket |
| 6 | MUTE/EQ button | 17 |  Play/Pause button Play/Pause button |
| 7 | ALARM button | 18 | LCD display |
| 8 | FAVO button | 19 |  Stop button Stop button |
| 9 | SLEEP button | 20 | EJECT button |
| 10 | VOLUME +/- knob | 21 | CD slot |
| 11 | Telescopic antenna |
Remote control

| 22 | Standby | 31 | Mute |
| 23 | Menu | 32 |  Next Next |
| 24 |  Previous Previous | 33 |  Play/Pause Play/Pause |
| 25 | Alarm setting | 34 | Favo/Add |
| 26 | Up | 35 | Right |
| 27 | Left | 36 | Enter/Snooze |
| 28 | CD Prog. | 37 | Vol + |
| 29 | Down | 38 | Vol - |
| 30 | Eject | 39 | Mode/EQ Setting |
Power connection
- Connect the power adaptor with the radio, and then connect the power adaptor to the mains socket. The unit is powered on.
![]()
- Press Standby button to switch the unit to standby mode. To switch the unit off, press the Standby button and unplug the unit from the mains socket.
![]()


Network setting
Users encountering networking issues may find these options useful for diagnosing and fixing network problems.
- Press Menu button and select Configuration - Network, press OK/SNOOZE button to confirm.
- Turn SCROLL + / - knob to select your desired network setting option, and then press OK/SNOOZE button to confirm your setting.
Adjusting the volume
Use the VOLUME + / - knob or Vol + or Vol- buttons to increase or decrease the volume of the unit.

Date & Time Setting
- The clock can be updated automatically if connected to the internet or received DAB/FM signals in your location.
- To manually set the date and time, press Menu button and select Configuration - Date & Time.


Internet Radio Mode
- Press Menu button and select Internet Radio mode – Skytune, Search (Skytune) or History.
Listen to DAB radio stations
- For initial use, press Menu button and select Configuration – DAB Setup, and then select DAB Full Scan to carry out a full scan and store stations list in memory.
![]()
- Press Menu button, use OK button scroll to DAB Radio mode, and press OK button, then turn SCROLL + / - knob to select your desired station in DAB Station List, press OK/SNOOZE button to confirm.


Note: If you change your area, please repeat step 1 to enable DAB function.
Listen to FM Radio stations
- For initial use, press Menu button and select Configuration – FM Setup, and then select FM Full Scan to search the FM radio stations.

- Press Menu button, use OK button scroll to FM Radio mode, and press OK button,, turn SCROLL + / - knob to select your desired station in FM Station List, press OK/SNOOZE button to confirm.


Note: If you change your area, please repeat step 1 to enable FM function.
My Favorite FM stations
Your radio can store up to 10 of your favorite FM stations. This will enable you to access your favorite stations quickly and easily.
- While playing your favorite station, long press Favo button on the control panel to confirm.
- Turn SCROLL + / - knob to select "YES" and then press OK/SNOOZE button to confirm.
CD Player mode
- Press Menu button to select CD Player, then insert a CD.
![]()
- Press
![]() to play or pause the music. Press
to play or pause the music. Press ![]() to play the next track, press
to play the next track, press ![]() to the previous track. Press
to the previous track. Press ![]() to stop playing the music.
to stop playing the music.
![]()
- Press Eject button to eject the CD.
![]()

 to play or pause the music. Press
  to play the next track, press
  to the previous track. Press
  to stop playing the music.

Media Centre
UPnP (Universal Plug and Play)
You can stream music from a networked device which supports UPnP function, allow sharing of the data and entertainment. For instance, most of the latest computer laptop supports UPnP, and you can stream the music from Windows Media Player application on the computer and Listen on your radio. If your PC is running Microsoft Windows XP, you can use Windows Media Player 11 (WMP11) to act as your UPnP (Universal Plug and Play) media server. (For Windows 7 or above, please download the correspond version of Windows Media Player). Windows Media Player 11 may be Microsoft's website and install by following the instructions detailed in its installation wizard.
Once installed, Windows Media Player 11 will create a library from all the media files available to it on your PC. To add new media files to the library, ENTER File > Add to Library > Advanced Options, Click 'Add' and choose the files you wish to add and click 'OK'.
You will now need to connect your Internet radio to Windows Media Player 11 and configure it to allow the radio to access your media library. In order to this, you will need to do the following:
- Press Menu button to select Media Centre, and then enter UPnP. Press OK/SNOOZE button to scan for all available UPnP servers. It may take a few seconds for the radio to complete its scan and before the scan has completed, the radio will display 'Scan for media server...'. The radio will continue to display 'Empty list' if no UPnP servers are found.
- After a successful scan. Access your UPnP server, turn SCROLL + / - knob to select your desired server, and then press OK/SNOOZE button to confirm ('Access Denied' will be displayed at this stage).
- Your PC will now prompt you that a device has attempted to connect to your UPnP server. In order to allow the radio to have access to the media files, you will need to click the 'Library' tab from Windows Media Player 11 and access the <Media Sharing> item to open the 'Media Sharing' window.
Access "Media Sharing" for Windows Media Player 11:

- From the 'Media Sharing' windows, the radio will be listed as an unknown device. Click on the unknown device, and then click the 'Allow' button. Then click 'OK'. Allowing the unit to Connect.

- Turn SCROLL + / - knob to select your desired music, and then press OK/SNOOZE button to display.


Note: When you are playing the music under UPnP, you are able to change the mode of playback via accessing Media Player/Playback Mode.
AUX-in
- Press Menu button to select Aux-in mode then press OK button to confirm.
![]()
- Connect one end of the 3.5mm line in cable into the port on the unit and insert the other end into your device.
![]()
- Choose your music from your device.
![]()


Bluetooth mode
- Press Menu button until Bluetooth is selected.
- From your Bluetooth device, search for available Bluetooth devices.
- Select "MIR-260" and connect.
Sleep timer
This feature enables your radio to switch to standby mode after a set sleep time.
- Press Sleep button, Turn the SCROLL + / - knob to select from below options: Turn Off, 15, 30, 45, 60, 90, 120, 150 and 180 minutes. Press the OK/SNOOZE button to confirm the selected one. The sleep icon and sleep time will be shown on the display.
Alarm setting
Your radio includes dual alarms. Before setting an alarm, make sure to set the clock first.
- Press the ALARM button to go to enable the alarm function.
- Turn the SCROLL + / - knob to select "Alarm 1" or "Alarm 2", and then press the OK/SNOOZE button to confirm.
- Turn the SCROLL + / - knob to select options (Time, Sound, Repeat, Alarm volume), and then press the OK/SNOOZE button to confirm the settings.
- When an alarm rings, press SNOOZE button to stop the alarm. The alarm will sound again 9 minutes later.
- When an alarm is stopped, press ALARM button, the alarm will sound again the next day at the same time.
Backlight Setting
This radio display has a backlight with adjustable brightness level.
- Press the Menu button and select Configuration - Dimmer, then press the OK/SNOOZE button to confirm.
- Turn the SCROLL + / - knob to select Mode or Level, and then press the OK/SNOOZE button to confirm.
- Turn the SCROLL + / - knob to select backlight level, and then press the OK/SNOOZE button to confirm the setting.
Language setting
You can change the display language of your unit, there are 9 options available: German, English, Spanish, French, Italian, Dutch, Polish, Russian and Chinese.
- Press the Menu button and select Configuration - Language, press the OK/SNOOZE button to confirm.
- Turn the SCROLL + / - knob to select your desired language, and then press the OK/SNOOZE button to confirm.
Factory reset
Doing a factory reset clears all user defined settings, replacing them with the original default values, so time/date, DAB station list and preset stations are all lost.
- Press Menu button and select Configuration - Reset to default, press OK/SNOOZE button to confirm.
- Turn SCROLL + / - knob to select "YES" and then press OK/SNOOZE button to confirm.
Technical specification
| Item number: | MIR-260 |
| Power adaptor: | 100-240V ~ 50/60Hz |
| Audio output: | 2 x 10W RMS |
| Frequency range: | |
| FM: | 87.5 MHz to 108 MHz |
| DAB: | Band III, 174 MHz to 240 MHz |
Please notice - All products are subject to change without any notice. We take reservations for errors and omissions in the manual.
ALL RIGHTS RESERVED, COPYRIGHT DENVER ELECTRONICS A/S

Electric and electronic equipment and included batteries contains materials, components and substances that can be hazardous to your health and the environment, if the waste material (discarded electric and electronic equipment and batteries) is not handled correctly.
Hereby, Inter Sales A/S declares that the radio equipment type MIR-260 is in compliance with Directive 2014/53/EU. The full text of the EU declaration of conformity is available at the following internet address: www.denver-electronics.com and then click the search ICON on topline of website. Write model number: MIR-260. Now enter product page, and red directive is found under downloads/other downloads.
Operating Frequency Range:
Max Output Power:
DENVER ELECTRONICS A/S
Omega 5A, Soeften
DK-8382 Hinnerup
Denmark
www.facebook.com/denverelectronics

Documents / Resources
References
Download manual
Here you can download full pdf version of manual, it may contain additional safety instructions, warranty information, FCC rules, etc.
Advertisement


Need help?
Do you have a question about the MIR-260 and is the answer not in the manual?
Questions and answers