Table of Contents
Advertisement
Quick Links
Advertisement
Table of Contents

Related Manuals for Denver IR-110


Summary of Contents for Denver IR-110
-
Page 1: Instruction Manual
Instruction manual IR-110... -
Page 2: Safety Precautions
SAFETY PRECAUTIONS Read all the instructions carefully before using the unit and keep them for future reference. Check that the voltage marked on the rating label matches your mains voltage. The unit must be placed on a flat stable surface and should not be subjected to vibrations. - Page 3 C A U T I O N RISK OF ELECTRIC SHOCK DO NOT OPEN The lightning flash with arrowhead symbol, within an equilateral triangle, is intended to alert the user to the presence of uninsulated “dangerous voltage” within the unit’s enclosure that may be of sufficient magnitude to constitute a risk of electric shock.
-
Page 4: Product Overview
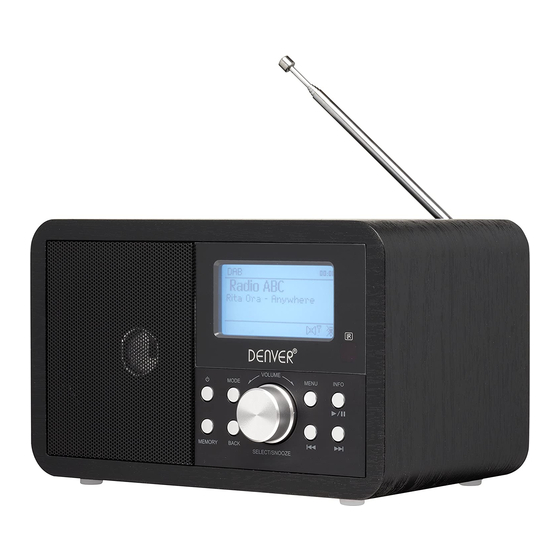
product overview front view 7. VOLUME Dial/ 1. Display 2. STANDBY Button SELECT/SNOOZE Button 3. MODE Button 8. INFO / Button 4. MEMORY Button 9. MENU Button 5. BACK Button Button 6. Remote Control Sensor Button rear view 12. Antenna 13. -
Page 5: Battery Replacement For The Remote Control
remote control 1. STANDBY Button 2. INFO Button 3. MENU Button Button Button 6. SELECT Button 7. VOLUME – Button Button 9. TUNING Button Button Button 12. MONO/ST. Button 13. SLEEP Button 14. MODE Button 15. MEMORY Button 16. BACK Button Button 18. -
Page 6: Remote Control Operation Range
Handling the Battery Improper or incorrect use of batteries may cause corrosion or battery leakage, which could cause fire, personal injury or damage to property. Only use the battery type indicated in this manual. Do not dispose of the used battery as domestic waste. Dispose of it in accordance with local regulations. -
Page 7: Network Connection
Network Connection Wired network 1. Check first of all whether the control lamps (LINK/ACT) of your LAN connection or your router light up. 2. Connect the NETWORK socket on the unit to the corresponding port on your Router using a commercially available LAN or Ethernet cable (CAT5 or better with RJ45 connector). -
Page 8: Selecting Modes
Selecting Modes Press the MODE button repeatedly on the unit or remote control to switch between Music player, DAB radio, FM radio, AUX In and Internet radio modes. When the unit is idle for approximately 15 minutes, it will automatically switch to standby. -
Page 9: System Settings
System Settings Press the MENU button to display the menu, press the buttons to select Main menu and then press the SELECT button to confirm. Press the buttons to select System settings and then press the SELECT button to confirm. Equaliser This system supports a variety of equalizers and sound effects. - Page 10 Network profile View the connected network. Clear network To delete the connected network memory in Network settings profile. Keep network To define whether remains connected to its network in connected Standby mode and when not in Network radio mode. This is necessary for remote operation and audio streaming in Music Player mode.
-
Page 11: Inactive Standby
Inactive Standby Use the Inactive Standby to turn off the unit after a certain time in play mode. 1. During System settings mode, press the / buttons to select Inactive Standby and then press the SELECT button to confirm. 2. The display will show : Off > 2 hours > 4 hours > 5 hours > 6 hours 3. -
Page 12: Setup Wizard
Setup wizard The setup wizard is available in the system settings section; you can run through this to configure settings for date/time and network. Once this has finished, your radio is ready to use. It is not necessary to run through the setup wizard if a wired network is being used. -
Page 13: Last Listened
Last listened 1. Press the / buttons to select the history of stations that you have listened to before. 2. Press the SELECT button to confirm. Station list Press the / buttons to select from the following options, and then press the SELECT button to confirm. -
Page 14: Preset Stations
My added Even though the Internet radio portal contains thousands stations of stations, you may want to listen to stations not listed. You can add your own stations via the portal (www.wifiradio-frontier.com). These added stations are accessible by selecting “Station list >... -
Page 15: Music Player Operation
Music Player Operation This function is for more advanced users. The built-in Music Player allows you to play unprotected audio files (AAC, MP3, WMA, FLAC) stored on a networked computer. To play music from the computer, you must setup a shared file or media library on the computer. Press the MODE button repeatedly to select Music Player mode. -
Page 16: Usb Operation
Prune servers 1. During Music Player mode, press the / buttons to select Prune servers and press the SELECT button to confirm. 2. Press the / buttons to select YES to remove servers that are no longer available. Press the SELECT button to confirm. Or select NO to cancel. USB Operation When a USB device is connected to the unit, (F.5) -
Page 17: Dab Operation
• The maximum current for USB charging is 1A. • All devices for USB charging are not guaranteed. • The USB charging is only active during power ON mode, it is not supported when unit is at STANDBY mode. DAB Operation (F.6) Press the MODE button repeatedly to select “DAB radio”. -
Page 18: Dab Display Modes
3. The display will show the multiplex 5A to 13F. 4. Press the / buttons to select the channel, and press the SELECT button to confirm. DAB Display Modes Every time you press the INFO button on the remote control or press and hold the INFO button on the unit, the display will show the following display modes: DLS –... -
Page 19: Scan Setting
Auto Scan Press and hold the TUNING buttons to start searching for a station. The search may not stop at a station with a very week signal. Manual Tuning To search for FM stations manually, press the TUNING buttons repeatedly until your desired frequency is reached. With FM radio, it may be necessary to fine tune each station by pressing the TUNING buttons repeatedly. -
Page 20: Sleep Setting
2. Press the MODE button repeatedly to select AUX in mode. 3. Turn the VOLUME dial on the unit or press the VOL +/– buttons on the remote control to adjust the volume control for your desired sound output level. 4. -
Page 21: Setting The Alarm
Setting the Alarm 1. Press the ALARM button on the remote control, the display shows “Alarm (1 or 2): Off [hh:mm]”. 2. Press the / buttons to select the Alarm number (1 or 2) and then press the SELECT button to start the setting of the following parameters. For the following setting, press the / buttons to select then press the SELECT button to confirm. -
Page 22: Headphone Jack
Headphone Jack A 3.5mm type stereo headphone jack is located at the back of the unit. Connect a set of stereo headphones (not included) to this jack for private listening without disturbing others. The speakers are automatically disconnected when the headphones are in use. When using headphones always set the volume to a low level before you put the headphones on. - Page 23 ALL RIGHTS RESERVED, COPYRIGHT DENVER ELECTRONICS A/S Electric and electronic equipment and included batteries contains materials, components and substances that can be hazardous to your health and the environment, if the waste material (discarded electric and electronic equipment and batteries) is not handled correctly.
Need help?
Do you have a question about the IR-110 and is the answer not in the manual?
Questions and answers