Table of Contents
Advertisement
Quick Links
DAB-43 PLUS (English_2014) (495 x 150 mm) • 10 Feb 2014 • AT
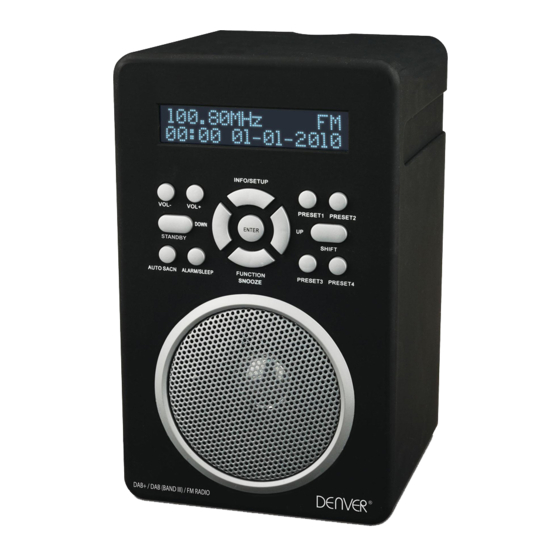
LOCATION OF CONTROLS
ENGLISH
DAB-43 PLUS
DAB+/ DAB (BAND III) / FM RADIO
INSTRUCTION MANUAL
POWER SUPPLY
OPERATING THE UNIT ON AC POWER
Insert one end at the supplied power cord to the DC 6V IN Jack located at the rear of the
unit and the other end into the Wall outlet.
When the First time used the cord has to be firmly pushed into the socket if does not work
1
2
3
4
5 6
7
on AC, to try again to be sure for a positive connection.
OPERATING THE UNIT ON BATTERIES
1. To play your unit on batteries, the AC power cord must be disconnected from the player.
2. Unplug the AC power cord from the unit and insert 4 size "AA" batteries (not provided)
8
3. Close the battery compartment door.
16
17
Note:
Check your batteries regularly. Old or discharged batteries should be replaced. If the unit
9
21
18
is not to be used for sometime or is being run exclusively on AC electrical current, remove
15
batteries from the battery compartment to avoid leakage.
Warning: Before using the unit. Check that the local mains supply is compatible with the
19
14
Unit Do not plug or unplug the power cable when your hands wet.
11
When planning not to use this unit for long periods of time (i.e. Vacation etc.) disconnect
the plug from the wall outlet.
13
22
12
20
BATTERY SAFETY PRECAUTIONS:
• Keep batteries away from children and pets.
10
• Insert the batteries observing the proper polarity (+/–). Failure to properly align the
• Remove old or discharged batteries from the product. Remove the batteries when the
1.
VOL+ BUTTON
12. FUNCTION/SNOOZE BUTTON
• Never throw batteries into a fire, do not expose batteries to fire or other heat sources
• Battery Disposal: Old or discharged batteries must be properly disposed of and recycled
2.
DOWN BUTTON
13. ALARM/SLEEP BUTTON
3.
INFO/SETUP BUTTON
14. AUTO SCAN BUTTON
4.
UP BUTTON
15. STANDBY BUTTON
• Follow the battery manufacturer's safety, usage, and disposal instructions.
5.
PRESET1 BUTTON
16. VOL- BUTTON
6.
LCD DISPLAY
17. POWER (ON/OFF) BUTTON
FUNCTION DESCRIPTION
7.
PRESET2 BUTTON
18. AUX IN JACK
short press----------- indicates that you should press and release the key to activate the
8.
SHIFT
19. PHONES JACK
function
9.
PRESET4 BUTTON
20. DC 6V JACK
long press ------------indicates that you should press and hold the key until the function is
10. SPEAKER
21. BATTERY DOOR
activated
11. PRESET3 BUTTON
22. FM TELESCOPIC ANTENNA
POWER (ON/OFF) SWITCH
Press it to switch the unit between OFF and STANDBY. The press action also controls
Setup
functions such as SNOOZE and SLEEP Timer cancel.
For use with battery power, remove the Battery Compartment Cover and insert six
"AA" size alkaline batteries, observing the proper polarity (+/–) as indicated inside the
VOLUME BUTTON
Battery Compartment. Reattach Battery Compartment Cover.
Press the volume button to adjust the volume. VOL+ to increase and VOL– to decrease.
This BUTTON also controls the volume of the headphone output.
For use with electrical AC power, plug the AC Power Cord into a standard 230-volt AC
electrical outlet.
UP & DOWN BUTTON
These buttons are used to set the Alarm and Sleep timer
ENTER BUTTON
The ENTER BUTTON is used to
-confirm station selection in DAB mode
-Change audio mode in FM mode
-Confirm Alarm and Sleep settings
INFO/SETUP BUTTON
in the compartment.
Short press the INFO/SETUP button to change the type of information shown on the display
FUNCTION/SNOOZE BUTTON
Short press the FUNCTION/SNOOZE button to change between DAB and FM
PRESET1,PRESET2,PRESET3 & PRESET4 BUTTONS
These keys are used to store and recall station presets in DAB and FM modes
ALARM/SLEEP BUTTON
Short press to select the Alarm setup menu
In radio on mode,Long press to select the sleep setup menu
AUTO SCAN BUTTON
In DAB mode, A short press starts a quick DAB scan ,A long press for a full DAB scan
In FM mode, A short press starts a FM scan
battery polarity can cause personal injury and/or property damage.
HEADPHONES
product will not be used for extended periods of time to prevent damage due to rusted
A 3.5mm socket for connecting a set of stereo headphones (not included). The internal
or corroded batteries
loudspeaker is muted when headphones are plugged-in.
Avoid listening to headphones at high volume levels to prevent possible hearing damage.
AUX LINE INPUT
in compliance with all applicable laws. For detailed information, contact your local solid
This 3.5mm socket is for connecting an external source such as an MP3 player, CD player,
waste authority
TV or computer.
DC 6V JACK
Connect to the UNIT power adapter.
STANDBY MODE
1. Press POWER (ON/OFF) switch to "ON" position.
2. The display on the UNIT will light and display 'Welcome! Digital Radio'
3. After 2-3s the display light dims, the message changes to 'Standby' and then goes to the
OPERATING THE UNIT IN DAB MODE
AUTO SCAN
1. Fully extend the telescopic antenna.
2. Short press the STANDBY button to switch on the radio.
3. The first time the radio is powered and switched on, it will automatically select DAB
4. When the scan is complete, the UNIT will automatically tune to the first station in the
5. If no stations are detected during the scan the display will show 'NO SIGNAL DAB' ,in
Note: Like Digital TV there are some areas where it may still be difficult to get a good
DAB signal. The broadcasters are constantly improving DAB coverage so in some cases it
may be neccesary to wait before some or all DAB services become available. You can check
coverage for your area .
1. Short press either the UP or DOWN button to scroll through the available station list
2. The display may show 'SEARCHING ...' while the radio selects the new station. If after
SECONDARY STATIONS
Some stations have one or more secondary services associated with them. When
secondary stations are available a > sign is shown after the station name.
BBC5Live> >BBC Sport Extra
BBC National DAB BBC National DAB
TO STORE A STATION PRESET
1. Select a DAB station as described above.
2. Press and hold one of the Preset keys until the display shows 'Preset x stored'.
TO RECALL A PRESET STATION
Short press the required Preset key.
Note: The unit can store 8 stations for DAB & 8 stations for FM
Note: To use memory 5~8 function, you shall press the shift key first and then press the
PRESET1~4 buttons together.
Time screen.
Time and date will automatically update on-air, when the radio is operated.
mode and start a scan of the DAB channels to search for available stations. Please leave
it to complete this process otherwise no DAB stations will be stored for later selection.
During the scan the display shows the scan progress, channel number, the multiplex
name and then the total number of stations.
list. Stations are listed in numeric-alpha order i.e. from 0 to 9 and then A to Z.
this case, reposition the unit and/or the aerial and short press theAUTO SCAN button
to start another scan.
and stop at the required station.
selecting a station, 'not available' is shown, try relocating the radio to improve reception.
Advertisement
Table of Contents

Related Manuals for Denver DAB-43 PLUS


Summary of Contents for Denver DAB-43 PLUS
- Page 1 DAB-43 PLUS (English_2014) (495 x 150 mm) • 10 Feb 2014 • AT LOCATION OF CONTROLS POWER SUPPLY UP & DOWN BUTTON OPERATING THE UNIT IN DAB MODE ENGLISH OPERATING THE UNIT ON AC POWER These buttons are used to set the Alarm and Sleep timer...
- Page 2 DAB-43 PLUS (English_2014) (495 x 150 mm) • 10 Feb 2014 • AT INFO PRESETS SETTING AND USING THE ALARM ALARM ON-OFF The UNIT has DAB information modes which are shown on the bottom line of the display. VIEW ALARM SETTINGS With the Alarm set to ON, it will sound each day at the set time.
Need help?
Do you have a question about the DAB-43 PLUS and is the answer not in the manual?
Questions and answers