Table of Contents
Advertisement
Quick Links
move differently
Instruction Manual
Instruction Manual
MOTOmed
layson edition
® ®
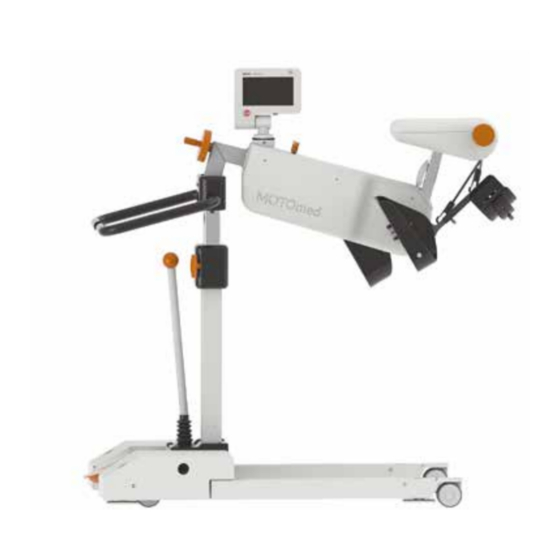
MOTOmed layson.l with expandable chassis
Touch screen
Stop button
MOTOmed layson.la
Handle
Operating lever for
expandable chassis
Foot pedal for
ground fixation
Mains plug
Medizintechnik
Operating panel
LED display
Swivelling
Knee bending adjustment
Operating panel
Knee bending adjustment
with adjusting wheel
Vertical adjustment
Expandable chassis
Transport wheels
Ground fixation
(four foot stop)
Power cord
MOTOmed layson.l
On / Off button
User remote control
Leg guide
"TrainCare"
Safety foot shells
Advertisement
Table of Contents

Subscribe to Our Youtube Channel
Related Manuals for RECK MOTOmed layson


Summary of Contents for RECK MOTOmed layson
- Page 1 Safety foot shells Knee bending adjustment with adjusting wheel Operating lever for expandable chassis Vertical adjustment Foot pedal for Expandable chassis ground fixation Transport wheels Ground fixation (four foot stop) Mains plug Power cord MOTOmed layson.l with expandable chassis MOTOmed layson.l Medizintechnik...
- Page 2 à nous demander une autre traduction. Utilice el MOTOmed sólo después de haber leído las instrucciones de uso. Si no entiende el idioma de la presente versión, por favor exija un manual MOTOmed layson.la en su lengua nacional. Swivelling...
- Page 3 2. Page 13 If you have any further questions or comments, please don’t hesitate to call your MOTOmed representative or the RECK customer Page 79 service team. Enjoy the training with your MOTOmed!
-
Page 5: Table Of Contents
Introduction Page 5 Safety precautions Visual inspection Structure, positioning, commissioning Operation Accessories Troubleshooting Cleaning, maintenance, recycling Technical data, signs Service EMC information Index CONTENTS... -
Page 7: Introduction
Introduction Page Information about this manual Intended purpose Patient target group Intended use Disclaimer Treatment goals Indications (clinical pictures) Contraindications Undesirable side effects Serious incident INTRODUCTION... - Page 8 Order-No. 261.030 MOTOmed layson.l (expandable chassis) Order-No. 261.110 MOTOmed layson.l (parallel chassis) Order-No. 261.010 MOTOmed layson kidz.la (expandable chassis) Order-No. 261.330 MOTOmed layson kidz.la (parallel chassis) Order-No. 261.230 MOTOmed layson kidz.l (expandable chassis) Order-No. 261.310 MOTOmed layson kidz.l (parallel chassis) Order-No.
- Page 9 Patient target group The MOTOmed layson is suitable for young people and for adults. The typical patient is over 15 years old, 140–200 cm tall, has a maximum weight of 135 kg and is bed bound due to illness.
- Page 10 Beds or couches which are not readily accessible (end too wide or with insufficient ground clearance) are not suitable. The MOTOmed layson.la or the MOTOmed layson kidz.la must be used for beds or couches which can only be approached from the side.
- Page 11 - repairs or other interventions on the MOTOmed by persons not authorised by the manufacturer - use of a power cord other than the one supplied by the manufacturer to operate the MOTOmed - use of a power cord other than the one supplied by the manufacturer - connection of external devices to the MOTOmed - connection of the patient remote control or the removable operating panel to external devices...
- Page 12 - for patients with lymphoedemas in the post-operative phase following cancer - for patients with vascular diseases such as peripheral artery occlusive disease (PAOD) Contraindications Contraindications resulting in the exclusion of a subject from the studies did not occur during the clinical evaluation. On the basis of a risk analysis and many years of experience in the field of movement therapy, the following indications / symptoms must be discussed with the physician and therapist before beginning the...
- Page 13 Undesirable side effects Training with the MOTOmed movement therapy device has given rise to no undesirable side effects and none are known. Notes on the residual risk: The principle of the MOTOmed movement therapy device is based on the function of electric motors, which drive the cranks of the arm or leg trainer with defined forces.
-
Page 15: Safety Precautions
Safety precautions General information Adjust the MOTOmed training to the individual clinical picture. Training tips by the manufacturer or its distribution partners are not binding. We cannot specify exactly how you should use the MOTOmed for the various diseases. This also applies to the details of the training functions, as the possible settings are dependent on age, height, individual fitness, postoperative resilience and general condition of the user. - Page 16 If you have too little grip with signs of paralysis or severe cramps (spasticity), the “Train Care” leg guide must be used for the legs and the quick foot fastening system “QuickFix” may be required along with forearm shells for the arms. Make sure that the user understands the functions and operation of the MOTOmed and can independently operate and stop the MOTOmed during training via the removable operating panel or the patient...
- Page 17 In the case of open wounds or the risk of decubitus (e.g. due to sensitive tissue or skin condition), especially on the body parts that are in contact with the therapeutic device, MOTOmed training is allowed only after consultation with the doctor and therapist, or at own risk of the user.
- Page 18 Make sure that the hand, wrist and arm adjustments recommended by your clinic are always used. Also make sure that the child remains seated as upright as possible and avoid turning of the forearm and wrist. If the correct connection of the MOTOmed is not clear to you or if you have any questions, please contact our staff at MOTOmed Service Centre.
- Page 19 CAUTION Risk of injury due to falling device Do not load the MOTOmed sideways. Do not load the hand grips and handles with the partial or total body weight (e.g. by supporting or pulling up). The hand grips must only be for holding firmly with the hands while exercising.
- Page 20 CAUTION Danger of overheating the housing parts Parts of the housing may overheat if permanently exposed to direct sunlight, so place the MOTOmed appropriately. The surface temperature of the operating panel housing is up to 13 °C above the ambient temperature due to the heat dissipation of the electronic components.
- Page 21 Make sure that no oil gets into the drive parts. Repairs should only be carried out by or under the direction and supervision of professionals who, by virtue of their training, knowledge and experience, are capable of assessing repairs and identifying potential effects and risks.
-
Page 23: Visual Inspection
Visual inspection Instructions for visual inspection of the MOTOmed before starting the training Your MOTOmed is a high quality medical device and is designed and manufactured according to the highest medical and safety standards. In accordance with the legal requirements, the manufacturer of a medical device has to give the user a multitude of safety instructions, which can be found on the following pages. - Page 24 Damaged power supply tested and approved for the cables must therefore MOTOmed. For this, contact not be used under any the service partners of RECK. circumstances! Is the power supply Never use power cords which If the power cord is...
- Page 25 Test step Measures if errors are Reason for the test step detected during the visual inspection Is the surface coating Have the hand grips or The PVC coating of the hand of the hand grips or foot shells replaced by the grips or foot shells offers the foot shells undamaged? manufacturer’s service...
- Page 26 Test step Measures if errors are Reason for the test step detected during the visual inspection Are all orange locking Check the locking handles Loose locking handles may handles for setting the for height adjustment cause parts to detach or height and distance and horizontal distance partially come away from...
- Page 27 Test step Measures if errors are Reason for the test step detected during the visual inspection Are other mains- Remove all other electrical If other mains-powered operated electrical devices that are not approved electrical devices are devices that are not as medical devices from the touched by the patient approved as medical...
-
Page 29: Structure, Positioning, Commissioning
Structure, positioning, commissioning Page Structure, initial commissioning Set swivelling stop Fit hand grips Fit safety foot shells Fit removable operating panel (product configuration) Set track width on the parallel chassis Fine adjustment of the running rails Transport Positioning Moving up to the bed / couch Expandable chassis Ground fixation Lateral moving up to the bed / couch... - Page 30 A cable tie is attached to the lifting column of the assembled (Fig. 4.1) and partially assembled (Fig. 4.2) variants of the MOTOmed layson to secure it during transportation. This prevents inadvertent extension of the lifting column, even if a locking handle is released...
- Page 31 Set swivelling stop The MOTOmed layson.la and the MOTOmed layson kidz.la are delivered in a special transport position. The device must be placed in the training position prior to use. Turn the locking screw on the swivel joint of the side arm right out with an SW4 Allen key and retain it.
- Page 32 Fit safety foot shells With the MOTOmed layson.la and the MOTOmed layson kidz.la, the safety foot shells are supplied unfitted. They must be fitted prior to training. For this purpose follow the description ‘Preparation leg training’, Page 43 ‘Fit foot safety shells’.
- Page 33 Note: If the operating panel still rotates too easily, the clamping screws will have to be tightened. During this process make sure that the operating panel can still be rotated as before. This also applies for the fixed operating panel used as standard! Set track width on the parallel chassis If the track width of the MOTOmed chassis is too small to go under the bed / couch, this can be increased by a maximum of 30 cm with the...
- Page 34 Fig. 4.7, 4.8 Fig. 4.9 Fine adjustment of the running rails If the chassis should remain unstable following adjustment of the track width or one of the rollers is not on the ground, fine adjustment of the running rails will be necessary. Pull the protective cap upwards and away.
- Page 35 Downwards adjustment of the running rail: Turn the adjustment screw in a clockwise direction and the adjustment screw anticlockwise to the same extent. Once the chassis is stable, re-tighten both fixing screws and then the adjustment screws Put the protective cap back in position.
- Page 36 MOTOmed and ‘collision’ with the running rails is prevented. With the MOTOmed layson.la, the training unit must be aligned in the direction of travel and in line with the running rails.
- Page 37 CAUTION Danger of property damage due to tilting When approaching the bed / couch with the MOTOmed layson.la, make sure that the vertical lifting column is as close to the foot of the bed / couch as possible. The MOTOmed stands more stably in position as a result of this and will not tilt in the event of e.g.
- Page 38 (it springs forward on its own) and let it lock into one of the locking positions provided. Note: Inward expansion of the running rails is not possible on the MOTOmed layson.la models. Do not move the operating lever forcefully over the stop to the right! Activate the foot pedal for ground fixation prior to starting training.
- Page 39 Fig. 4.15, 4.16 Ground fixation Activate the ground fixation by placing the complete foot on the foot pedal and pressing its front half downwards. This guarantees a high level of stability during training. To release the ground fixation, place the complete foot on the foot pedal and press the rear half downwards.
- Page 40 Danger of property damage due to tilting CAUTION Do not move the MOTOmed layson.la sideways up to the bed / couch if the user is loading the device with his / her whole bodyweight due to severe spasticity for example. This can result in the MOTOmed becoming unstable.
- Page 41 Fig. 4.18 Note: The training unit must again be swivelled and locked in the direction of travel if the MOTOmed layson.la is to be transported. Release the locking handle and swivel the training unit in the direction of travel. Lock the locking handle once again.
- Page 42 (product configuration) The knee bending adjustment has an adjusting wheel as an option with the MOTOmed layson.l and MOTOmed layson kidz.l while this comes as standard with the MOTOmed layson.la and MOTOmed layson kidz.la. This means you can adjust the knee bend during the training session as well.
- Page 43 If the training unit is fully retracted, do not continue to rotate the adjusting wheel forcefully as this could cause damage to the internal mechanism. Make sure that the locking handle is released if you wish to operate the adjusting wheel. MOTOmed layson.l Fig. 4.22, 4.23 MOTOmed layson.la Fig. 4.24, 4.25...
- Page 44 Leg guide “TrainCare” (accessories) If the MOTOmed is to be equipped with the “TrainCare” leg guide, this must be inserted into the aperture on the training unit. For this See Fig. 4.26, 4.27 purpose open the cover plate carefully until it comes to a stop and insert the rectangular profile of the “TrainCare”...
- Page 45 Preparation leg training Fit safety foot shells If the hand grips are attached to the MOTOmed layson.la, replace these with safety foot shells. The quick change technology enables tool-free replacement. Open the safety bracket and take the hand grips away.
- Page 46 Fig. 4.31, 4.32 Preparation arm / upper body training Fit hand grips If the safety foot shells are attached to the MOTOmed layson.la, replace these with hand grips. The quick change technology enables tool-free replacement. Open the safety bracket and take the safety foot shells away.
- Page 47 Fig. 4.33 If the leg guide “TrainCare” is attached, pull the rectangular profile out of the aperture and place the “TrainCare” at a secure location. Close the cover plate on the training unit. Attach the hand grips and close the safety bracket again.
- Page 48 Commissioning After a long journey, allow the MOTOmed to stand at room temperature for at least 3 hours before first use. You can fold the operating panel out until it comes to a stop, or See Fig. 4.35 incline and swivel it to a position suitable for you. Fig.
- Page 49 Fig. 4.36 The MOTOmed is now in standby mode. You will recognize this by the green LED indicator on the operating panel. Press the ‘On / Off’ button to turn on the MOTOmed. The MOTOmed is ready for operation no later than 30 seconds after switching on. The main screen appears.
- Page 50 To save energy, the screensaver will appear 15 minutes after the end of the training session or after the last input. It can be reactivated via the ‘On / Off’ button. If no action takes See Fig. 4.37 place, the MOTOmed moves to standby mode after a further 15 minutes.
-
Page 51: Operation
Removable operating panel with user remote control Activate interface for user remote control Training mode Free training MOTOmed layson.l / layson kidz.l / layson.l dia MOTOmed layson.la / layson kidz.la / layson.la prof Active / passive training Motor speed Resistance... - Page 52 Fig. 5.1 CAUTION Risk of damage to the device Only accessories approved by RECK may be connected to interface connections on the operating panel. Rotating operating panel with user remote control The MOTOmed is equipped with an operating panel which you can See Fig.
- Page 53 With the operating panel there is a user remote control , which the patient can use to stop the training session independently at any time. The interface must be activated in the settings so that the user remote control can be used. For this purpose follow the description ‘Activate interface for user Page 53 remote control’.
- Page 54 The interface must be activated in the settings so that the user remote control can be used. For this purpose follow the description ‘Activate interface for user Page 53 remote control’. Take the operating panel away from the operating panel holder.
- Page 55 Fig. 5.6 Activate interface for user remote control The associated interface must be activated beforehand so that the user remote control can be used. The setting of the interface for user remote control remains saved even when the MOTOmed is restarted. If the interface is activated, the training can only be started if the user remote control is connected.
- Page 56 Fig. 5.7, 5.8 Press the ‘settings’ button on the home screen Fig. 5.9 Select the button ‘interface’ and then the button ‘user remote control’ Fig. 5.10 OPERATION...
- Page 57 Fig. 5.11 Press the ‘on’ button and confirm the entry with The interface for user remote control is thereby activated. Fig. 5.12 Training mode Free training Press the ‘On / Off’ button on the operating panel to turn on your MOTOmed.
- Page 58 MOTOmed layson.l / layson kidz.l / layson.l dia The button for the leg trainer appears on the home screen. Fig. 5.13 The training session starts after activating the leg trainer button. The foot shells will now slowly start moving at the set passive speed.
- Page 59 MOTOmed layson.la / layson kidz.la / layson.la prof The buttons for the leg trainer and arm / upper body trainer appear on the home screen. The buttons can each be selected directly. Note: The safety foot shells must be fitted prior to selection of the leg trainer.
- Page 60 Active / passive training The user can continue to move passively (passive training) with the motor, or he / she can start to move actively (active training) at any time. Motor speed In passive training mode, you can change the speed from 1-60 rpm with the button Resistance In active training mode you can change the resistance from 0-20 with...
-
Page 61: Accessories
Accessories Page Leg guide “TrainCare” Order-No. 261.500 “TrainCare”, Order No. 261.502 “TrainCare kidz” Quick foot fastening system “QuickFix” Order No. 265.004 Docking station for removable operating panel Order No. 261.523 Wrist cuff Order No. 562.000 size L, Order No. 562.030 size M, Order No. - Page 62 Leg guide “TrainCare” The “TrainCare” leg guide with calf shells guarantees secure positioning of the lower leg and prevents unintended sideways movement. Overstretching and locking of the knee joints is also prevented. The “TrainCare” leg guide is essential for paralysed and unconscious users.
- Page 63 Fig. 6.2, 6.3 Prior to starting the MOTOmed, check whether the set angles provide the user’s legs with sufficient support. Lateral evasive movement of the legs should be prevented. The lifting force of the “TrainCare” leg guide can be set independently for each leg.
- Page 64 Fig. 6.4, 6.5 Quick foot fastening system “QuickFix” With the quick foot fastening system “QuickFix” you can quickly fasten the feet in the safety foot shells and release them again. Open the “QuickFix” by pushing down or pulling up the control lever and insert the feet.
- Page 65 Docking station for removable operating panel You can attach the docking station to the removable operating panel Fig. 6.8 Wrist cuff The wrist cuff for hand fixation allows easy and fast fixation of a paralysed (weak) hand to the various hand grips. Fig.
- Page 66 Tetra hand grips with quick change technology The tetra hand grips allow easy and independent insertion of the arms. The forearm support can be flexibly adjusted with the setting screw The quick change technology enables easy, tool-free exchange of the hand grips. Open the bracket and remove the hand grip.
- Page 67 Ergo hand grips with quick change technology The Ergo hand grips allow an individual hand position without modification. The user can choose from 3 handle holding positions. For the way of functioning of the quick change technology see Tetra See Fig. 6.10 hand grips.
- Page 68 CAUTION Make sure that hands (and fingers) are fixed so that they cannot touch the pedal cranks. Training with arms and hands inserted and fixed in the forearm shells may only be carried out under supervision. Fig. 6.13 Hook grip The hook grip for hand fixation allows easy and fast fixation of a paralysed (weak) hand on the hand grip.
-
Page 69: Troubleshooting
Troubleshooting Page Safety requirements for troubleshooting The MOTOmed does not run or the operating panel does not respond The MOTOmed runs unevenly Possible effects of electromagnetic interference on the MOTOmed TROUBLESHOOTING... - Page 70 If a malfunction has occurred that cannot be resolved and is not listed below or if you have questions, please contact the RECK service centre Page 79 or an authorised partner.
- Page 71 Possible effects of electromagnetic interference on the MOTOmed Possible effects Corrective action The training session stops Start training again The MOTOmed switches off Switch MOTOmed back on Selected training switches to a different Stop training and start the desired training mode training again The training speed changes No action required, automatic recovery...
-
Page 73: Cleaning, Maintenance, Recycling
Cleaning, maintenance, recycling Cleaning WARNING Danger of injury due to electrical voltage! For safety reasons, the power supply of the MOTOmed movement therapy device must be disconnected by removing the power plug before cleaning and disinfection! The MOTOmed may only be cleaned or disinfected using suitable wipes. Risk of damage to the MOTOmed! CAUTION Spray disinfection and disinfectant showers are not allowed due to the... - Page 74 Maintenance The MOTOmed does not require regular maintenance / servicing. Before the training session, a visual inspection in accordance with section 3 must be carried out. Worn wear parts (e.g. foot shell linings, Page 21 hand grips, expanders) must be replaced. Recycling The MOTOmed is made in high-quality all-metal construction: It is durable, environmentally friendly and recyclable.
-
Page 75: Technical Data, Signs
Technical data, signs Dimensions and weight MOTOmed model Dimensions Weight (external dimensions in cm min./max.) (in kg) Length Width Height layson.l / layson kidz.l 110–125 62–100 113–157 expandable chassis layson.l / layson kidz.l 110–125 62–92 113–157 Parallel chassis layson.la / layson kidz.la 142–155 67–105 131–166... - Page 76 Environmental conditions for storage and transport − 25 °C to + 70 °C Temperature humidity relative humidity of up to 90 %, without condensation at + 5 °C to + 35 °C water vapour pressure up to 50 hPa at >+ 35 °C to + 70 °C Air pressure not specified Protection class...
- Page 77 General signs and symbols Name plate fitted on the chassis of the MOTOmed. The presentation just serves as an example; the actual serial number can be read on the MOTOmed! Marking on the removable operating panel. Marking on the patient remote control. Indicates the manufacturer of the medical device.
- Page 78 Follow the instructions for use. The MOTOmed complies with IP21 protection class: Protected against the penetration of solid foreign parts and vertically dripping liquids. Device of protection class II. Observe appropriate disposal WEEE-Reg.-No. DE 53019630. Year of construction, in which the MOTOmed was manufactured (e.g.
- Page 79 Lateral pushing, leaning on or pushing of the MOTOmed is not permitted. Climbing on the MOTOmed or training in a standing position are not permitted. Application parts of type BF Application parts are components which – when the device is used as intended – have contact with the user and must therefore comply with special safety criteria.
-
Page 81: Service
Service We are of course available if you have any questions. Please call us – your questions and suggestions are very welcome. We are also happy to call you back. Please always give us the device number (SN). This can be found on the nameplate on the chassis of the MOTOmed. The presentation just serves as an example;... -
Page 83: Emc Information
EMC information Page Manufacturer's Declaration – Electromagnetic emissions Manufacturer's Declaration – Electromagnetic immunity Recommended safety distances EMC INFORMATION... - Page 84 The manufacturer declares compliance with the requirements of EN 60601-1-2:2016-05 for the mains connection cable of the MOTOmed. The use of accessories and wiring other than those specified or provided by the manufacturer of this equipment may result in increased electromagnetic emissions or reduced electromagnetic immunity of the equipment and may result in incorrect operation.
- Page 85 Manufacturer's Declaration – Electromagnetic immunity The MOTOmed is intended for use in the electromagnetic environment specified below. The customer or the user of the MOTOmed should ensure that it is used in such an environment. Immunity tests IEC 60601 test level Electromagnetic environment –...
- Page 86 Immunity tests IEC 60601 test level Electromagnetic environment – guidelines Conducted RF Use of this device immediately interference according 0.15 MHz to 80 MHz adjacent to other equipment to IEC 61000-4-6 should be avoided, as this could result in improper operation. If it in ISM and amateur radio is nevertheless necessary to use frequency bands between...
-
Page 87: Index
Index Accessories Arm / upper body training Classification Cleaning Commissioning Construction year Contact person Contraindications Device number Dimensions Disclaimer Disinfection Disposal Electromagnetic emissions Electromagnetic immunity Environmental conditions Ergo hand grips Expandable chassis Forearm shells Foreword Free training INDEX... - Page 88 Ground fixation Handle Hook grip Indications (clinical pictures) Initial commissioning Intended purpose Intended use Interface for patient remote control Knee bending adjustment Leg guide “TrainCare” Leg training Mains plug Maintenance Nameplate Negative side effects INDEX...
- Page 89 Operating panel Parallel chassis Patient remote control Patient target group Positioning Power cord 2, 28 Power input Power requirements Preparation Protection Quick change technology “QuickFix” foot fastening system Recycling Removable operating panel Safety distances Safety foot shells Safety precautions Serial number Serious incident Service Signs and symbols...
- Page 90 Technical specifications Tetra hand grips Training mode Transport Transport wheels Treatment goals Troubleshooting User remote control 28, 49 User weight Vertical hand grips Visual inspection Weight Wrist cuff INDEX...
- Page 92 Valid from year of manufacture 2020 100.019.752 en 20201009 We reserve the right to make technical changes in line with technical progress. Reproduction, also in extracts, is only permitted with the written permission of RECK. RECK-Technik GmbH & Co. KG Reckstraße 1–5, 88422 Betzenweiler, GERMANY Telephone +49 7374 18- ...
Need help?
Do you have a question about the MOTOmed layson and is the answer not in the manual?
Questions and answers