Table of Contents
Advertisement
Instruction Manual
MOTOmed
loop.l
®
loop.a
loop.la
Medical technology
move differently
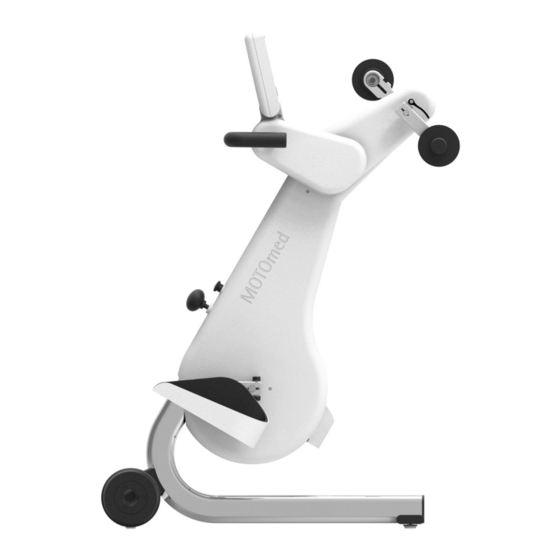
Operating panel
Touch screen LED display
Stop button
loop.la
Operating panel
Transport handle
Vertical adjustment
Safety foot shell
Small
Large
device stand
device foot
Transport wheels
Power cord
loop.a
On/Off button
Arm trainer
Hand grip
loop.l
Handlebar
Advertisement
Table of Contents

Subscribe to Our Youtube Channel
Related Manuals for RECK MOTOmed loop.l


Summary of Contents for RECK MOTOmed loop.l
- Page 1 Operating panel Touch screen LED display On/Off button move differently Instruction Manual MOTOmed loop.l ® loop.a Stop button loop.la loop.la Operating panel Arm trainer Transport handle Hand grip Vertical adjustment loop.l Safety foot shell Small Large device stand device foot Handlebar Transport wheels Power cord...
- Page 2 Operating panel Touch screen LED display Please use the MOTOmed only after you have read the instruction manual. On/Off button If you should not understand the language of the present version, please request the instruction manual in your national language. Benutzen Sie das MOTOmed erst, nachdem Sie die Gebrauchsanweisung gelesen haben.
- Page 3 Safety precautions listed in section 2. Page 11 If you have any further questions or comments, please don’t hesitate to call your MOTOmed representative or the RECK customer service Page 63 team. Enjoy the training with your MOTOmed!
-
Page 5: Table Of Contents
Introduction Page 5 Safety precautions Visual inspection Commissioning, transport Operation Accessories Troubleshooting Maintenance, cleaning, recycling Technical specifications, symbols Warranty services Service EMC information Index CONTENTS... -
Page 7: Introduction
Introduction Page Information about this manual Intended purpose Intended use Disclaimer Treatment goals Indications (clinical pictures) Contraindications Negative side effects INTRODUCTION... - Page 8 Information about this manual Read this instruction manual carefully before first use and note the points listed. Keep the manual for future use. This manual contains safety information that helps you to identify and prevent hazards. Two signal words and the associated symbols highlight potential dangers: WARNING Indicates a potential hazard with medium risk, which can result in death or (serious) bodily injury if it is not avoided.
- Page 9 Intended use The MOTOmed is applied by the user to train in a safe and stable wheelchair or on a stable and sturdy chair (without wheels) with a sufficiently high backrest in front of the movement therapy device. The user must assume a sitting position and the wheelchair or chair must not tilt backwards.
- Page 10 Treatment goals Avoidance, reduction, improvement of (consequential) damage due to loss of movement or lack of exercise in the following main indications: Indications (clinical pictures) - (Spastic) paralysis or neuromuscular disorders with major loss of leg (limb) mobility (e.g. stroke, multiple sclerosis, paraplegia, post-polio syndrome, Parkinson's, craniocerebral trauma, cerebral palsy, cerebral palsy, spina bifida) - Orthopaedic complaints such as rheumatism, arthritis, knee/hip...
- Page 11 Negative side effects No negative side effects have been recorded or reported as a result of training with the MOTOmed exercise therapy device. Notes on the residual risk: The principle of the MOTOmed movement therapy device is based on the function of electric motors, which drive the cranks of the arm or leg trainer with defined forces.
-
Page 13: Safety Precautions
Safety precautions General information Adjust the MOTOmed training to the individual clinical picture. Training tips by the manufacturer or its distribution partners are not binding. We cannot specify exactly how you should use the MOTOmed for the various diseases. This also applies to the details of the training functions, as the possible settings are dependent on age, height, individual fitness, postoperative resilience and general condition of the user. - Page 14 The hand grips, or the foot shells and calf shells of the leg guides, may generally come into contact with intact skin. When using fastening straps, wear socks and/or shoes, long pants or similar textiles. This avoids the direct contact of the skin with the foot shells or fastening straps and thus prevents bruises, skin irritations and abrasions.
- Page 15 One-sided training, either with only one leg or arm or with large weight differences of the limbs, initially only in the presence of a caregiver perform. Only carry out one-sided training with a high braking resistance or using a counterweight provided by the manufacturer.
- Page 16 Safety and technical information The MOTOmed is a highly specialized movement therapy device that is not designed for high-performance sports or for diagnostic purposes. We recommend using approved and calibrated ergometers or treadmills for this purpose. As a electrically powered medical device, the MOTOmed is subject to special precautions regarding EMC.
- Page 17 CAUTION Risk of injury due to rotating pedal cranks and moving parts of the device Do not make any mechanical adjustments (pedal radius, height adjustment of hand and grab handles or arm/upper body trainer, etc.) on the MOTOmed while the pedal cranks are turning. When operating the buttons on the operating panel, also pay attention to the rotating pedal cranks.
- Page 18 The surface temperature of the operating panel housing of is up to 13 °C above the ambient temperature due to the heat dissipation of the electronic components. Even if not exposed to direct sunlight, the buttons of the operating panel temperatures may reach up to 53 °C at the maximum permissible ambient temperature (40 °C).
- Page 19 Only original parts and original accessories may be used for the attachment or conversion. In commercial facilities, the accident prevention regulations of the employer's liability insurance association for electrical installations and equipment must be observed. WARNING Risk of injury due to packaging material Do not leave the packaging material lying carelessly around.
-
Page 21: Visual Inspection
Visual inspection Instructions for visual inspection of the MOTOmed before starting the training Your MOTOmed is a high quality medical device and is designed and manufactured according to the highest medical and safety standards. In accordance with the legal requirements, the manufacturer of a medical device has to give the user a multitude of safety instructions which can be found on the following pages. - Page 22 Damaged power supply tested and approved for the cables must therefore MOTOmed. For this, contact not be used under any the service partners of RECK. circumstances! Is the power supply Never use power cords which If the power cord is...
- Page 23 Test step Measures if errors are Reason for the test step detected during the visual inspection Is the device free from Contaminants should be Removing contaminants contamination? removed before using the reduces the risk of transmit- device according to the care ting pathogens.
- Page 24 Test step Measures if errors are Reason for the test step detected during the visual inspection Is the vertical Slowly move the vertical Unscrewed connections may adjustment securely adjustment up or down until cause parts to detach from locked with the safety you hear an audible click at the device during exercise.
- Page 25 Test step Measures if errors are Reason for the test step detected during the visual inspection If the training is carried Switch off the electric The wheelchair must not roll out while seated in an wheelchair and apply the away during the training. electric wheelchair: Is brakes.
- Page 26 Test step Measures if errors are Reason for the test step detected during the visual inspection Are other electrical Remove all other electrical If other mains-powered devices that are not devices that are not approved electrical devices are approved as medical as medical devices from the touched by the patient devices within reach of...
-
Page 27: Commissioning, Transport
Commissioning, transport Page Transport Commissioning Standby COMMISSIONING, TRANSPORT... - Page 28 Transport The MOTOmed is equipped with two big transport wheels, enabling easy transport within a building. To avoid damage to sensitive surfaces, the transport wheels are provided with a circumferential rubber ring. Before transport, remove the the mains connection cable completely. Page 27 To relocate, grab the MOTOmed by the transport handle firmly and...
- Page 29 Commissioning Scope of delivery: - MOTOmed loop - Power supply cable, length 2.50 m - Allen key SW 4 - MOTOmed loop Instruction Manual After a long journey, allow the MOTOmed to stand at room temperature for at least 3 hours before first use. Close the operating panel until it stops.
- Page 30 Fig. 4.4 The MOTOmed is now in standby mode. You will recognize this by the green LED indicator on the operating panel. Press the On/Off button to turn on the MOTOmed. The MOTOmed is ready for operation no later than 30 seconds after switching on. The main screen appears.
- Page 31 To save energy, the screensaver will appear 15 minutes after the end of the training session or after the last input. 30 minutes later the screen turns off, and after another 15 minutes the MOTOmed switches into standby mode. The MOTOmed is designed for continuous standby operation. Unplug the power cord when carrying out repair, cleaning or transport tasks to ensure complete interruption of the power supply.
-
Page 33: Operation
Operation Page Introduction Preparation Operating panel Training mode Vertical adjustment Free training MOTOmed loop l MOTOmed loop a MOTOmed loop la Active/passive training Motor speed Resistance Pedal radius Leg training Seat distance Arm/upper body training OPERATION... - Page 34 Introduction The operation of the MOTOmed will be explained on the following pages. Preparation Place the big device foot of the MOTOmed as close as possible to a wall. Sit in a wheelchair or on a sturdy chair close enough to the MOTOmed so that the knee joints are not fully stretched while training Page 40 (when the foot shells are at the furthest distance from the body).
- Page 35 A USB interface and a serial interface are located at the bottom Page 32 of the housing. A memory stick can be connected to the USB interface . This is for storing training data and for software updates. Detailed information on functions and settings of the operating panel can be found in a separate manual.
- Page 36 Fig. 5.3, 5.4 Free training Press the On/Off button to turn on your MOTOmed. Page 32 The MOTOmed starts up and goes into standby mode. The home screen appears. MOTOmed loop l The buttons for the leg trainer appear on the home screen. Fig.
- Page 37 MOTOmed loop a The buttons for the arm/upper body trainer appear on the home screen. Fig. 5.6 The training session starts after activating the arm/upper body button. The hand grips will now slowly start moving at the set passive speed. MOTOmed loop la The buttons for the leg trainer and arm/upper body trainer appear on the home screen.
- Page 38 Start training with the last used setting If you want to train again with the last used trainer, you can start training immediately by selecting it again. The foot shells and/or hand grips will now slowly start moving at the set passive speed. Change from leg training to arm/upper body training If you want to train your upper body, but the device was previously used as a leg trainer, the drive must be adjusted accordingly.
- Page 39 A message appears that the arm/upper body cranks should be brought to Z position. Fig. 5.9 After acknowledging the message, the arm/upper body cranks are moved to the holding position. The cranks automatically move slowly to the stop position. Risk of injury due to rotating pedal cranks CAUTION Do not touch the hand grips while the pedal cranks are rotating.
- Page 40 Motor speed In training mode, you can change the speed from 1-60 rpm. Resistance In training mode, you can change the resistance from 0-20. You can interrupt your workout at any time by pressing the red Stop Page 32 button You can access the home screen y pressing the operating button You can go back one step by pressing the control button Pedal radius...
- Page 41 Alternatively use a torque wrench and tighten the screws to 9 Nm. Incorrectly tightened hexagon socket screws on the ball bearing clamp ring are not subject to warranty by RECK-Technik GmbH & Co. KG. OPERATION...
- Page 42 Leg training Select the leg training button on the home screen. The hand grips will automatically open to U position. CAUTION Risk of injury due to rotating pedal cranks Do not touch the hand grips while the pedal cranks are rotating. Seat distance Choose the seat distance to the MOTOmed so that your legs are always slightly bent.
- Page 43 Fig. 5.13 Arm/upper body training Select the arm/upper body training button on the home screen. Wait until the MOTOmed automatically switches to arm/upper body training. For a separate arm/upper body workout, remove the legs from the safety shells. Bring the hand grips into Z position. To do so, open the pedal lock on the left hand grip and turn the...
-
Page 45: Accessories
Accessories Page Safety foot shells Pedal radius - precise setting Leg guides with calf shells Self-operated foot holders »QuickFix« Tetra handles with quick-change technology Wrist cuff for hand fixation Hook grip Underarm shells with arm cuff and quick-change technology Handle assortment for underarm shells ACCESSORIES... - Page 46 Safety foot shells Fig. 6.1 The safety foot shells are softly padded and have a surrounding security border with a particularly high interior side to protect the ankles and legs. For safe and easy fixation of the feet, the safety foot shells are equipped as standard with a Velcro strap around the ankle.
- Page 47 WARNING Risk of injury! The pedal radius may only be adjusted when the MOTOmed is switched off and the legs have not been inserted. Fig. 6.2 To change the pedal radius, release the hexagon socket screw with the supplied Allen key SW 4 key By pulling up the locking button , the safety foot shell can be shifted on the pedal bar...
- Page 48 Leg guides with calf shells Fig. 6.3 The leg guides with calf shells are shaped to allow for easy placement. Due to their flexible shape, the calf shells can adapt to the lower legs. For optimum guidance and support of the legs , the lower legs must rest on the calf shells.
- Page 49 Leg guides with plastic calf shells, long Fig. 6.4 In case of larger legs, optional leg guides with plastic calf shells (long) are available. Self-operated foot holders »QuickFix« Fig. 6.5, 6.6 With the Self-operated foot holders »QuickFix«, you can fix your feet independently and quickly in the safety foot shells and release them again.
- Page 50 Tetra handles with quick-change technology Fig. 6.6 The tetra hand grips allow easy and independent insertion of the arms. The forearm support can be flexibly adjusted with the setting screw The quick change technology enables easy, tool-free exchange of the hand grips. Open the bracket and remove the hand grip.
- Page 51 Hook grip Fig. 6.8 The hook grip for hand fixation allows easy and fast fixation of a paralysed (weak) hand on the arm trainer or on the handle. Underarm shells with arm cuff and quick-change technology Fig. 6.9 The forearm shells allow attachment and fixation of the arms in severe paralysis.
- Page 52 CAUTION Pay attention to the minimum insertion depth of the cross hand grip of 2.5 cm. The quick change technology enables easy, tool-free exchange of the hand grips. Open the bracket and remove the hand grip. Insert the forearm shell and close the bracket completely CAUTION Make sure that hands (and fingers) are fixed so that they cannot touch...
-
Page 53: Troubleshooting
Troubleshooting Page Safety requirements for troubleshooting The MOTOmed does not run or the operating panel does not respond The MOTOmed runs unevenly Possible effects of electromagnetic interference on the MOTOmed TROUBLESHOOTING... - Page 54 If a malfunction has occurred that can not be resolved and is not listed below or if you have questions, please contact the service centre of Page 63 the RECK or an authorised partner. The MOTOmed does not run or the operating panel does not respond...
- Page 55 4. In stroke patients, differently affected body sides may cause the device to run unevenly (especially if the braking resistance is low). 5. If the uneven movement continues when the legs are not inserted, a check must be carried out by qualified personnel. Possible effects of electromagnetic interference on the MOTOmed Possible effects...
- Page 57 Cleaning, maintenance, recycling Cleaning WARNING Danger of injury due to electrical voltage! For safety reasons, the power supply of the MOTOmed movement therapy device must be disconnected by removing the power plug before cleaning and disinfection! The MOTOmed may only be cleaned or disinfected using suitable wipes. CAUTION Risk of damage to the MOTOmed! Spray disinfection and disinfectant showers are not allowed due to the...
- Page 58 Maintenance The MOTOmed does not require regular maintenance / servicing. Before the training session, a visual inspection in accordance with section Page 19 3 must be carried out. Worn wear parts (e.g. foot shell linings, hand grips, expander) must be replaced. Recycling The MOTOmed is made in high-quality all-metal construction: It is durable, environmentally friendly and recyclable.
- Page 59 Technical data, signs Dimensions and weight (basic device) MOTOmed model Dimensions Weight (External dimensions in cm min./max.) (in kg) Length Width Height loop.l 107 / 122 loop.a 107 / 122 loop.la 107 / 122 Connected values (mains voltage, mains frequency) PSU P M P 12 0 F - 17 100–240 V~ / max.
- Page 60 Protection class IP21 Classification protection class II, type BF Classification according to MPG lI a Classification according to MDR ll (SOR / 98-282) NBOG Code 1108 active rehabilitation devices FDA product code BXB - exerciser powered Maximum permissible 135 kg user weight The handles are coated with PVC.
- Page 61 The following application parts (type BF) can be mounted on the MOTOmed and must be checked regularly: - operating panel - hand grips - foot shells - leg guides with calf shells IP21 The MOTOmed complies with IP21 protection class: Protected against the penetration of solid foreign parts and vertically dripping liquids.
- Page 62 Observe appropriate disposal WEEE-Reg.-No. DE 53019630. Serial number of the device Expected service life The expected service life cannot be generally indicated because it is determined by the operating environment, the frequency of use and the type of use. The expected service life is therefore considered to be the period during which the device is to maintain operational readiness since initial start-up.
-
Page 63: Warranty Services
Warranty services RECK-Technik GmbH & Co. KG assumes the warranty for material and manufacturing defects, in accordance with the legal provisions. I. Contents of the guarantee During the warranty period, RECK undertakes to replace faulty parts of MOTOmed for free or to repair the MOTOmed at the factory or in a workshop approved by RECK free of charge if: 1. -
Page 65: Service
Service We are of course available if you have any questions. Please call us – your questions and suggestions are very welcome. We are also happy to call you back. Please always give us the device number (SN). This can be found on the nameplate on the large pedestal of the MOTOmed. -
Page 67: Emc Information
EMC information Page Manufacturer's Declaration – Electromagnetic emissions Manufacturer's Declaration – Electromagnetic immunity Recommended safety distances EMC INFORMATION... - Page 68 The manufacturer declares compliance with the requirements of EN 60601-1-2:2016-05 for the mains connection cable of the MOTOmed. The use of accessories and wiring other than those specified or provided by the manufacturer of this equipment may result in increased electromagnetic emissions or reduced electromagnetic immunity of the equipment and may result in incorrect operation.
- Page 69 Manufacturer's Declaration – Electromagnetic immunity The MOTOmed is intended for use in the electromagnetic environment specified below. The customer or the user of the MOTOmed should ensure that it is used in such an environment. Immunity tests IEC 60601 test level Electromagnetic environment –...
- Page 70 Immunity tests IEC 60601 test level Electromagnetic environment – guidelines Conducted RF Use of this device immediately interference according 0.15 MHz to 80 MHz adjacent to other equipment to IEC 61000-4-6 should be avoided, as this could result in improper operation. If it in ISM and amateur radio is nevertheless necessary to use frequency bands between...
- Page 71 Recommended safety distances between portable and mobile HF telecommunications equipment and the MOTOmed The MOTOmed is intended for use in an electromagnetic environment in which the RF interference is controlled. Portable RF communications equipment (radio devices) (including their accessories such as antenna cables and external antennas) should not be used more than 30 cm (or 12 inches) away from the MOTOmed parts and wiring specified by the manufacturer.
-
Page 73: Index
Index Indications Accessories Initial operation Arm/upper body trainer Intended purpose Intended use CE mark Classification Leg trainer Cleaning Commissioning Construction year Contact person Maintenance Contraindications Medical device class Device number Nameplate Dimensions Disclaimer Disinfection Offset position Electromagnetic emissions Parallel position Electromagnetic immunity Pedal radius Environmental conditions... - Page 74 Index Warranty services »QuickFix« Weight Weight limit Recycling Safety distances Safety foot shells Safety precautions Self-operated foot holders »QuickFix« Service Signs and symbols Standby Stand-by mode/operation Technical specifications Training preparation Transport Transport wheels Troubleshooting User weight Visual inspection INDEX...
- Page 76 IDN 100.014.598 as of 20180413 EN We reserve the right to make technical changes in line with technical progress. Reproduction, also in extracts, is only permitted with written permission of RECK. RECK-Technik GmbH & Co. KG Reckstraße 1–5, 88422 Betzenweiler, GERMANY Phone 07374 18- 84, Fax 07374 18- 80 kontakt@MOTOmed.de, www.MOTOmed.de...
Need help?
Do you have a question about the MOTOmed loop.l and is the answer not in the manual?
Questions and answers