Advertisement
Instruction Manual
MOTOmed
muvi
®
Medical Devices
move differently
operating panel touchscreen
decrease
resistance
increase
resistance
stop button
operating panel
handlebar
large tube stand
mains cable
transport wheels
LED display
on / off button
increase motor speed
decrease motor speed
horizontal adjustment
handle
arm trainer
pivoting adjustment
vertical adjustment
safety foot shells
small front stand
Advertisement
Table of Contents

Subscribe to Our Youtube Channel
Related Manuals for RECK MOTOmed muvi


Summary of Contents for RECK MOTOmed muvi
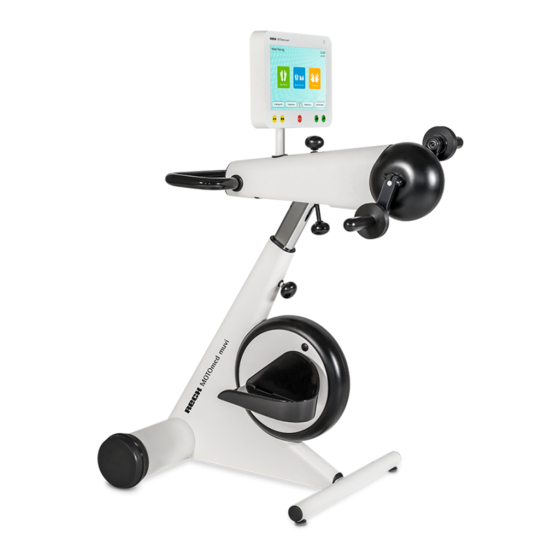
- Page 1 move differently operating panel touchscreen LED display on / off button Instruction Manual MOTOmed muvi ® decrease increase motor speed resistance increase decrease motor speed resistance stop button operating panel horizontal adjustment handlebar handle arm trainer pivoting adjustment vertical adjustment large tube stand mains cable safety foot shells...
- Page 2 operating panel touchscreen Please use the MOTOmed only after you have read the instruction manual. LED display If you should not understand the language of the present version, please request the instruction manual in your national language. on / off button Benutzen Sie das MOTOmed erst, nachdem Sie die Gebrauchsanweisung gelesen haben.
- Page 3 2. page 11 If you have further questions or comments, please do not hesitate to call your MOTOmed representative or the RECK customer service team. page 63 We are happy to assist you.
-
Page 5: Table Of Contents
Introduction page 5 Safety Precautions Visual Inspection Setup, Transport Operation Accessories Troubleshooting Maintenance, Cleaning, Recycling Technical Specifications, Symbols Warranty Service EMC Directive Index CONTENTS... -
Page 7: Introduction
Introduction page Information about this instruction manual Application Conventional use Disclaimer of liability Goals of treatment Indications (diseases) Contraindications Negative side effects INTRODUCTION... - Page 8 Information about this instruction manual Carefully read this instruction manual before first use and pay attention to the listed instructions. Keep the instruction manual for future reference. This instruction manual contains safety instructions that help you to recognize and avoid danger. The following symbol and three signal words mark potential danger.
- Page 9 Application The MOTOmed is suitable only for active, motor-assisted and passive movement of lower and upper extremities while seated. During the training the MOTOmed can be operated via operating panel. The MOTOmed is mobile and therefore can be used at various locations. Conventional use During the training the user is seated in front of the device in a safe wheelchair or in a stable chair (without wheels), with a sufficiently...
- Page 10 - use without prior consultation of a responsible physician and therapist - attachment of unauthorized accessories - repair or other interference by any person not authorized by the manufacturer Goals of treatment Avoiding, reducing and improving the consequences of loss or lack of movement, especially in the following cases: Indications (diseases) - (spastic) paralysis or neuromuscular conditions...
- Page 11 Contraindications There are no clinical examinations that excluded subjects from intervention due to a contraindication. Risk analysis and long term experience in the field of movement therapy show that patients with the following indications are required to consult their doctor and therapist before starting the training: Acute joint injuries and post surgery, serious knee and hip arthrosis, joint stiffness, strong deformation of extremities, tendency to hip and shoulder luxation (e.g.
-
Page 13: Safety Precautions
Safety Precautions General instructions The MOTOmed training has to be adapted to the individual health condition of the patient. Training suggestions by the manufacturer or its distributors are given without guarantee and are non-binding. No exact instructions can be given for the use of the MOTOmed in different health situations. - Page 14 Generally, the handles or foot shells and the calf shells of the leg guides may get in contact with intact skin. Please wear socks or/and shoes as well as long trousers when using the fixing straps (Velcros). This avoids direct skin contact with the foot shells or fixing tapes and therefore prevents from pressure marks, skin irritations or abrasions.
- Page 15 One-sided training, either with only one leg/arm or with big differences in weight of the limbs should be done only under supervision of a person in charge. Conduct one-sided training only at a high resistance setting or by using an original MOTOmed counterweight accessory.
- Page 16 Safety and technical instructions The MOTOmed is suitable for special therapeutic use. Thus, it is not suitable for high-performance sports or making diagnoses. In this case we recommend approved and calibrated medical ergometers or treadmills. Being an electronic medical device the MOTOmed complies with special EMC safety standards in regard of electromagnetic compatibility.
- Page 17 CAUTION Risk of injury by rotating pedal cranks and by moving parts of the device Do not make any mechanical changes to the MOTOmed (pedal radius, height adjustment of handlebar or arm/upper body trainer, etc.) while the pedals / foot shells are moving. Always make sure to pay attention to the rotating pedals when operating the buttons of the operating panel.
- Page 18 CAUTION Risk of damaging motor and electronics Do not actively push against the preset passive rotation movement. WARNING Risk of injury by electric shock Never use the MOTOmed if the side casing is demounted. Do not open the casing and do never insert metal objects into the MOTOmed. The MOTOmed must only be opened by qualified and trained persons.
- Page 19 In commercial facilities, the safety requirements of the Association of Commercial Trade for electrical installations and equipment must be observed. Security related controls according to the Medical Device Operator Ordinance (German MPBetreibV) have to be carried out at least every second year.
-
Page 21: Visual Inspection
Visual Inspection Guidance for visual inspection of the MOTOmed before the start of training Your MOTOmed is a high-quality medical device and thus has been developed by specific, high safety and quality standards, in accordance to guidelines governing the production of medical devices. In compliance to legal regulations the manufacturer of a medical product is expected to provide the user with multiple safety instructions that can be found on the following pages. - Page 22 Therefore, the MOTOmed casing. you are advised to replace it with an original, tested, and Therefore damaged mains authorized part of the RECK cables must not be used at Company. Therefore, please any time! contact your RECK service partner.
- Page 23 Test step Necessary measures in case Explanation of fault detection during visual inspection Are the accessories For example if the optionally Improperly chosen fitted and suitable for available forearm shells are accessories can result in the user? too small or too large, an increased risk of injury please exchange them by and a failure to perform the...
- Page 24 Test step Necessary measures in case Explanation of fault detection during visual inspection Is the device positioned Make sure to have enough To prevent injuries, the and set up so that the legroom when adjusting the MOTOmed needs to be intended movements height of the arm trainer: positioned and set up so...
- Page 25 Test step Necessary measures in case Explanation of fault detection during visual inspection Is the floor providing By choosing a slip proof floor The MOTOmed might slip enough grip so that no you can ensure a safe seating on straight floors (tiles, shifting occurs? and device position.
- Page 26 Test step Necessary measures in case Explanation of fault detection during visual inspection Are no other electrical Please remove all other Should the patient devices, that are not electronic devices, not come in contact with registered as medical authorized as medical other mains-supplied products, in the products, from user's...
-
Page 27: Setup, Transport
Setup, Transport page Setup Stand-by mode Transport SET UP, TRANSPORT... - Page 28 - MOTOmed muvi - operating panel, packed separately - flat wrench AF 15, Allen key AF 4 - instruction manual MOTOmed muvi - operation video on USB flash drive and on the device itself (available via the operating panel) Position the device securely| extend the small front stand For optimal stability extend the small front stand.
- Page 29 Fix the small front stand in its position. Put the Allen key into the Allen screw and turn the Allen key clockwise. Tighten the Allen screws until you feel a resistance and put the MOTOmed back up. The MOTOmed only stands safe and steady if the small front stand is fixed properly! fig.
- Page 30 Position the operating panel plumb-vertically to the base frame, as pictured. Put the enclosed Allen key into the pre-mounted hexagon socket set screw . Turn the Allen key clockwise and tighten the hexagon socket set screw until it does not stick out of the clamping socket Plug in both motor control cable connectors at the bottom side of...
- Page 31 Stand-by At first connect the mains cable with the inlet plug at the center of the left wheel. Make sure the cable is connected properly. Then plug in the mains plug of the mains cable into the power socket of your room. The power socket must be accessible for a safe and fast unplugging of the MOTOmed.
- Page 32 fig. 4.8 15 minutes after the training or after the last operation, the screen saver appears to save energy. 30 minutes later the screen turns off automatically, after 15 more minutes the MOTOmed goes into stand-by mode. The MOTOmed is made for continuous stand-by mode. For repair, cleaning or transportation of the MOTOmed, the mains plug has to be unplugged.
- Page 33 fig. 4.9 If you have to move the MOTOmed over any small bumps, make sure that both wheels move simultaneously (parallel) over the bump. CAUTION Risk of material damage by jerky movements Do not transport the MOTOmed on uneven grounds (e.g. cobblestone). The MOTOmed electronics and casing may get damaged.
-
Page 35: Operation
Operation page Introduction Preparation Operating panel Training operation Free training Foot insertion aid Active / passive training Motor speed Resistance Leg trainer Seating position Pedal radius Arm/upper body trainer Swiveling of arm/upper body trainer Horizontal adjustment Vertical adjustment OPERATION... - Page 36 Introduction Details about how to use the MOTOmed are explained in the following pages. Preparation Position the MOTOmed, preferably with the large tube stand facing a wall. Sit in a wheelchair or in a stable chair in front of the MOTOmed within a suitable distance to the device - the legs need to move freely but the knee joints must not be stretched out completely at any time page 37...
- Page 37 The loud speakers , a USB port , the motor control cable connector and a serial interface are located at the bottom of the casing. The USB port may be connected to a USB flash drive. It is used to save training data and to update the software.
- Page 38 Insertion aid Push of the main screen. fig. 5.4 In the 'Insertion aid screen', push until the foot shells are in the desired position. You can now easily and comfortably insert your feet, one after the other, each in the lowest pedal position.
- Page 39 Resistance During the training you can change the passive speed from 0–20 by pressing the buttons page 34 You can pause your training at any time by pushing the red stop button page 34 Push to go to the main screen. Push to go back.
- Page 40 Pedal radius Your MOTOmed provides a 2 stage pedal radius adjustment: stage 1: 7 cm / 2.8 in. (standard) stage 2: 12.5 cm / 5 in. WARNING Risk of injury! The MOTOmed must be switched off and the feet must not be inserted when changing the pedal radius.
- Page 41 Push the covering cap onto the first hole. Repeat the same procedure with the right safety foot shell Hint: Please make sure the same pedal radius is adjusted on both sides in order to guarantee a smooth pedal movement. Make sure the bearing screws are tightened properly on both sides.
- Page 42 Horizontal adjustment Use the same distance from seat to MOTOmed as for leg training. Arms should never be fully stretched but always slightly bent. Use the horizontal adjustment to regulate the distance between the arm/ upper body trainer and yourself. Open the screw knob at the top of the arm/upper body trainer and push or pull it into the...
- Page 43 fig. 5.14 OPERATION...
-
Page 45: Accessories
Accessories page Safety foot shells Leg guides with calf shells Self-operating foot holders Synchronized arm/upper body trainer with quick switch to the standard option Tetra handles with quick release system Hand fixation with wrist cuff Hook grip Forearm shells with arm cuffs and quick release system Grip range for forearm shells ACCESSORIES... - Page 46 Safety foot shells fig. 6.1 The safety foot shells are covered with soft PVC which is easy to disinfect. They have a large safety side panel for a high foot and ankle protection. The safety foot shells are equipped as standard with Velcro straps at the ankle level for a safe and easy fixation of the feet.
- Page 47 The shape of the leg guides with calf shells enable an easy fixation. Due to their flexible shape the calf shells can be adjusted to the lower leg. The calf shells need to rest against the calves for an optimal guidance and hold of the legs.
- Page 48 Self-operating foot holders fig. 6.4 The self-operating foot holders help you to fix and loosen your feet easily and independently. Open the foot holders and insert your feet. Use the lever to guide the foot holder up and to the side for positioning the foam roll Close the lever completely (you will feel the resistance of the safety lock).
- Page 49 Synchronized arm/upper body trainer with quick switch to the standard option fig. 6.5 The synchronized setting for the arm/upper body trainer allows for a parallel movement of the arms, similar to a handbike. You can change to the standard option by quick switch , no tools required.
- Page 50 Hand fixation with wrist cuff fig. 6.7 The hand fixation with wrist cuff enables quick and simple attachment of weak or paralyzed hands to the arm/upper body trainer, the handlebar, or any handle. Hook grip fig. 6.8 The hand fixation with hook grip enables quick and simple attachment of weak or paralyzed hands to the arm/upper body trainer or the handlebar.
- Page 51 Forearm shells with arm cuffs and quick release system fig. 6.9 The forearm shells firmly fasten and guide strongly paralyzed arms. In order to allow some lateral movement for the forearms, the forearm shells have a pivot bearing for horizontal movement. Open the wing screw at the bottom side of the forearm shell and adjust the length of the cross grip...
- Page 52 Grip range for forearm shells The forearm shells are equipped with cross grip as standard. There are following versions available: fig. 6.10 ball-shaped hand rest vertical handle cross hand grip ACCESSORIES...
-
Page 53: Troubleshooting
Troubleshooting page Safety instructions for troubleshooting The MOTOmed runs unevenly The MOTOmed does not work at all or the operating panel does not react TROUBLESHOOTING... - Page 54 For security reasons, please pull the mains cable from the outlet before starting the maintenance. In cases of unlisted malfunctions, or if you have any questions, please refer to the RECK customer service department or to an authorized page 63 MOTOmed representative.
- Page 55 The MOTOmed does not work at all or the operating panel does not react Please check if the operating panel is mounted properly and if the motor cable is plugged in correctly. Make sure the mains cable is page 29 plugged in correctly at the outlet and at the inlet connector at the center of the wheel of the MOTOmed.
- Page 57 Cleaning, Maintenance, Recycling Cleaning WARNING Risk of injury by electric voltage! Before cleaning or disinfecting the MOTOmed, the device must be unplugged from mains (electric outlet) so that the power supply is completely disconnected. The MOTOmed is only suitable for moist wipe disinfection with common disinfectant cloths.
- Page 58 Maintenance There is no regular maintenance service required for the MOTOmed. Security related controls according to the Medical Device Operator Ordinance (German MPBetreibV) have to be carried out at least every second year. Please pay attention to follow the most recent version of the regulation DIN EN 62353.
-
Page 59: Technical Specifications, Symbols
Technical Specifications, Symbols Dimensions and weight (basic model) MOTOmed models Dimensions Weight (outside dimensions in cm and in. (in kg and lbs) min. / max.) length width height muvi with 95 / 108 cm 60 cm 124 / 135 cm 51 kg arm/upper body trainer 37.4 / 42.5 in. - Page 60 According to MDR (SOR/98-282) NBOG Code 1108 active rehabilitation devices FDA product code BXB - exerciser powered Maximum 135 kg / 297lbs user weight The handles are PVC coated (depending on the model). Pulling the mains plug guarantees an all-phase power switch off. Symbol description - in general Protection class II device Type BF application parts...
- Page 61 IP21 The MOTOmed corresponds to the degree of protection IP21: Protected against ingress of foreign material and dripping fluids. Follow the instruction manual. The MOTOmed meets the medical device 93/42/EWG standards. Year of manufacture of the MOTOmed (e.g. 2014) Pay attention to proper disposal directions WEEE-reg.-no.
-
Page 63: Warranty
1. The claim is not about wearing parts (e.g. Velcro straps). 2. Previous maintenance (servicing, inspection, repair) was conducted only by a RECK service agent or the RECK Company in a proper manner. 3. No modifications have been made on the MOTOmed. - Page 64 By request of the RECK Company, defective components replaced due to manufacturer or material defects are to be returned to the RECK Company after the repair. Replaced parts become property of RECK-Technik GmbH & Co. KG. In case of part delivery on warranty, an extension of warranty period does not come into effect.
-
Page 65: Service
Service Should you have any questions we will be happy to assist you. Please call us - your questions and suggestions are always welcome. We will gladly return your call. Please have the serial number (SN) of your MOTOmed right at hand. You can find it on the label on the large front tube of your MOTOmed. - Page 67 EMC Instructions page Manufacturer's Declaration - electromagnetic emissions Manufacturer's Declaration - electromagnetic immunity Recommended separation distance EMC INSTRUCTIONS...
- Page 68 The manufacturer states that the mains cable of the MOTOmed complies with the requirements of the EN 60601-1-2:2007-12. Manufacturer's Declaration - electromagnetic emissions The MOTOmed is supposed to be operated in the electromagnetic environment described below. The customer or user of the MOTOmed has to guarantee the use in the appropriate environment.
- Page 69 Manufacturer's Declaration - electromagnetic immunity The MOTOmed is supposed to be operated in the electromagnetic environment described below. The customer or user of the MOTOmed has to guarantee the use in the appropriate environment. Immunity tests IEC 60601 - test level Electromagnetic environment - guidelines Electrostatic...
- Page 70 Immunity tests IEC 60601 - Compliance Electromagnetic test level level environment - guidelines Portable and mobile RF communications equipment should be used no closer to any part of the MOTOmed including cables, than the recommended separation distance calculated from the equation appropri- ate for the frequency of the transmitter.
- Page 71 Recommended separation distances between portable and mobile RF communications equipment and the MOTOmed The MOTOmed is supposed to be operated in an electromagnetic environment where the RF interference is controlled. The customer or user of the MOTOmed can help avoid electromagnetic interference by keeping the separation distances between portable and mobile RF communications equipment (transmitters) and the MOTOmed - which depends on the performance of the communication device as...
-
Page 73: Index
Index accessories immunity application indications (diseases) arm/upper body trainer insertion aid 13, 39 introduction CE symbol classification label class of medical products leg trainer cleaning contraindications conventional use maintenance measurements disclaimer of liability disinfection operating panel electromagnetic emissions pedal radius electromagnetic immunity power consumption power requirements... - Page 74 Index safety foot shells safety precautions self-operating foot holders separation distances serial number service service contact setup stand-by stand-by mode symbol description swivel the arm/ upper body trainer technical specifications transport transport wheels troubleshooting user weight vertical adjustment visual inspection warranty weight year of manufacture...
- Page 76 - valid as of year of construction 2017 – status April 2017 IDN 100.011.719 status 20170401 GB We reserve the right to technical changes according to the progress. Reprint, also extracts require a written permission of the RECK Company. RECK-Technik GmbH & Co. KG Reckstraße 1–5, 88422 Betzenweiler, GERMANY ph: +49 7374 18-85, fax: +49 7374 18-480, info@MOTOmed.com, www.MOTOmed.com...
Need help?
Do you have a question about the MOTOmed muvi and is the answer not in the manual?
Questions and answers