Table of Contents
Advertisement
Quick Links
Advertisement
Table of Contents

Related Manuals for Woodway Curve LTG


Summary of Contents for Woodway Curve LTG
- Page 1 WOODWAY USA, Inc. Curve LTG Treadmill Owner’s Manual Copyright 2022 © ® WOODWAY USA, Inc. All rights reserved. No portion of this content may be repro- duced in any form without permission from the publisher, except as permitted by U.S.
- Page 2 In 1975, WOODWAY® GMBH was founded in Weil am Rhein, Germany. The name “WOODWAY”® is derived from the German “wald weg” or “way of the woods” – the feel of running on a soft pine needle covered path in the forest.
-
Page 3: Table Of Contents
WOODWAY USA, Inc. Table Of Contents 1. Introduction How To Use This Manual ..... 4 2. Important Safety Instructions Safety ..........5 Hazard Signal Words ..... 5 General Safety ........ 6 3. Installation Optional Tools ........ 12 Hardware/Tools Included ..12 Unpacking ........ -
Page 4: Introduction
For The Long Run ® 1 Introduction 1.1 How To Use This Manual (READ THIS FIRST) This manual is published in PDF format. It is designed for printing. This owner’s manual supports equipment installation and set-up. Observe all safety procedures. See “Hazard Signal Words” on page 6. Also see “General Safety” on page 7 for general safety considerations. -
Page 5: Important Safety Instructions
Failure to leave ample clearance around the Curve LTG could cause you to be trapped between the Curve LTG and a wall if you fall, resulting in burns or other serious injury from the moving slatbelt. Allow a minimum clearance of 18 inches (46cm) on each side of the Curve LTG. -
Page 6: General Safety
Servicing By Unqualified Technicians Can Lead To Injury Or Death Serviceable only by qualified service technicians. A qualified service technician is a person who has successfully completed the WOODWAY® factory authorized service school or has equivalent training and experience. WARNING Injury Hazard Follow all listed service precautions. - Page 7 ® technical changes in the context of product improvement without prior notice. Illustrations are for basic understanding only and may differ from the actual design. WOODWAY accepts no liability for ® accidents, equipment damage, or personal injury caused by using third-party accessories.
- Page 8 For The Long Run ® Note: Curve LTG treadmills have no drive motor. Electrical power requirements are minimal. The display system is powered by an enclosed generator. Note: This equipment is not intended for use in damp locations. 2.3.1 Equipment Specifications...
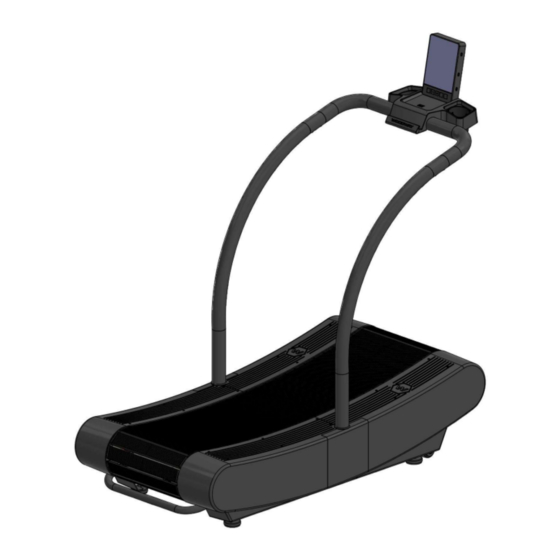
- Page 9 WOODWAY USA, Inc. FIG. 2 Curve LTG Dimensions Page 9...
- Page 10 For The Long Run ® 2.3.2 Customer Service And Nameplate Information Table 3: Contact Information Europe WOODWAY® USA, Inc. WOODWAY® Gmbh Steinackerstr, 20 W229N591 Foster Ct. Waukesha. WI 53186 79576 Weil am Rhein Germany Tel: 1(262) 548-6235 Tel: +49 (0) 7621-940-999-0...
-
Page 11: Installation
WOODWAY USA, Inc. 3 Installation This section describes the proper procedure for moving the equipment and positioning it into the final location. Follow the process precisely as presented. The process is incomplete until equipment is ready for installation, post-installation testing, and commissioning. -
Page 12: Optional Tools
For The Long Run ® Optional Tools #2 Phillips Screwdriver 16mm Open End Wrench Hardware/Tools Included Hardware and Tools Supplied on Blister Pack FIG. 3 Blister Pack Page 12... -
Page 13: Unpacking
WOODWAY USA, Inc. Unpacking Move boxed unit to room where it will be used. The packaged Curve LTG is very heavy and weighs 317 lbs (144 kg) packaged. WARNING: To avoid injury, use caution when moving and lifting the Curve LTG during unpacking and assembly. - Page 14 Remove the Curve LTG base from bottom box and place it where it will be used as determined in step one. Two people need to utilize the grab bar to lift the aft side of the Curve LTG and use the front caster wheels to position the Curve LTG accordingly.
-
Page 15: Assembly
WOODWAY USA, Inc. Assembly Assemble the display, mount plate, and enclosure tray. FIG. 8 Display Assembly FIG. 9 (Assembled) Page 15... - Page 16 For The Long Run ® Assemble display/tray to the horseshoe portion of the handrail. FIG. 10 Display to Horseshoe FIG. 11 (Assembled) Connect the wires from the horseshoe assembly to the wires from the display assembly and stow the extra length of wire. ...
- Page 17 WOODWAY USA, Inc. Position the handrail with the wire connection to the righthand side of the base, and the handrail without any wires to the lefthand side of the base. FIG. 12 Handrails to Base FIG. 13 Handrails to Base...
- Page 18 For The Long Run ® Mount the LH and RH handrails to the base with the hardware shown. FIG. 14 Mounting Handrails FIG. 15 Connect the wires from the bottom of the RH handrail to the base frame wires.
- Page 19 WOODWAY USA, Inc. Loosely insert the LH side of the display/tray and handrail (horseshoe) assembly into the top end of the LH handrail. FIG. 16 Horseshoe to Handrails Connect the wires from the horseshoe to the wires from the RH handrail.
- Page 20 For The Long Run ® FIG. 18 Handrails and Hardware Insert and tighten the hardware shown, then tighten the hardware at the bottom of the LH and RH handrails. FIG. 19 Hardware Installed Page 20...
- Page 21 WOODWAY USA, Inc. Insert the cup holders into the top of the display tray. Install tray bottom cover with hardware. FIG. 20 Display Enclosure FIG. 21 (Assembled) Page 21...
- Page 22 For The Long Run ® Install the remaining two side cover panels. FIG. 22 Side Covers FIG. 23 (Assembled) Page 22...
-
Page 23: Adjusting Treadmill Feet
WOODWAY USA, Inc. Adjust grommets as necessary during side panel installation. FIG. 24 Grommets 3.5 Adjusting Treadmill Feet Adjust the front feet down, one at a time, to raise the caster wheels just off the floor surface. When the front feet are adjusted to the proper position, tighten the locking nuts to the frame. - Page 24 If you feel that your position while using the Curve LTG is too far aft, the aft feet can be adjusted as noted in the previous steps to raise the aft end of the Curve LTG. When ever adjusting...
Need help?
Do you have a question about the Curve LTG and is the answer not in the manual?
Questions and answers