Table of Contents
Advertisement
Quick Links
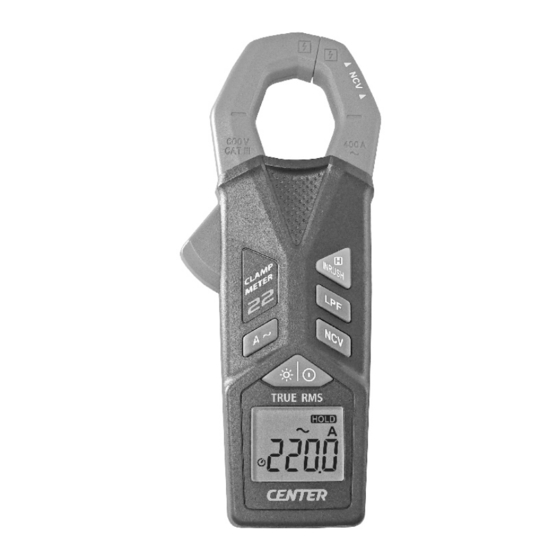
22
ACTRMSCLAMPMETER
CENTER TECHNOLOGY CORP.
4F, NO.415, Jung-Jeng Rd., Shu-Lin Dist., New Taipei City 238, Taiwan
E-Mail:center@centertek.com
http://www.centertek.com
GCA000022-12000
Specifications
GENERAL SPECIFICATION:
Display:
4 digits LCD display with maximum reading 4200.
Symbol and Scale range:
Adjust automatically according range and input signal.
Over Load: When the signal larger than the maximum will be shown -
Sample Rate:
2 times/sec for digital data.
Low Power Indication:
When the battery is under the proper operation range,
will appear
on the LCD display.
Power Source: UM-4 or AAA 1.5V battery x 2
Typical Battery Life: (alkaline battery)
200 hours approx.
Auto Power Off:
If there is no key operation for 15 minutes, the meter will power
itself off to save battery consumption.
Disable Auto Power Off:
To disable the function, press the "
" Hold button and keep it
pressed while powering on the meter. The LCD segments will all light up,
the
indicator will not be displayed.
Clamp opening size: 23 mm
Dimension / Weight: 149(L)x59(W)x27.5(H)mm / 140g (
include battery
Accessory: Instruction manual, Carrying case, Battery 1.5Vx2
Safety Information
Do not operate the tester if the body of meter look broken.
Check the main function and make sure it is at the correct position
before each measurement.
Change the battery when the
symbol appears to avoid incorrect
data.
Environmental Conditions:
Altitude up to 2000 meters.
Operating temperature: 0°C ~ 40°C, <80% RH, non-condensing
Storage temperature: -10°C ~ 60°C, <70% RH, battery removed
Pollution Degree: 2
Installation Categories II
Explanation of Symbols:
Attention! Refer to operation instructions.
Dangerous voltage may be present at terminals.
This instrument has double insulation.
Approvals:
EN61010 600V CAT III
ELECTRICAL SPECIFICATION:
ACA (Autorange)
Accuracy
Range
Resolution
50Hz~60Hz
45Hz~400Hz
40A
0.01A
-.
±2.0% + 5dgts
±3.8% + 8dgts
400A
0.1A
Low Pass Filter(LPF) (Autorange)
Accuracy
Range
Resolution
50Hz ~ 60Hz
40A
0.01A
400A
0.1A
±3.5% + 8dgts
Note: Cut-off frequency(-3dB):160Hz
Inrush Current
Range
Resolution
Accuracy
400A
0.1A
±3.5% + 8dgts
Note:
Integration time: 100ms
Trigger current(threshold): 5A
NCV Sense
Volt sense indication bar with beep should be on
at 100VAC@ 1inch(2.54cm)
)
5
2
Symbol Definition & Button Location
1. Name of Parts & Position:
1
3
4
8
9
10
1
Current sensing clamp
5
Hold/Inrush button
NCV induction area
LPF button
2
6
Safety protection ring
NCV button
3
7
Clamp opening handle
AC button
4
8
Button Instructions
Hold / Inrush Function:
Press "
" button to freeze the data shown on the LCD screen.
Press it again to exit Data-Hold mode.
Overload Protection
If you press and hold the button for 2 seconds, to access inrush
current mode, the LCD display will show " INRUSH ", " ---- " until the
420Arms
motor starting up and being detected (5A above). The detection will be
done only on time and the output reading will be hold.
To exit inrush current mode, press and hold the button for 2 seconds or
Overload Protection
"
" button.
Power On/Off / Back-Light Function:
420Arms
Press "
" button to turn on the meter. Press and hold the button for
2 seconds to turn off.
Press "
" button to turn on the LCD back-light. This makes it
Overload Protection
easier to read in dark environment. Press it again to turn off back-light.
420Arms
The back-light will be automatically turned off after 10 seconds to save
battery power.
NCV Function:
Press "
" button to enter NCV (non-contact voltage detector)
function. "
" symbol will appear on the display. To exit NCV mode,
press "
" button.
LPF
Function:
(Low Pass Filter)
Press "
" button. "
" symbol will appear on the display.
Press it again, or press "
" button to exit the LPF mode.
Note: This meter is built with LPF function at ACA ranges.
6
3
2. LCD Display:
Low battery
indication
2
Non-Contact voltage
indication
Low pass filter
indication
5
Maintenance
6
WARNING & CAUTION!
7
Before opening the battery door, disconnect both test leads and never
use the meter if the battery door is open.
To avoid contamination or static damage, do not touch the circuit board
without proper static protection.
11
REMARK:
If the meter is not going to be used for a long time, take out the battery and
do not store the meter in high temperature or high humidity environment.
9
Power On/Off/Backlight button
When taking current measurement
LCD dispaly
10
clamp to get more accurate test result
11
Battery compartment cover
Repairs or servicing not covered in this manual should be performed only by
qualified person
.
CLEANING:
Periodically wipe the case with a dry cloth and detergent.
Do not use abrasives or solvents on this instrument.
Measuring Instructions
(1) ACA measurement:
Press the "
" button to access the AC Current measurement mode.
The "
" symbol will appear on display.
Open the clamp by pressing the jaw-opening handle and insert the cable
to be measured into the jaw.
Close the clamp and get the reading from the LCD panel.
Note:
In some occasion that the reading is hard to read, push the
and read the result later.
CORRECT
7
4
Inrush indication
Hold Data indication
Current measurement
indication
Alternative
source indication
Reading indicator
Auto power off indication
,
keep the cable at the center of the
.
button
INCORRECT
8
Advertisement
Table of Contents

Related Manuals for Center 22


Summary of Contents for Center 22
- Page 1 Current sensing clamp Hold/Inrush button Power On/Off/Backlight button When taking current measurement keep the cable at the center of the NCV induction area LPF button LCD dispaly clamp to get more accurate test result...
- Page 2 Replacing Battery (2) Inrush Current Mode: (4) Non-Contact Voltage (NCV): Press and hold the “ ” button for 2 seconds to access the 1. When the battery voltage drops below proper operation range, the symbol Inrush current mode. The LCD display will show “INRUSH”, “ ---- ” until DANGER! will appear on the LCD and the battery needs to be replaced.
Need help?
Do you have a question about the 22 and is the answer not in the manual?
Questions and answers