Table of Contents
Advertisement
Quick Links
Advertisement
Table of Contents

Related Manuals for Renishaw MIH


Summary of Contents for Renishaw MIH
- Page 1 H-1000-5200-07-D =>?@D =>?@D User’s Guide...
- Page 2 CHANGES TO EQUIPMENT Renishaw reserves the right to improve, change or modify its hardware or software without incurring any obligations to make changes to Renishaw equipment previously sold. WARRANTY Renishaw plc warrants its equipment provided that it is installed exactly as defined in associated Renishaw documentation.
- Page 3 User's Guide SALES & SERVICE: A Tech Authority, Inc. 13745 Stockton Ave. Chino CA 91710 909-614-4522 sales@atechauthority.com H-1000-5200-07-D © 2001 Renishaw...
- Page 4 Information to user (FCC Section 15.21) The user is cautioned that any changes or modifications not expressly approved by Renishaw plc or authorised representative could void the user's authority to operate the equipment. Special accessories (FCC Section 15.27)
- Page 5 Use only the recommended batteries. Do not allow the battery terminals to contact other metallic objects. For instructions regarding the safe cleaning of Renishaw products refer to the MAINTENANCE section of the relevant product documentation. Remove power before performing any maintenance operations.
- Page 6 Trattare e smaltire le pile in conformità alle istruzioni del fabbricante. Usare solo pile del tipo consigliato. Evitare il contatto tra i terminali delle pile e oggetti metallici. Per le istruzioni relative alla pulizia dei prodotti Renishaw, fare riferimento alla sezione MANUTENZIONE (MAINTENANCE) della documentazione del prodotto.
- Page 7 Utilizar apenas as baterias recomendadas. Não permitir que os terminais da bateria entrem em contacto com outros objectos metálicos. Para instruções relativas à limpeza segura de produtos Renishaw, consultar a secção MANUTENÇÃO (MAINTENANCE) da documentação do produto. Desligar a alimentação antes de efectuar qualquer operação de manutenção.
- Page 8 Gebruik uitsluitend de aanbevolen batterijen. Zorg ervoor dat de poolklemmen niet in contact komen met andere metaal-houdende voorwerpen. Voor het veilig reinigen van Renishaw produkten wordt verwezen naar het hoofdstuk ONDERHOUD (MAINTENANCE) in de produktendocumentatie. Voordat u enig onderhoud verricht dient u de stroom uit te schakelen.
- Page 9 Käytä paristoja ja hävitä ne valmistajan ohjeiden mukaisesti. Käytä ainoastaan suositeltuja paristoja. Älä anna paristonapojen koskettaa muita metalliesineitä. Renishaw-tuotteiden turvalliset puhdistusohjeet löytyvät tuoteselosteen HUOLTOA (MAINTENANCE) koskevasta osasta. Kytke pois sähköverkosta ennen huoltotoimenpiteitä. Katso koneen toimittajalle tarkoitettuja käyttöhjeita.
- Page 10 User/Supplier information 8 MIH User’s Guide...
-
Page 11: Table Of Contents
Introduction - Datum mode - Simple mode - Memory mode - Sequence mode SUMMARY OF BUTTON OPERATION ACCESSORIES DIMENSIONS 10.0 MECHANICAL SPECIFICATION 11.0 ELECTRICAL SPECIFICATION Battery life 12.0 TROUBLESHOOTING GUIDE 13.0 MIH SELF TEST 14.0 MAINTENANCE MIH User’s Guide 9... -
Page 12: Introduction
(DCC) machines and motorised probe heads. The MIH is adjustable in two axes, both of which can be unlocked by a single thumbwheel operation. A probe/stylus combination can be orientated to 720 different positions and, once the head is locked, each position will be repeatable to 1µm* (0.00004in) (2σ). -
Page 13: Dos And Don'ts
DO NOT leave the head unlocked for long periods DO NOT attempt to use probe extensions over 300mm long DO NOT attempt to lock the head in an overtravel position DO NOT move the axes beyond overtravel positions MIH User’s Guide 11... -
Page 14: Major Components
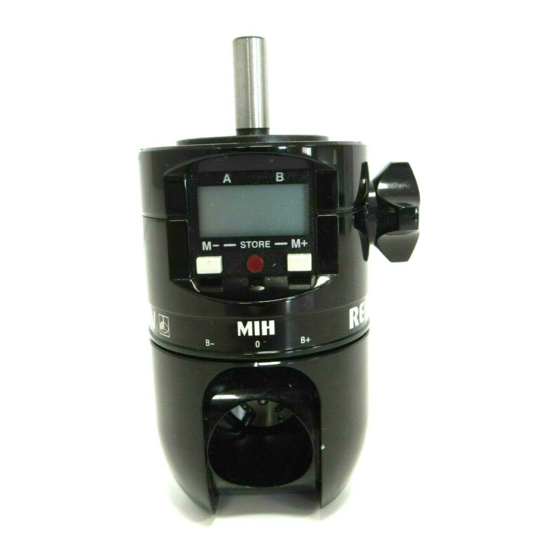
Lock/unlock thumbwheel Figure 1 LCD display Probe status LED LCD memory programming buttons Probe Autojoint lock/unlock access window Renishaw Autojoint probe mounting (recessed into A axis swivel) A axis zero position markers B axis zero position markers Battery housing MIH back... - Page 15 Major components Figure 1 B axis A axis MIH User’s Guide 13...
- Page 16 A axis positional data (0° to +105°) B axis positional data (-180° to +180°) display Figure 2 Low battery indicator Head locked symbol Rotation direction arrows Position confirmation symbol Sequence store indicator Memory mode indicator Memory number 14 MIH User’s Guide...
- Page 17 LCD display Figure 2 MIH User’s Guide 15...
-
Page 18: Installation
Installation 4.0 INSTALLATION 1. Move MIH to axis positions A0.0, B0.0 and lock up 2. Unscrew housing retaining screw Fitting the 3. Open housing door battery 4. Insert battery as shown (negative end first) Figure 3 5. Close door and secure retaining screw (do not overtighten) 6. - Page 19 Installation Figure 3 Figure 4 Key slot Figure 5 MIH User’s Guide 17...
-
Page 20: Using The Mih
Using the MIH 5.0 USING THE MIH Both A and B axes are unlocked by a single turn of the thumbwheel in a counter-clockwise direction. The locked Unlocking (key) symbol on the LCD will disappear. The head detent will the head not support extensions longer than 150mm (5.91in) and... - Page 21 Using the MIH Figure 6 Figure 7 MIH User’s Guide 19...
-
Page 22: The Lcd/Software Facility
6.1.2 completion of the datuming routine. Following the time-out Simple of other modes, the MIH software will always return the user mode to Simple mode. This is a use-only mode in which live A and B axis data will always be shown. In addition, if the head is... - Page 23 Software modes The user can enter Memory mode from Simple mode by 6.1.3 pressing either the M+ or M- button. In this mode the MIH Memory memory can be programmed or used. In Memory mode, mode chosen head positions can be stored in up to 20 memory stores.
- Page 24 NOTE Do not leave the head unused in an unlocked position, as this will shorten battery life. When the battery is first inserted or replaced, the MIH enters a Datum mode routine which must be successfully completed Datum prior to use. The A and B axis position detectors within the...
- Page 25 Datum mode Figure 8 LCD power down Figure 9 Step 1 Step 2 MIH User’s Guide 23...
- Page 26 Confirm that datum is correctly set by rotating each axis to 6.2.5 its extreme positions and check that the position data on the Step 5 LCD is correct. A axis 0° to +105° plus overtravel B axis ±180° plus overtravel 24 MIH User’s Guide...
- Page 27 Datum mode Figure 10 Step 3 Press Step 4 MIH User’s Guide 25...
- Page 28 Simple mode Following insertion of the battery and datuming of the head, the MIH is now ready to be used in Simple mode. All data Simple shown in the A and B axis positions on the LCD will be "live".
- Page 29 Simple mode Figure 11 Step 1 Step 2 Step 3 MIH User’s Guide 27...
- Page 30 Attempting to move the head axes whilst locked will cause damage and may result in movement of the axis position detectors in severe cases. Should this occur, the MIH software will signal an axis error message and will ask for a datum reset (Figure 12) when unlocked.
- Page 31 Memory mode Figure 12 Figure 13 Step 1 Step 2 Press MIH User’s Guide 29...
- Page 32 (A0.0, B0.0) press M- to decrement the memory number to Step 7 M1. The direction arrows flash to show the direction moves Figure 14 required to reach that position and the axis data stored in M1 (A0.0, B0.0) is displayed. 30 MIH User’s Guide...
- Page 33 Memory mode Figure 14 Step 3 Press Step 4 Step 5 Press Step 6 Press Step 7 Press MIH User’s Guide 31...
-
Page 34: Memory Mode/Sequence Mode
The display gives the choice to either use the existing sequence (press M- button) or edit the sequence to create a new one (press M+). If no choice is made within 5 seconds, the display will return to Simple mode. 32 MIH User’s Guide... - Page 35 Sequence mode Figure 15 Step 8 Step 9 Figure 16 Press MIH User’s Guide 33...
- Page 36 M+ and M- buttons has been transferred back to selecting sequence steps. * If the buttons are held for longer than 3 seconds, the display will revert to the 'End USE' screen (see step 7). 34 MIH User’s Guide...
- Page 37 Sequence mode Figure 17 Step 1 Step 2 Press Step 3 Press Figure 18 Step 4 Press Press MIH User’s Guide 35...
- Page 38 Store E in sequence step 4 by pressing the M+ and M- buttons simultaneously for between half a second and 3 seconds. The sequence is now complete and is as follows - Step 1 (M1), Step 2 (M2), Step 3 (M5), Step 4 (E). 36 MIH User’s Guide...
- Page 39 Sequence mode Figure 19 Step 5 Press Figure 20 Step 6 Press Press Press MIH User’s Guide 37...
- Page 40 (E) in sequence step 1 during sequence editing. When using a sequence, the only requirement is to position the MIH following the axis direction arrows and lock up once Using a the correct position is reached. On unlock, the sequence will...
- Page 41 Sequence mode Figure 21 Step 7 Press Press Figure 22 Step 1 MIH User’s Guide 39...
- Page 42 (press M+) or end using Sequence mode (press Figure 25 M-). Pressing M+ will take the user back to step 1 in the sequence. Pressing M- or taking no action for 5 seconds will transfer the display back to Simple mode. 40 MIH User’s Guide...
- Page 43 Sequence mode Figure 23 Step 2 Figure 24 Step 3 Figure 25 Step 4 Press Step 5 Press MIH User’s Guide 41...
-
Page 44: Summary Of Button Operation
Button operation 7.0 SUMMARY OF BUTTON OPERATION s l l ½ s l l ½ t i s ½ 42 MIH User’s Guide... - Page 45 Button operation Summary of button operation (continued) s l l ½ s l l ½ ½ s t i s l l ½ s l l ½ ½ s t i MIH User’s Guide 43...
- Page 46 Button operation Summary of button operation (continued) s l l ½ s l l ½ s t i t i x 44 MIH User’s Guide...
-
Page 47: Accessories
MIH. MAPS can be either wall-mounted or bolted directly to the CMM table for easy access. For further information on MAPS, see the MAPS User Guide (Part No. H-1000-5300). - Page 48 Utilising the patented Renishaw Autojoint, probing set-ups Figure 27 can be simply locked onto the MIH without the need to re- qualify each time, yielding maximum flexibility and valuable time saving. Figure 27 PAA1 adaptor...
- Page 49 (continued) Renishaw provide an extensive range of machine mounting shanks to fit most makes of CMM. Please take care when Shanks mounting the MIH with a parallel shank, as any rotational Figure 28 movements will invalidate any stored data. WARNING Always fit mounting shanks to the MIH by using the screws supplied (M3 x 5mm (0.20in) long).
-
Page 50: Dimensions
° 5 t i s ° 0 ° 5 ± t i s t i s i l t ° 0 ° 0 F ° ° 5 * Using a TP6A fitted with a 21mm (0.83in) stylus 48 MIH User’s Guide... -
Page 51: Electrical Specification
(10 minutes/day unlock time): Battery life Before low battery warning 40 weeks After low battery warning 11 days BATTERY LIFE WITH HEAVY USAGE (20 minutes/day unlock time): Before low battery warning 26 weeks After low battery warning 8 days MIH User’s Guide 49... -
Page 52: Troubleshooting Guide
, y r 50 MIH User’s Guide... - Page 53 Troubleshooting guide The MIH contains no user serviceable parts and should be returned to Renishaw if suspected faulty l l i i o j f f i y l t i o j l l i . y r y t l...
-
Page 54: Mih Self Test
Pressing the M+ button will display all LCD segments Figure 31 simultaneously. Pressing the M- button will display the MIH software version number. Press the M+ and M- buttons simultaneously to transfer to the encoder test. The head should be locked during this test. - Page 55 Self test Figure 31 Press Figure 32 Press Figure 33 Press MIH User’s Guide 53...
-
Page 56: Maintenance
Maintenance 14.0 MAINTENANCE The MIH contains no user serviceable parts. The MIH may be cleaned by wiping with a dry, lint-free cloth. 54 MIH User’s Guide... - Page 57 Renishaw plc, New Mills, Wotton-under-Edge, Gloucestershire GL12 8JR, UK +44 (0)1453 524524 [07000 RENISHAW] +44 (0)1453 524901 Telex 437120 RENMET G email uk@renishaw.com Renishaw Inc, USA Renishaw (Hong Kong) Ltd., Hong Kong, +1 847 286 9953 The People’s Republic of China...
Need help?
Do you have a question about the MIH and is the answer not in the manual?
Questions and answers