Advertisement
Register your product online at
� SCDSCI-IE"
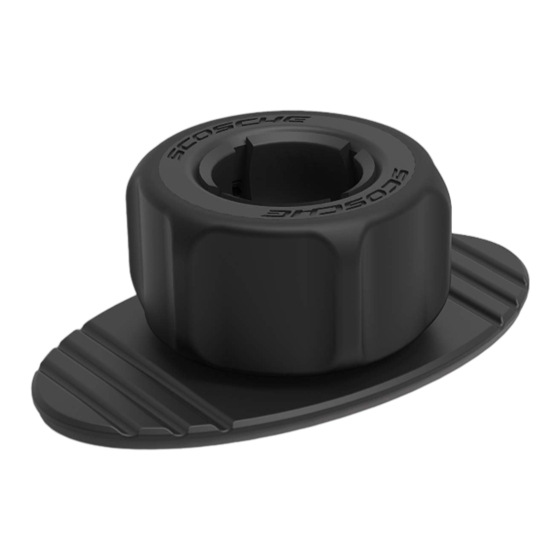
REPLACEMENT MOUNTING BASE
FOR MAGICMOUNT" PRO DASH
A. Low-profile adhesive mounting base
Note: Replacement base for MAGICMOUNT
PRO DASH (MPD-BP0) magnetic mount with
threaded ball-joint assembly (magnetic mount
and ball-joint tensioner collar not included).
B. Cleaning wipe
Questions?
�
Need help with your Product?
I..
Call Customer Service at:
..i11111
(BOO) 363-4490 x1
REMOVING THE DASH MOUNT
OPTION 1
1. Using a household hair-dryer, apply
LOW heat to the base of the dash
mount for 2-3 minutes. To avoid
damage to the dash surface, make
sure to hold the hair-dryer at
least 6-9" away from the dash.
2. Gently pull the dash mount away from the dash.
3. Apply household adhesive remover (such as
Goo-Off) for any remaining adhesive residue.
©2019 SCOSCHE INDUSTRIES, INC.
www.scosche.com/register
PARTS INCLUDED
OPTION 2
1. Wrap dental floss behind the base.
2. Gently pull the floss back and forth to slice through
the adhesive layer, until the mount is detached from
the dashboard,
3. Apply household adhesive remover (such as
Goo-Off) for any remaining adhesive residue.
MPDBASE-BP0
B
SI 300MPDBASE-BP0 5/19
Advertisement
Table of Contents

Subscribe to Our Youtube Channel
Related Manuals for Scosche MAGICMOUNT PRO MPDBASE-BP0


Summary of Contents for Scosche MAGICMOUNT PRO MPDBASE-BP0
- Page 1 2. Gently pull the floss back and forth to slice through the adhesive layer, until the mount is detached from the dashboard, 3. Apply household adhesive remover (such as Goo-Off) for any remaining adhesive residue. ©2019 SCOSCHE INDUSTRIES, INC. SI 300MPDBASE-BP0 5/19...
- Page 2 Peel the adhesive backing from the bottom of the mounting base, and place in position. Apply firm pressure. Loosen, then re-tighten the base to adjust for optimum viewing angle. For complete warranty details, please visit us at www.scosche.com or call (800) 363-4490...
Need help?
Do you have a question about the MAGICMOUNT PRO MPDBASE-BP0 and is the answer not in the manual?
Questions and answers