Advertisement
Quick Links
Register your product onllM at
� SCDSCI-IE"
MAGICGRIP
SENSE AND GRIP
WIRELESS CHARGING
READ INSTRUCTIONS COMPLETELY BEFORE
INSTALLING THIS MOUNT KIT.
WARNING: Use caution whenever removing or handling plastic parts
of any vehicle. Unnecessary force or pressure can cause pieces to
crack or break. Please use a plastic card to remove the metal plates.
Remove adhesive residue with a non-abrasive cleaner.
AIRBAG WARNING: Do not place this pad, or any other object,
on or near the airbag. In the event of deployment, objects placed
on or near airbag could cause serious injury.
NOTICE TO DRIVERS: Please check your local and state vehicle codes
regarding cell phone, GPS or portable device mounting laws and restrictions.
Alternative Scosche mounting products are available, if windshield/dash
@
mounting is prohibited in your state or locale. Scosche does not take any
responsibility for any fines, penalties, or damages that may be incurred as a
result of disregarding this notice.
IF YOU NEEO ASSISTANCE OR REPLACEMENT PARTS
CALL US
HOURS MON-FRI 8AM-5:30PM (PST}
©2019 SCOSCHE INDUSTRIES, INC.
www.scosche.com/register
™
WINDOW/DASH
MOUNT
IMPORTANT!
DO NOT RETURN PRODUCT
TO THE RETAILER
TOLL FREE:
1-800-363-4490 X1
SATURDAY 8AM-2PM (PST}
MGQDWD-CPO
SI 300MGQDWD-CP0 8/19
Advertisement

Related Manuals for Scosche MAGICGRIP MGQDWD-CPO


Summary of Contents for Scosche MAGICGRIP MGQDWD-CPO
- Page 1 GPS or portable device mounting laws and restrictions. Alternative Scosche mounting products are available, if windshield/dash mounting is prohibited in your state or locale. Scosche does not take any responsibility for any fines, penalties, or damages that may be incurred as a result of disregarding this notice.
-
Page 2: Parts Included
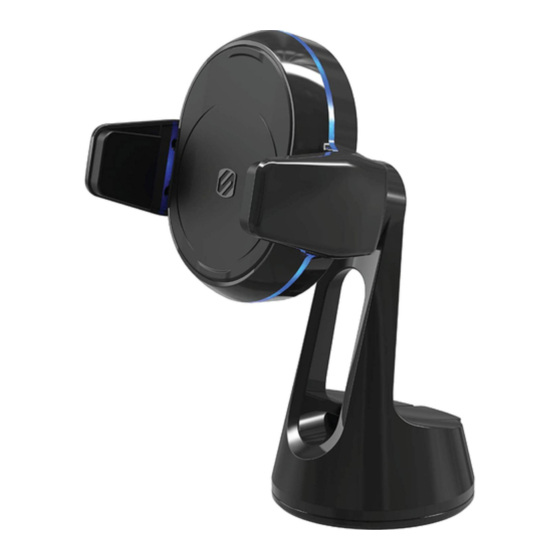
PARTS INCLUDED (1) Wireless charging mount with motorized support arms (1) Window/dash mount with suction cup base (1) Dash mount with dual 360' rotation (1) Car power adapter (1) USB-C charge cable (2) Wire clips (1) Cleaning wipe MAGICGRIP ™ CHARGING MOUNT 1a. - Page 3 SPECIFICATIONS: ™ MAGICGRIP u1· SVDC=2A, gvDC=1.67A ��tp�: 1 OW Max. V Power Adapter l npu1 : 12V Ou1pu1 : J.6-6.5VDC=3A, 6.5 - 1.lVDC--- 2A' 9-12VDC = 1.SA...
- Page 4 ™ MAGICGRIP "SENSE AND GRIP" Place your device against the charging pad as shown (A). ™ When the charging areas on the device and MAGICGRIP are aligned, the support arms will sense contact and close automatically (B). To remove the device, gently pivot the device away from the ™...
- Page 5 MAGICGRIP ™ TRANSMITTER PLACEMENT IN VEHICLES It is possible for the transmitter to interfere with some wireless systems within a car. Specifically, key fobs with immobilizers, keyless start systems or tire pressure monitors. Therefore, it is recommended to test the location of your transmitter before deciding on final placement.
- Page 6 SWITCHING MOUNTING BASE Place selected base on flat surface and hold firmly. Carefully - but firmly- push the charging mount onto base. Scan QR code for more info Questions? Need help with your Product? Call Customer Service at: (BOO} 363-4490 x1...
- Page 7 WINDOW/DASH SUCTION CUP MOUNT ™ NOTE: STICKGRIP suction cup may leave residue or discoloration on some surfaces. It may also leave a ring of residue when mounted to the dash. 1. Find a location on your dashboard/windshield that is out of your direct line of sight.
- Page 8 DASH MOUNT 1. Clean the dash surface with supplied cleaning wipe (A). Note: Wipe may cause discoloration of certain plastics, vinyls and painted surfaces. It is recommended to test in an inconspicuous area first. 2. Peel the adhesive backing from the bottom of the mounting base (8), and place in position (C).
-
Page 9: Wireless Charging
WIRELESS CHARGING Plug the magnetic mount into your vehicle's 12V socket using the included USB-C cable and 12V power adapter as shown (A&B). Optional: Attach the included adhesive clips (C) to the dash or console to secure the cable. - Page 10 LED INDICATOR & AMBIENT LIGHT SENSOR The LED indicator band around the edge of the mount (A) illuminates as shown in the chart below. The ambient light sensor (B) increases the LED's intensity in bright conditions and decreases the LED's intensity in low light conditions. .
-
Page 11: Fcc Statement
FCC STATEMENT This device complies with Part 15 of the FCC Rules. Operation is subject to the following 1wo conditions: (1) This device may not cause harmful interference, and (2) this device must accept any interference received, including interference that may cause undesired operation. - Page 12 This equipment complies with IC RSS-102 radiation exposure limits set forth for an uncontrolled environment. This transmitter must not be co-located or operating in conjunction with any other antenna or transmitter. For complete warranty details, please visit us at www.scosche.com or call (800) 363-4490...
Need help?
Do you have a question about the MAGICGRIP MGQDWD-CPO and is the answer not in the manual?
Questions and answers