
Related Manuals for Kärcher K2100PS


Summary of Contents for Kärcher K2100PS
- Page 1 K2100PS 1.106-220.0 Operator Manual Electric Pressure Washer....4 Manuel D’utilisation Laveuse à pression électrique ….…. 21 Register 9.808-310.0-A 11/21 your product www.kaercher.com/welcome...
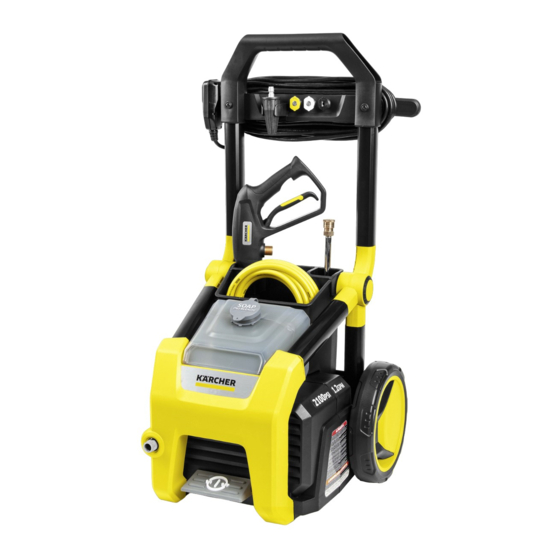
- Page 2 Machine Parts List 1. Water Inlet 2. High Pressure Outlet 3. Hose Connector 4. ON/Off Pedal 5. Power Cord Cleat 6. Nozzles 7. Turbo Nozzle 8. High Pressure Hose 9. Spray Wand 10. Spray Gun 11. Handle 12. Plug Storage 13.
-
Page 4: Table Of Contents
K2100PS Pressure Washer Contents Customer Service Customer Service ....4 Registration Safety Instructions ....5 Intended Use . -
Page 5: Safety Instructions
● Know how to stop the product and Mexico Customer Service bleed pressures quickly. Be thoroughly familiar with the controls. You can contact our Customer Service ● Stay alert - watch what you are doing. department by phone at ● Do not operate the product when 01-800-024- 13-13 or via the website fatigued or under the influence of... - Page 6 ● Inspect cord before using - Do not ● Do not use with flammable liquids use if cord is damaged. and toxic chemicals. ● Keep all connections dry and off the ● High-pressure. Keep clear of nozzle. ground. ● Injection hazard: Equipment can ●...
- Page 7 Water Supply Ground Fault Circuit (Cold Water Only) Interrupter Protection This electric pressure washer is equipped with a Ground Fault Circuit When connecting the water inlet to Interrupter (GFCI) built into the plug of the water supply mains, local the power cord for your protection. regulations of your water company The Consumer Product Safety Com- must be observed.
-
Page 8: Intended Use
Intended Use Assembly Instructions 1. Insert wheels into the body of the This high pressure washer (hereinaf- machine. Secure with axle pin. ter referred to as “device”) is designed for domestic use only. ● For cleaning machines, vehicles, buildings, tools, facades, terraces, gardening tools, etc. -
Page 9: Initial Start-Up
4. Attach nozzles to handle. Initial Start-Up 1. Thread the garden hose onto the water inlet connector and hand tighten. 5. Thread one end of the high pressure hose tightly onto the high pressure outlet on the unit. 2. Connect the garden hose to the cold water source and turn the water completely on. -
Page 10: Operation Instructions
wand and hand tightening the thread- ing of the gun onto the wand. NOTE: The actual appearance of the GFCI may be different from this illustra- 4. Pull the lever on the trigger gun to tion. make sure that water is flowing freely and that all air has been purged from Operation Instructions the device. -
Page 11: Using The Accessories
Check to make sure that Nozzle is 4. Switch off the device by releasing the secure. lever of the trigger gun. High pressure remains in the device. Using the Accessories To avoid serious injury, never point spray nozzle at yourself, other persons or animals. -
Page 12: Working With Detergents
The 15° Nozzle is optimized for concentrated Never Use: cleaning power and ● Bleach, chlorine products and other time. Use to remove corrosive chemicals paint, stains, mildew, ● Liquids containing solvents (i.e., paint oil, compacted dirt and grime from thinners, gasoline, oils) decks, siding, driveways and patios. -
Page 13: Taking A Break
2. Fill the soap tank with Kärcher Taking a Break detergent. five minutes or more 1. Release trigger and engage gun safety lock. 2. Turn pressure washer OFF by stepping on the foot pedal. 3. Turn on the pressure washer by step- ping on the foot pedal. -
Page 14: Shutting Down & Cleaning Up
4. Release trigger and engage the gun Shutting Down & safety lock. Cleaning Up 1. Turn the machine off by stepping on the foot pedal and unplug the cord from the outlet. 5. Disconnect the garden hose from the water inlet on the machine. 2. -
Page 15: Winterizing & Long Term Storage
Winterizing & Long Term Maintenance Instructions Storage 1. Disconnect all water connections. Cleaning the Water Inlet Filter 2. Turn on the machine for a few seconds, until the water which had 1. Disconnect the connector from the remained in the pump exits, turn off water inlet. -
Page 16: Cleaning Tips
Cleaning Tips House Siding (With or without detergent). Pre-rinse cleaning surface with fresh ● Before cleaning any surface an water. If using detergent, apply to inconspicuous area should be surface at low pressure. For best cleaned to test spray pattern and results, limit your work area to smaller distance for maximum cleaning sections of approximately 6sq. -
Page 17: Optional Accessories
Cars, Boats and Patio and Lawn Furniture Motorcycles (With or without detergent). Pre-rinse furniture and surrounding (With or without detergent). area with fresh water. If using Pre-rinse vehicle with fresh water. If detergent, apply to surface at low using detergent, apply to surface at pressure. -
Page 18: Troubleshooting
Troubleshooting Disconnect the unit from the power source before making any repairs. Symptom Cause Solution Power Cord not Plug in Power Cord. plugged in. Electrical Outlet does Try a different outlet. not supply adequate power. Tripped GFCI plug. Press “Reset” button on GFCI plug. Motor will not start Tripped Circuit Breaker. - Page 19 Symptom Cause Solution Pump is sucking in air. Check that hoses and fittings are air tight. Turn off machine and purge pump by squeezing trigger gun until a steady flow of water emerges through the nozzle. Output pressure Water inlet filter is Remove garden hose adapter and varies high clogged.
- Page 20 Symptom Cause Solution Pump is sucking in air. Check that hoses and fittings are air tight. Turn off machine and purge Pump is noisy pump by squeezing trigger gun until a steady flow of water emerges through the nozzle. Loose fittings. Tighten fittings.
- Page 21 THANK YOU! GRACIAS! MERCI! www.kaercher.com/welcome www.kaercher.com/service...
Need help?
Do you have a question about the K2100PS and is the answer not in the manual?
Questions and answers