
Subscribe to Our Youtube Channel
Related Manuals for Entrematic Ditec BOX


Summary of Contents for Entrematic Ditec BOX
- Page 1 IP1529EN Ditec BOX Technical Manual Balanced up and over doors (original instructions) www.ditecentrematic.com...
- Page 2 All the rights concerning this material are the exclusive property of Entrematic Group AB. Although the con- tents of this publication have been drawn up with the greatest care, Entrematic Group AB cannot be held responsible in any way for any damage caused by mistakes or omissions in this publication.
-
Page 3: Table Of Contents
Index Subject Page General safety precautions Declaration of incorporation of partly completed machinery 2.1 Machinery Directive Technical data 3.1 Operating instructions Standard installation Dimensions Main components Installation 7.1 Preliminary checks 7.2 Base plate fastening 7.3 Geared motor installation 7.4 Left geared motor installation 7.5 Manual release Electrical connections Automation closure... -
Page 4: General Safety Precautions
1. General safety precautions Failure to respect the information given in this manual may cause personal injury or damage to the device. Keep these instructions for future reference This installation manual is intended for qualified personnel only. Installation, electrical connections and adjustments must be performed by qualified person- nel, in accordance with Good Working Methods and in compliance with the current regulations. -
Page 5: Declaration Of Incorporation Of Partly Completed Machinery
The manufacturer Entrematic Group AB, with headquarters in Lodjursgatan 10, SE-261 44 Land- skrona, Sweden, declares that the automation for balanced up and over door type Ditec BOX: - is designed to be installed on a manual gate to form a machine pursuant to Directive 2006/42/ EC. -
Page 6: Technical Data
3. Technical data BOX3EH Power supply 24 V Absorption Torque 300 Nm Opening time 15÷30 s Weight 11,40 kg Service class 3 - FREQUENT Intermittence S2 = 30 min S3 = 50% Temperature min -20° C max +55° C Degree of protection IP44 IP40 (with E1HBOX) Control panel... -
Page 7: Standard Installation
4. Standard installation Ref. Code Description BOX3EH DC irreversible actuator with control panel incorporated Safety edge GOL4 Transmitter LAMP Flashing light LAMPH XEL5 Key selector GOL4M Codified via radio control keyboard XEL2 Photocells LAB4 Photocells IP55 Connect the power supply to an approved omnipolar switch with an opening distance of the contacts of at least 3mm (not supplied). -
Page 8: Dimensions
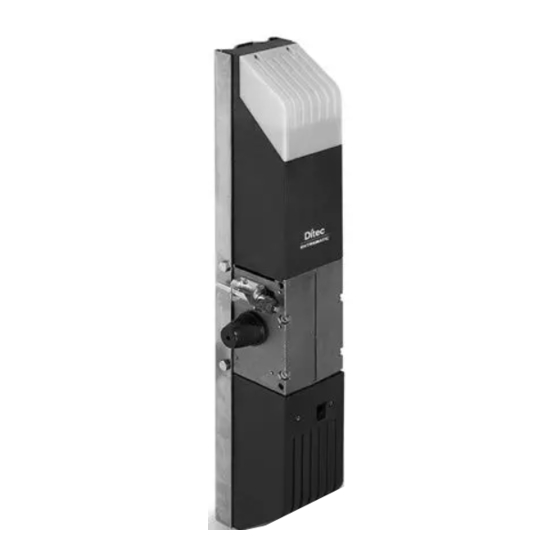
5. Dimensions 6. Main components Ref. Code Description Gearmotor Courtesy light Casing Bottom casing Manual release Gearmotor shaft Base plate BOXSL Base platee L=2500 E1HBOX BOX3EH’s control panel Control panel support Control panel casing... -
Page 9: Installation
7. Installation The given operating and performance features can only be guaranteed with the use of DITEC accessories and safety devices.Unless otherwise specified, all measurements are expressed in millimetres (mm). 7.1 Preliminary checks Check the dimensions, balancing and condition of the door, the type of installation, the use limits of the gearmotor and the necessary accessories. - Page 10 Standard balancing door Totally concealing balancing door Articulated panel balancing door...
-
Page 11: Geared Motor Installation
7.3 Geared motor installation - Fix the gearmotor to the base plate and the accessories as shown in the examples. 3400 max BoxB2D BoxB2C BoxRCG BoxRCG Box3EH BoxB2D BoxB2C BoxRL Box3EH BoxB2D BoxB2D BoxB2C BoxB2C Box3EH Box3EH... - Page 12 BoxB2D 2700 max BoxB2C BoxRL Box3EH For up and over doors with L>2700mm, it is necessary to extend the transmission shaft, using the accessories BOXA (pole) and BOXG (coupling for poles). If the arms are not long enough, use the extensions BOX2P.
- Page 13 0÷60 [1] Fix the corner-joint [A] onto the upper frame of the up and over door, in line with the motor arm. [2] If the corner-joint [A] cannot be fixed onto the upper frame of the door, respect the dimensions shown in the figure.
-
Page 14: Left Geared Motor Installation
7.4 Installing the left-hand gearmotor In the event of left-hand side assembly, it is necessary to rotate the gearmotor 180° so that the release shaft is pointing towards the centre of the up and over door. 180° Disassemble the snap ring, unthread the lever and disassemble the upper bracket. Rotate the gearmotor 180°. -
Page 15: Manual Release
7.5 Manual release To release the gearmotor from the outside, drill a Ø13 hole in the tilting door in line with the release pin A and release using the supplied key. NOTE: The gearmotor can also be released using the BoxSBC-BoxSBI accessories. For more information, refer to the relevant installation manuals. -
Page 16: Electrical Connections
8. Electrical connections Before connecting the power supply, make sure the plate data correspond to that of the mains power supply. An omnipolar disconnection switch with minimum contact gaps of 3 mm must be included in the mains supply. Check that upstream of the electrical installation there is an adequate residual current circuit breaker and a suitable overcurrent cutout. -
Page 17: Operating Instructions
Operating instructions General safety precautions for the user These precautions are an integral and essential part of the product and must be supplied to the user. Read them carefully since they contain important information on safe installation, use and maintenance. These instructions must be kept and for- warded to all possible future users of the system. - Page 18 must not be carried out by children unless they are supervised. To ensure that the system works efficiently and correctly, the manufac- turer’s indications must be complied with and only qualified personnel must perform routine maintenance on the motorised door or gate. In particular, regular checks are recommended in order to verify that the safety devices are operating correctly.
- Page 19 For more information, refer to the relevant installation manuals. Installer's stamp Operator Date of intervention Technician's signature Customer's signature Intervention performed For any problems and/or information, contact the Technical Service. Entrematic Group AB Lodjursgatan 10 SE-261 44, Landskrona Sweden www.ditecentrematic.com...
- Page 20 Entrematic Group AB Lodjursgatan 10 SE-261 44, Landskrona Sweden www.ditecentrematic.com...
Need help?
Do you have a question about the Ditec BOX and is the answer not in the manual?
Questions and answers