EDAN M3 User Manual
Vital signs monitor
Hide thumbs
Also See for M3:
- Service manual (55 pages) ,
- User manual (114 pages) ,
- Service manual (20 pages)
Table of Contents
Advertisement
EDAN Agile PLM Electronic Signature Information
--Signatures related to this document and performed in EDAN Agile PLM.
文件名称(Document Name):M3 说明书_英文
文件编号(Number):01.54.109395
版本(Version):2.5
产品型号(Product Model):M3
项目编码(Project Code):2077I000
签批信息(Signature):
作者(Originator) : 吴 孝萍 (wuxiaoping)
2019-01-16 15:28:45
审核人(Reviewers) : 史 洪华 (shihonghua)
2019-01-16 15:46:10
审核人(Reviewers) : 韦 华彪 (weihuabiao)
2019-01-16 15:53:18
审核人(Reviewers) : 王 敏 (wangmin)
2019-01-16 15:45:06
审核人(Reviewers) : 陈 艳娟 (chenyanjuan)
2019-01-16 16:30:27
审核人(Reviewers) : 王 红春 (wanghongchun)
2019-01-16 16:52:54
审核人(Reviewers) : 刘 自成 (liuzicheng)
2019-01-16 15:45:52
批准人(Approvers) : 夏 欢欢 (xiahuanhuan)
2019-01-16 17:33:59
批准人(Approvers) : 陈 浩杰 (chenhaojie)
2019-01-16 17:17:19
版权©深圳市理邦精密仪器股份有限公司 (Copyright©Edan Instrument,Inc.)
Advertisement
Table of Contents

Related Manuals for EDAN M3


Summary of Contents for EDAN M3
- Page 1 EDAN Agile PLM Electronic Signature Information --Signatures related to this document and performed in EDAN Agile PLM. 文件名称(Document Name):M3 说明书_英文 文件编号(Number):01.54.109395 版本(Version):2.5 产品型号(Product Model):M3 项目编码(Project Code):2077I000 签批信息(Signature): 作者(Originator) : 吴 孝萍 (wuxiaoping) 2019-01-16 15:28:45 审核人(Reviewers) : 史 洪华 (shihonghua) 2019-01-16 15:46:10 审核人(Reviewers) : 韦...
- Page 3 This manual will help you understand the operation and maintenance of the product better. It is reminded that the product shall be used strictly complying with this manual. User’s operation failing to comply with this manual may result in malfunction or accident for which EDAN INSTRUMENTS, INC. (hereinafter called EDAN) cannot be held liable.
- Page 4 Terms Used in this Manual This guide is designed to give key concepts on safety precautions. WARNING A WARNING label advises against certain actions or situations that could result in personal injury or death. CAUTION A CAUTION label advises against actions or situations that could damage equipment, produce inaccurate data, or invalidate a procedure.
-
Page 5: Table Of Contents
Table of Contents Chapter 1 Intended Use and Safety Guidance ................1 1.1 Intended Use/Indications for Use ................... 1 1.2 Safety Guidance ........................1 1.2.1 Environment ........................ 1 1.2.2 Power Source Requirements ..................1 1.2.3 Grounding the Monitor ....................1 1.2.4 Equipotential Grounding ..................... - Page 6 4.6 Version ..........................31 4.7 Time Setup ........................... 31 4.8 NIBP Setup ........................... 31 4.9 TEMP Setup ......................... 31 4.10 Alarm Setup ........................31 4.11 Maintain ..........................31 4.12 Data Store ........................... 35 4.13 Sleep Mode ........................36 Chapter 5 Alarm ..........................38 5.1 Alarm Modes ........................
- Page 7 8.5 Assessing the Validity of a SpO Reading ................55 8.6 SpO Alarm Delay ........................ 56 8.7 Perfusion Index (PI)* ......................56 8.8 SatSeconds Alarm Management* ..................56 8.8.1 Describing SatSeconds ....................56 8.8.2 SatSeconds “Safety Net” ................... 58 8.8.3 Setting SatSeconds Duration ..................58 8.9 Alarm ............................
- Page 8 Chapter 11 Other Functions ......................85 11.1 Nurse Call ........................... 85 11.2 Network ..........................85 11.3 Central Monitoring System ....................85 Chapter 12 Accessories ........................86 Chapter 13 Warranty and Service ....................90 13.1 Warranty ..........................90 13.2 Contact Information ......................90 Appendix A Specifications .......................
-
Page 9: Chapter 1 Intended Use And Safety Guidance
M3 Vital Signs Monitor User Manual Intended Use and Safety Guidance Chapter 1 Intended Use and Safety Guidance 1.1 Intended Use/Indications for Use The monitor is intended to be used by qualified physicians or personnel professionally trained and it is for monitoring adults, pediatrics and neonates in hospital environments. -
Page 10: Condensation
Only qualified service engineers can install this equipment. And only service engineers authorized by EDAN can open the shell. EXPLOSION HAZARD-Do not use the monitor in a flammable atmosphere where concentrations of flammable anesthetics or other materials may occur. - Page 11 Keep it away from the monitor. 17 Do not use a battery with serious scratch or deformation. 18 Only patient cable and other accessories supplied by EDAN can be used. The performance and electric shock protection cannot be guaranteed, and the patient may be injured otherwise.
- Page 12 Wireless LAN coverage area. 33 The equipment can provide protective means to prevent the patient from being burned when used with HF SURGICAL EQUIPMENT. Use only EDAN-approved accessories. 34 Without any external memory, all data measured (including trend data, review data, alarm events and so on) are cleared either when the monitor is turned off or when the monitor is powered down in the process of monitoring.
- Page 13 M3 Vital Signs Monitor User Manual Intended Use and Safety Guidance WARNING 42 The medical electrical equipment needs to be installed and put into service according to the EMC Information provided in this user manual. 43 Portable and mobile RF communications equipment can affect medical electrical equipment;...
- Page 14 If the monitor gets damp, put it in dry circumstance to dry it until it can work normally. If liquid pours on the monitor, please contact the service personnel authorized by EDAN. 10 Remove a battery whose life cycle has expired from the monitor immediately.
-
Page 15: Protecting Personal Information
Protecting personal health information is a major component of security strategy. To protect the personal information and ensure the proper device performance, the user should take necessary precautions in accordance with local laws and regulations and institution’s policies. EDAN recommends health care organizations or medical institutions to implement a comprehensive and multifaceted strategy to protect the information and systems from internal and external security threats. -
Page 16: Explanation Of Symbols On The Monitor
Ensure that the data are deleted after the patient is discharged. (Refer to Section 4.12 Data Store). Ensure that the monitor is connected only to the device authorized/approved by EDAN. Users should operate all EDAN deployed and supported monitors within EDAN authorized specifications, including EDAN approved software, software configuration, security configuration, etc. - Page 17 M3 Vital Signs Monitor User Manual Intended Use and Safety Guidance Caution Operating instructions Part Number Refer to User Manual (Background: blue; Symbol: white) Equipotential grounding Power Supply switch SERIAL NUMBER CE marking AUTHORISED REPRESENTATIVE IN THE EUROPEAN COMMUNITY Date of manufacture...
- Page 18 M3 Vital Signs Monitor User Manual Intended Use and Safety Guidance Warning (Background: yellow; Symbol and outline: black) This Way Up Fragile Keep Away From Rain Stacking Limit By Number Handle with care Do not step on Conforms to UL Std. 60601-1, IEC Std. 60601-2-30, IEC Std.
-
Page 19: Chapter 2 Installation Of Monitor
M3 Vital Signs Monitor User Manual Installation of Monitor Chapter 2 Installation of Monitor NOTE: To ensure that the monitor works properly, please read Chapter 1 Intended Use and Safety Guidance, and follow the steps before using the monitor. 2.1 Opening the Package and Checking Visually examine the package prior to unpacking. -
Page 20: Connecting Sensor To Patient
In this case, reset the system time after powering on. If the system time cannot be saved and resumes the default value after restart, contact the service department of EDAN to replace the button cell in main board. 2.4 Connecting Sensor to Patient Connect all the necessary patient sensors between the monitor and the patient. -
Page 21: Chapter 3 Introduction
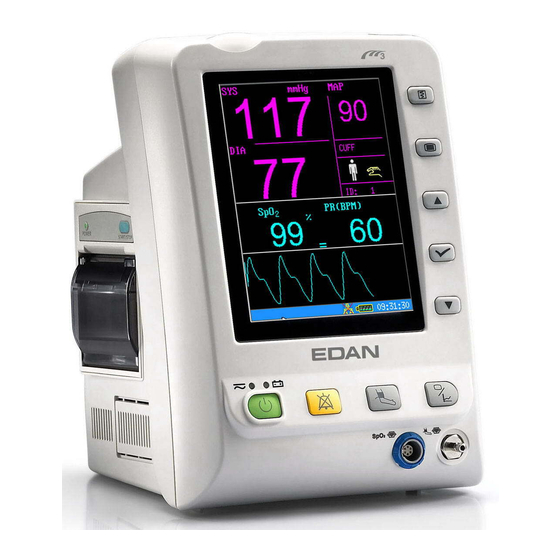
M3 Vital Signs Monitor User Manual Introduction Chapter 3 Introduction 3.1 General Information The monitor integrates the function of parameter measurement modules, display, recording and output to compose a compact, portable device. Its built-in replaceable battery provides convenience for patient movement. On the LCD display screen, SpO waveform and all the monitoring parameters can be displayed clearly. -
Page 22: Screen Display
M3 Vital Signs Monitor User Manual Introduction NIBP: Systolic Pressure (SYS); Diastolic Pressure (DIA); Mean Pressure (MAP); Pulse Rate (PR). TEMP: Temperature (TEMP) 3.2 Screen Display The monitor is equipped with LCD. The patient parameters, waveforms, alarm messages, patient ID, time, monitor status and other information can be reflected from the screen. - Page 23 M3 Vital Signs Monitor User Manual Introduction The Waveform area can display parameter trend list or alarm list. It displays as follows: ② Figure 3-3 Main Display with Alarm List The display on the screen can be changed to a trend graph as follows:...
- Page 24 M3 Vital Signs Monitor User Manual Introduction The icons on the interface and their meanings are as follows: Battery status indicator Connected to mains power supply Barcode Volume indicator Network connection indicator Network connection off Medium/Low alarm High alarm icon...
- Page 25 M3 Vital Signs Monitor User Manual Introduction Measuring oral TEMP in ADU mode Measuring axillary TEMP in ADU mode Measuring rectal TEMP in ADU mode Measuring oral TEMP in PED mode For device with the T2 or F3000 TEMP Measuring axillary TEMP in PED mode module only.
- Page 26 M3 Vital Signs Monitor User Manual Introduction NIBP: SYS, DIA, MAP (Unit: mmHg or kPa, 1 mmHg=0.133 kPa) Pulse Rate (Pulse Rate, Unit: bpm) NIBP measuring mode TEMP: Temperature (Unit: ℃ or ℉). The PR signal from SpO measuring takes priority to be displayed.
-
Page 27: Double-Parameter Mode
M3 Vital Signs Monitor User Manual Introduction 3.2.2 Double-Parameter Mode NIBP+SpO Interface Figure 3-5 NIBP as the Main Parameter Figure 3-6 SpO as the Main Parameter - 19 -... -
Page 28: Single Parameter Mode
M3 Vital Signs Monitor User Manual Introduction NIBP+TEMP Interface Figure 3-7 NIBP+TEMP Interface 3.2.3 Single Parameter Mode only measuring mode Figure 3-8 Display in SpO only Mode - 20 -... -
Page 29: Button Functions
M3 Vital Signs Monitor User Manual Introduction NIBP only measuring mode In NIBP only measuring mode, the PR from NIBP measurement is also displayed on screen. Figure 3-9 Display in NIBP only Mode 3.3 Button Functions ⑤ ⑥ ⑦ ⑧... - Page 30 M3 Vital Signs Monitor User Manual Introduction All the operations to the monitor can be finished by several buttons. When the monitor is off, press this button to switch on the ON/OFF monitor. When the monitor is on, press this button for less ①...
-
Page 31: Interfaces
M3 Vital Signs Monitor User Manual Introduction The icons on the front panel: The LED besides this icon indicates the charging status. ⑧ When the battery is being recharged, the LED is bright. CHARGE Indicator The LED besides this icon indicates the power status. - Page 32 M3 Vital Signs Monitor User Manual Introduction Right side of the monitor If the monitor has TEMP function, there will be TEMP module and thermometer outfitted on the right side. Three optional TEMP measurement modules are available: T2 module, TH module (Infrared Ear Temperature module) and F3000 module.
- Page 33 Introduction With F3000 TEMP Module: F3000 TEMP probe F3000 TEMP isolation chamber Figure 3-12 Right Panel WARNING Only connect accessories supplied or recommended by EDAN to the device. Rear Panel ④ ① ② ③ Figure 3-13 Rear Panel of M3 Sockets on the rear panel are shown in the above figure: ①...
-
Page 34: Built-In Rechargeable Battery
M3 Vital Signs Monitor User Manual Introduction ② Power supply socket: 100 V–240 V ~, 50 Hz/60 Hz. ③ Network Interface: Standard RJ45 Socket, for connecting to MFM-CMS of EDAN. ④ USB connecting port for USB storage. Bottom panel There are battery compartment and fuse box on the bottom panel. -
Page 35: Battery Status On The Main Screen
M3 Vital Signs Monitor User Manual Introduction WARNING Do not use, leave battery close to fire or other places where temperature may be above +60 ℃. Do not immerse, throw, and wet battery in water/seawater. Do not destroy the battery, do not pierce battery with a sharp object such as a needle;... -
Page 36: Replacing The Battery
M3 Vital Signs Monitor User Manual Introduction 3. Disconnect monitor from mains power and let the monitor run until there is no battery power left and the monitor shuts off. 4. The running time of the battery reflects the battery performance. -
Page 37: Chapter 4 System Menu
M3 Vital Signs Monitor User Manual System Menu Chapter 4 System Menu The monitor features in flexible configurations. You can configure various aspects of the monitor, including the parameters to be monitored, audio signal volume, and output content. Press MENU on the front panel to open SYSTEM MENU. You can perform the following operations in this menu. -
Page 38: Selection
M3 Vital Signs Monitor User Manual System Menu alarms will be disabled; medium and low technical alarms will only be indicated by turns in the information area. In the monitoring mode, audio and visual prompts for all alarms will be effective and alarms will be indicated by turns in the information area. -
Page 39: Version
Select MAINTAIN item in SYSTEM MENU to open ENTER MAINTAIN PASSWORD dialog box, in which you can enter password and then customize maintenance settings. Factory maintenance function is only available for the service engineers of EDAN or representative authorized by EDAN. - Page 40 M3 Vital Signs Monitor User Manual System Menu of EDAN. SERVER PORT: Set server port. PRES UNIT: Set the pressure unit to mmHg or kPa. TEMP UNIT: Set the temperature unit to C or℉. HOT KEY: Set the hot key to PATIENT or PRINT.
- Page 41 M3 Vital Signs Monitor User Manual System Menu WARNING This pneumatic test other than being specified in the ISO 81060-1 standard is to be used by the user to simply determine whether there are air leaks in the NIBP airway. If at the end of the test the system gives the prompt that the NIBP airway has air leaks, please contact the manufacturer for repair.
- Page 42 M3 Vital Signs Monitor User Manual System Menu 60s, 120s or 180s, then press the button on the front panel to pause audio alarm. The information area displays the remaining pause time in seconds with a yellow background. Key sounds and beat sounds keep their previous status. Auditory alarm will resume when you press the button again or the pause time terminates.
-
Page 43: Data Store
SAVE CURRENT AS USER CONFIG: Save the current setup as the user default configuration. Factory Maintain Factory maintenance function is only available for the service engineers of EDAN or representative authorized by EDAN. Calibrating NIBP NIBP is not user-calibrated. NIBP pressure transducers must be verified at least once every two years by a qualified service professional, and calibrated, if necessary. -
Page 44: Sleep Mode
M3 Vital Signs Monitor User Manual System Menu NOTE: 1. If you set the item to ON, after restarting the monitor, this item will store data automatically, otherwise you will have to manually store data. 2. If formatting is failed, try again. Restart the monitor and retry the formatting, or contact the service personnel of the manufacturer if formatting is failed repeatedly. - Page 45 M3 Vital Signs Monitor User Manual System Menu Quitting the Sleep Mode In the sleep mode, if a new signal occurs or you press any button on the front panel, the monitor will enter the working mode. NOTE: If the following situation occurs, monitor will return to normal monitoring mode automatically: The monitor receives physiological signal of SpO , and lasts for 5 s;...
-
Page 46: Chapter 5 Alarm
M3 Vital Signs Monitor User Manual Alarm Chapter 5 Alarm This chapter gives general information about the alarm and measures to be taken accordingly. Alarm setup and prompt messages are provided in respective parameter setup sections. WARNING A potential hazard can exist if different alarm presets are used for the same or similar equipment in any single area. - Page 47 M3 Vital Signs Monitor User Manual Alarm The description will display in Information area, such as “**NS TOO HIGH”, and displays beside the parameter to indicate the low-medium level alarm. Technical alarm will not prompt * signal. Alarm Level Visual Prompt...
-
Page 48: Alarm Setup
M3 Vital Signs Monitor User Manual Alarm NOTE: When alarms of different levels occur at the same time, the monitor prompts one of the highest levels. If the monitor is powered off and then turned on, the alarm setup can resume to the setup which is set before the power-off. -
Page 49: Audio Alarm Paused
M3 Vital Signs Monitor User Manual Alarm activated if the alarm is set to OFF. B. Conditions that activate the system alarms (technical alarm): Upon the system error, the monitor prompts alarm immediately. C. General alert In some circumstances, alerts will behave as physiological alarms in normal senses, we do not regard them as real patient health related items. -
Page 50: Alarm Reset
M3 Vital Signs Monitor User Manual Alarm The audio alarm is turned off, and no alarms are sounding. The visual alarm indications are still displayed. Other audible signals are not affected, including beat volume, key volume. Pressing the button again can resume the audio alarm. -
Page 51: When An Alarm Occurs
M3 Vital Signs Monitor User Manual Alarm 5.7 When an Alarm Occurs NOTE: When an alarm occurs, you should always check the patient's condition first. The alarm message appears in Information area of the screen. It is needed to identify the alarm and act appropriately, according to the cause of the alarm. -
Page 52: Chapter 6 Trend And Recording
M3 Vital Signs Monitor User Manual Trend and Recording Chapter 6 Trend and Recording In SELECTION submenu, the user can set the displayed contents to waveform, trend table or alarm list which can be printed out via RECORD. 6.1 General Information on Recording A thermal dot matrices recorder with printout paper of 48mm wide is used for the monitor. -
Page 53: Recorder Alarm Information
M3 Vital Signs Monitor User Manual Trend and Recording NOTE: Be careful when inserting paper. Avoid damaging the thermo-sensitive print head. Unless when inserting paper or shooting troubles, do not leave the recorder catch open. Removing Paper Jam When the recorder functions or sounds improperly, you should open the recorder casing to check for a paper jam. -
Page 54: Chapter 7 Maintenance/Cleaning
Maintenance shall be carried out at least once every two years, or as specified by local regulations. The following tasks are for EDAN-qualified service professionals only. Contact an EDAN-qualified service provider if your monitor needs a safety or performance test. Clean and disinfect equipment to decontaminate it before testing or maintaining it. -
Page 55: General Cleaning
M3 Vital Signs Monitor User Manual Maintenance/Cleaning Maintenance and Test Schedule Frequency Check all monitoring functions At least once every two years, or as needed. and measuring functions 7.3 General Cleaning If the device or accessory has been in contact with the patient, then cleaning and disinfection is required after every use. -
Page 56: Cleaning The Dust-Proof Filter Assembly
M3 Vital Signs Monitor User Manual Maintenance/Cleaning Wipe off residual moisture with a dry cloth. Air dry the cuff thoroughly after cleaning. Replacing the Air Bladder: After cleaning, replace the air bladder into the cuff following the steps below: Roll the bladder lengthwise and insert it into the cuff from the large opening at one end of the cuff. -
Page 57: Disinfection
NOTE: 1 The dust proof filter assembly is designed in the device, users can’t disassemble the device to clean. 2 If you need to replace the dust proof filter assembly, please contact EDAN’s service personnel. 7.4 Disinfection For devices or accessories that have been in contact mucosal surface, High Level disinfection must occur, for all other accessories, low level disinfection is appropriate. -
Page 58: Disinfecting The Monitor
M3 Vital Signs Monitor User Manual Maintenance/Cleaning Ethanol (75%) Isopropanol (70%) Cidex OPA (High level disinfection of intracavitary temperature probe only) If Ethanol or Isopropanol is used for both cleaning and disinfecting, then a new cloth is required to be used for the disinfection step. -
Page 59: Replacement Of Fuse
M3 Vital Signs Monitor User Manual Maintenance/Cleaning Take out the air bladder before disinfection. Wipe the cuff and the air bladder with a soft cloth dampened with the disinfectant solution. Leave the cuff and air bladder to air dry for at least 30 minutes. -
Page 60: Chapter 8 Spo 2 Monitoring (Optional)
Use only EDAN permitted sensors and extension cables with the monitor. Other sensors or extension cables may cause improper monitor performance and/or minor personal injury. -
Page 61: Measuring Spo
M3 Vital Signs Monitor User Manual Monitoring (Optional) A Functional tester or simulator cannot be used to assess the SpO2 accuracy. However, it can be used to demonstrate that a particular monitor reproduces a calibration curve that has been independently demonstrated to meet a particular accuracy. -
Page 62: Measurement Limitations
M3 Vital Signs Monitor User Manual Monitoring (Optional) Inspect the sensor to ensure that the light emitter and receiver are aligned with each other and there is no gap between the sensor and the finger. All the light emitted by the light emitter must pass through the patient's tissue. -
Page 63: Assessing The Validity Of A Spo Reading
M3 Vital Signs Monitor User Manual Monitoring (Optional) Move the sensor to a less active site, and keep the patient still, if possible. For Nellcor SpO module, the algorithm automatically extends the amount of data required for measuring SpO and PR depending on the measurement conditions. -
Page 64: Spo Alarm Delay
M3 Vital Signs Monitor User Manual Monitoring (Optional) 8.6 SpO Alarm Delay There is a delay between a physiological event at the measurement site and the corresponding alarm at the monitor. This delay has two components: 1. The time between the occurrence of the physiological event and when this event is represented by the displayed numerical values. - Page 65 M3 Vital Signs Monitor User Manual Monitoring (Optional) Points × Seconds = SatSeconds Where: Points = SpO percentage points outside of the limit Seconds = number of seconds that SpO remains at that point outside of the limit The alarm response time, assuming a SatSeconds limit set at 50 and a lower alarm limit set at 90, is described and illustrated below.
-
Page 66: Satseconds "Safety Net
M3 Vital Signs Monitor User Manual Monitoring (Optional) 8.8.2 SatSeconds “Safety Net” The SatSeconds “Safety Net” is for patients whose saturation makes frequent excursions below or above the SpO limit but does not remain in violation long enough for the SatSeconds limit to be reached. - Page 67 M3 Vital Signs Monitor User Manual Monitoring (Optional) Message Cause Alarm Level The signal of the measurement site is too weak due to NO PULSE insufficient blood supply and environmental factors, so High the monitor can’t detect the pulse signal.
- Page 68 M3 Vital Signs Monitor User Manual Monitoring (Optional) Alarm Message Cause What to do Level Reduce interference of Ambient light around the the ambient light and Interference sensor is too strong. avoid sensor’s exposure to strong light. Prompts: Message Cause SEARCH PULSE sensor may be disconnected from the patient or the monitor.
-
Page 69: Chapter 9 Nibp Monitoring (Optional)
M3 Vital Signs Monitor User Manual NIBP Monitoring (Optional) Chapter 9 NIBP Monitoring (Optional) 9.1 Overview This monitor uses the oscillometric method for measuring NIBP. It can be used for adult, pediatric and neonatal patients. It is also intended for use with pregnant, including pre-eclamptic patients. -
Page 70: Measurement Limitations
M3 Vital Signs Monitor User Manual NIBP Monitoring (Optional) WARNING 10 NIBP readings can be affected by the measurement site, the position of the patient, exercise, or the patient's physiologic conditions. 11 Continuous cuff pressure due to connection tubing kinking can block the blood flow, and may result in injury to the patient. -
Page 71: Nibp Monitoring
M3 Vital Signs Monitor User Manual NIBP Monitoring (Optional) Patients with obesity, where a thick layer of fat surrounding a limb dampens the oscillations coming from the artery. Patients on an edematous extremity. 9.4 NIBP Monitoring To obtain accurate measurements, the following operating steps need to be observed: 1. -
Page 72: Operation Prompts
M3 Vital Signs Monitor User Manual NIBP Monitoring (Optional) WARNING Prolonged non-invasive blood pressure measurements in automatic mode may be associated with purpura, ischemic and neuropathy in the limb wearing the cuff. When monitoring a patient, examine the extremities of the limb frequently for normal color, warmth and sensitivity. -
Page 73: Correcting The Measurement If Limb Is Not At Heart Level
M3 Vital Signs Monitor User Manual NIBP Monitoring (Optional) 4. To start a continuous measuring: Access the NIBP SETUP menu and pick the CONTINUAL item to start a continuous measurement. The continuous measurement will last 5 min. 5. To stop measuring: During measuring press the NIBP START/STOP on the front panel at any time to stop measurement. -
Page 74: Alarm Information And Prompts
M3 Vital Signs Monitor User Manual NIBP Monitoring (Optional) 10 mmHg ~ 100 mmHg 20 mmHg ~ 110 mmHg Default NIBP alarm limits: ADU (mmHg) PED (mmHg) NEO (mmHg) Lower Upper Lower Upper Lower Upper Limit Limit Limit Limit Limit... - Page 75 M3 Vital Signs Monitor User Manual NIBP Monitoring (Optional) Technical alarms: (display in the area below the NIBP value): Message Cause Alarm Level What to do Stop using measuring NIBP module failure or function of NIBP module; NIBP High COMM ERR communication failure.
- Page 76 M3 Vital Signs Monitor User Manual NIBP Monitoring (Optional) Message Cause Alarm Level What to do Measure again, if failure persists, stop using OVER Pressure has exceeded the measuring function of NIBP specified upper safety limit. module notify PRESSURE biomedical engineer manufacturer’s service staff.
-
Page 77: Chapter 10 Temp Monitoring (Optional)
10.1 TEMP Monitoring with T2 Module 10.1.1 Introduction M3 with the T2 module takes a temperature in either Predict or Monitor Mode. In the Predict mode, the monitor measures oral/axillary/rectal TEMP in a short time, calculates and gets the measuring results. In Monitor mode, it can monitor patient for 10 min. The Oral/Axillary sensor and Rectal sensor are of standard configuration. -
Page 78: Measuring Procedure
Biting the sensor tip while taking a temperature may result in damage to the sensor. Use disposable TEMP sensor covers recommended by EDAN to limit patient cross-contamination. The use of any other probe cover may produce temperature measurement errors or result in inaccurate readings. -
Page 79: Temp Setup For T2 Module
M3 Vital Signs Monitor User Manual TEMP Monitoring (Optional) For measuring oral TEMP, do not take an axillary temperature through patient’s clothing. The monitor enters PREDICT measuring mode, — — — displays in the TEMP parameter area. After Predict measuring is over, the measuring result displays, and MEASURE OVER appears on the interface. - Page 80 M3 Vital Signs Monitor User Manual TEMP Monitoring (Optional) Physiological alarms: Message Cause Alarm Level Measuring value of TEMP is above upper alarm limit. Medium TEMP HIGH Measuring value of TEMP is below lower alarm limit. Medium TEMP LOW Technical alarms:...
-
Page 81: Temp Monitoring With Th Module
The probe is disconnected from the patient. 10.2 TEMP Monitoring with TH Module 10.2.1 Introduction M3 with the TH module (Infrared Ear Temperature Module) takes a temperature in the ear. Diagram of the Infrared Ear Thermometer Batter Cover Pin Hole WARNING The infrared ear thermometer is not intended for neonatal patients. -
Page 82: Measuring Procedure
M3 Vital Signs Monitor User Manual TEMP Monitoring (Optional) WARNING Keep the probe covers away from children. Do not reuse the disposable probe covers. CAUTION Keep the probe window clean, dry, and undamaged at times to ensure accurate measurements. To protect the probe window, always keep the thermometer in the storage cover while transporting or when not in use. - Page 83 M3 Vital Signs Monitor User Manual TEMP Monitoring (Optional) Insert the probe into the probe cover on the probe cover loader until the probe cover clicks in place. NOTE: If the probe cover did not install well, the icon will flash on the LCD of the thermometer, and you cannot take the ear temperature (with four beep sounds heard and without reading on the LCD when measuring).
-
Page 84: Alarm
M3 Vital Signs Monitor User Manual TEMP Monitoring (Optional) The device must stay in stable ambient (room) temperature for 30 minutes before operation. Before the measurement, please stay in a stable environment for five minutes and avoid exercise or bath for 30 minutes. -
Page 85: Replacing The Battery
10.3 TEMP Monitoring with F3000 Module 10.3.1 General Information M3 with the F3000 module measures patient temperatures by oral, axillary or rectal means. The monitor can only measure temperature of adult and pediatric patients. If the user measure temperature of neonate patient, the monitor will not display data. -
Page 86: Safety Information
M3 Vital Signs Monitor User Manual TEMP Monitoring (Optional) 10.3.2 Safety Information WARNING Do not use this device near flammable anesthetics. Not suitable for use in the presence of flammable anesthetic mixture with air, oxygen or nitrous oxide. Do not use this thermometer without first installing a new probe cover. -
Page 87: Probe Covers -Applying & Removing
M3 Vital Signs Monitor User Manual TEMP Monitoring (Optional) measurement, please contact the manufacturer. 3. The reference body site temperature is the same as the temperature of the measuring site. 10.3.3 Probe Covers —Applying & Removing Open probe cover box by lifting tab at top corner and pulling to remove top panel. -
Page 88: Measuring Mode
M3 Vital Signs Monitor User Manual TEMP Monitoring (Optional) Once free of the latch, slide the L-shaped connector out of isolation chamber. To replace, properly align the top of the L-shaped connector to the slot on the back of the isolation chamber. - Page 89 M3 Vital Signs Monitor User Manual TEMP Monitoring (Optional) Withdraw probe and apply a probe cover. The thermometer turns on automatically and a beep will be heard when the probe completes warm-up. For Oral temperatures, insert the probe tip deep into the sublingual pocket next to the frenulum linguae, (vertical fold of tissue in middle of tongue), on one side or the other, toward the back of the mouth.
-
Page 90: Temp Setup For F3000 Module
M3 Vital Signs Monitor User Manual TEMP Monitoring (Optional) Withdraw the probe and apply a probe cover. Thermometer turns on automatically a beep will be heard when the probe completes warm-up. Apply lubrication if desired. Insert the probe into the patient’s rectum. To ensure proper tissue contact, angle the probe slightly after insertion.*... - Page 91 M3 Vital Signs Monitor User Manual TEMP Monitoring (Optional) Patient Type Measure position ALM HI ALM LO Step +43 C +33 C 0.1 C ADU/PED Oral/Axillary/Rectal (39 C by default) (36 C by default) 10.3.8.2 Alarm Information and Prompts WARNING In monitoring mode, no physiological alarms are available.
- Page 92 M3 Vital Signs Monitor User Manual TEMP Monitoring (Optional) Message Cause Alarm Level What to do Monitor mode heater thermistor unstable or Temp Error P03 out of range. Predict Mode patient Temp Error P04 thermistor unstable or out of range.
-
Page 93: Chapter 11 Other Functions
The obstacle may interfere with data transmission and even cause data loss. Use the wireless device recommended by EDAN, otherwise some exceptional situations such as frequent network disconnection may occur on the monitor. -
Page 94: Chapter 12 Accessories
M3 Vital Signs Monitor User Manual Accessories Chapter 12 Accessories You can order accessories from EDAN supplies at www.edan.com.cn or consult your local Edan representative for details. WARNING Never reuse disposable transducers, sensors, accessories and their casing that are intended for single use; or only use them on a single patient. Reuse may compromise device functionality and system performance and cause a potential hazard. - Page 95 M3 Vital Signs Monitor User Manual Accessories NELLCOR SpO 01.15.30043 Nellcor Reusable Adult SpO Sensor (DS-100A OxiMax) 01.15.40096 Nellcor Reusable Adult/Neonate SpO Sensor (OXI-A/N OxiMax) NIBP 01.57.471326 NIBP Cuff, E5, Infant, 10-15 cm, reusable 01.57.471327 NIBP Cuff, E6, Small child,13-17 cm, reusable 01.57.471328...
- Page 96 M3 Vital Signs Monitor User Manual Accessories TEMP (For TH Module) 01.13.036415 Infrared Ear Thermometer Communication Cable 01.57.208057 Infrared Ear Thermometer 01.57.208058 Probe Cover 01.57.208059 Probe Cover Loader TEMP (For F3000 Module) 01.57.471312 Filac 3000 Oral Probe 4ft 01.57.471313 Filac 3000 Oral Probe 9ft 01.22.066159...
- Page 97 M3 Vital Signs Monitor User Manual Accessories 02.04.241690 Patient monitor mounting arm assembly kit (Big basket) 83.60.261116 MT-206 Trolley (Plastic wheels) 83.60.261069 MT-206 Trolley (Metal wheels) 02.04.101976 Rolling Stand Basket (in the bottom) 02.04.243472 Patient monitor mounting arm assembly kit (Small basket) NOTE: The part name may vary depending on context, but the part number is constant.
-
Page 98: Chapter 13 Warranty And Service
EDAN will, at its discretion, repair or replace the defective part(s) free of charge. EDAN will not provide a substitute product for use when the defective product is being repaired. -
Page 99: Appendix A Specifications
M3 Vital Signs Monitor User Manual Specifications Appendix A Specifications A.1 Classification Anti-electroshock type ClassⅠequipment and internal powered equipment Anti-electroshock degree , NIBP: BF TEMP: CF (T2 module) BF (TH module, F3000 module) Ingress protection IPX1 With T2, TH or F3000 TEMP module: Ordinary... -
Page 100: Display
M3 Vital Signs Monitor User Manual Specifications When the monitor and related products have differing environmental specifications, the effective range for the combined products is that range which is common to the specifications for all products. Temperature 0 C ~ +40 C (32 ℉~104 ℉) Working With TEMP: +10 C ~ +40 C (50 ℉~104 ℉) -
Page 101: Recorder
M3 Vital Signs Monitor User Manual Specifications Working period (With a new fully charged battery, at (25 ± 2) C, continuous SpO measuring, NIBP automatic measuring mode with the operating interval of 15 minutes, automatic recording per 10 minutes) Typical Working Period 2500 mAh: 7 h;... -
Page 102: Spo
M3 Vital Signs Monitor User Manual Specifications DIA 10 mmHg ~ 215 mmHg MAP 20 mmHg ~235 mmHg PED mode SYS 40 mmHg ~230 mmHg DIA 10 mmHg ~180 mmHg MAP 20 mmHg ~195 mmHg NEO mode SYS 40 mmHg ~ 135 mmHg... - Page 103 M3 Vital Signs Monitor User Manual Specifications ☆Data update period ☆Accuracy 2% (70%~100% SpO Adult /Pediatric Undefined (0~69% SpO 3% (70%~100% SpO Neonate Undefined (0~69% SpO Measuring Range 0-10. It displays 0 for invalid PI value. Resolution Sensor Red light (6603) nm...
-
Page 104: Temp
M3 Vital Signs Monitor User Manual Specifications A.2.10 PR Measuring range Accuracy Resolution 2 bpm PR (SpO ) EDAN 25 bpm to 300 bpm 1 bpm 3 bpm (20 bpm to 250 Nellcor 20 bpm to 300 bpm 1 bpm... - Page 105 M3 Vital Signs Monitor User Manual Specifications TH Module: 34 C~ 42.2 C ☆Measuring range 10 C~ 40 C Working temperature 35.5 C~ 42 C ☆Adjustable range of alarm limits 0.1 C Resolution Response time Measuring Mode Adjusted Mode 0.2 C (0.4 ° F) (35.5 C ~42 C) (95 ° F ~107.6°F)
- Page 106 M3 Vital Signs Monitor User Manual Specifications Measuring Mode Direct Mode /Adjusted Mode ≤30 s Transient Response Time Clinical Bias (-0.2 to -0.4 )C Limits of Agreement 0.49 0.14 C Stability NOTE: The direct mode refers to monitor mode, while adjusted mode refers to predictive mode and quick predictive mode.
-
Page 107: Appendix B Emc Information - Guidance And Manufacture's Declaration
B.1 Electromagnetic Emissions Guidance and manufacture’s declaration – electromagnetic emission M3 is intended for use in the electromagnetic environment specified below. The customer or the user of M3 should assure that they are used in such an environment. Electromagnetic environment – guidance... - Page 108 M3 Vital Signs Monitor User Manual EMC Information 8 kV contact 8 kV contact Electrostatic Floors should be wood, discharge (ESD) concrete or ceramic tile. 15 kV air 15 kV air If floor are covered IEC/EN 61000-4-2...
-
Page 109: Electromagnetic Immunity
B.3 Electromagnetic Immunity Guidance and manufacture’s declaration – electromagnetic immunity M3 is intended for use in the electromagnetic environment specified below. The customer or the user of M3 should assure that they are used in such an environment. IEC/EN 60601 test... - Page 110 RF transmitters, an electromagnetic site survey should be considered. If the measured field strength in the location in which M3 is used exceeds the applicable RF compliance level above, M3 should be observed to verify normal operation.
-
Page 111: Recommended Separation Distances
M3 is intended for use in an electromagnetic environment in which radiated RF disturbances are controlled. The customer or the user of M3 can help prevent electromagnetic interference by maintaining a minimum distance between portable and mobile RF communications equipment (transmitters) and M3 as recommended below, according to the maximum output power of the communications equipment. - Page 112 M3 Vital Signs Monitor User Manual EMC Information Rated maximum Separation distance according to frequency of transmitter(m) output power of 150 kHz to 80 MHz 80 MHz to 800 MHz 800 MHz to 2.7 GHz transmitter 0.01 0.12 0.12 0.23 0.38...
-
Page 113: Appendix C Abbreviation
M3 Vital Signs Monitor User Manual Abbreviation Appendix C Abbreviation Abbr English Full Name/Description Alternating current Adult Arterial Left foot augmented lead Left arm augmented lead Right arm augmented lead Burst count Blood pressure BTPS Body temperature and pressure, saturated... - Page 114 M3 Vital Signs Monitor User Manual Abbreviation Abbr English Full Name/Description Federal Communication Commission Food and Drug Administration Fraction of inspired FiCO Fraction of inspired carbon dioxide Fraction of inspired nitrous oxide Fraction of inspired oxygen Halothane Hemoglobin Hb-CO Carbon mono-xide hemoglobin...
- Page 115 M3 Vital Signs Monitor User Manual Abbreviation Abbr English Full Name/Description Oxygen Operating room oxyCRG Oxygen cardio-respirogram Pulmonary artery PACU Post-anaesthesia care unit PAWP Pulmonary artery wedge pressure Pediatric Pleth Plethysmogram Pulse rate Premature ventricular complex Right Right arm Right atrial pressure...
Need help?
Do you have a question about the M3 and is the answer not in the manual?
Questions and answers