Vortice VORT HRI 200 FLAT IoT Instruction Booklet
Hide thumbs
Also See for VORT HRI 200 FLAT IoT:
- Instruction booklet (40 pages) ,
- Instruction booklet (48 pages)

Related Manuals for Vortice VORT HRI 200 FLAT IoT


Summary of Contents for Vortice VORT HRI 200 FLAT IoT
- Page 1 Libretto istruzioni Instructions booklet Manual de instrucciones Használati könyv VORT HRI 200 FLAT IoT VORT HRI 200 FLAT IoT H VORT HRI 350 FLAT IoT COD. 5.671.084.111 03/08/2022...
-
Page 2: Table Of Contents
Megfelelőség ......90 jelen használati utasítást. A VORTICE nem felel az Biztonság . -
Page 3: Descrizione Ed Impiego
L’apparecchio è dotato della funzione bypass termodinamico, della protezione antigelo integrata e di un modulo wifi per la connessione tramite cloud con altri dispositivi VORTICE IoT. È necessario installare i dispositivi VORTICE IoT in aree dove è presente una buona copertura del segnale wifi. Questo garantirà all’apparecchio di comunicare costantemente con il cloud e di funzionare in modo efficace, per la migliore esperienza d’uso possibile. - Page 4 Centro Assistenza VORTICE. • Se il prodotto cade o riceve forti colpi farlo verificare subito presso un Centro di Assistenza Tecnica autorizzato VORTICE. • L’apparecchio deve essere montato in modo da garantire che, in condizioni normali di funzionamento, nessuno possa venirsi a trovare in prossimità...
-
Page 5: Struttura E Dotazione
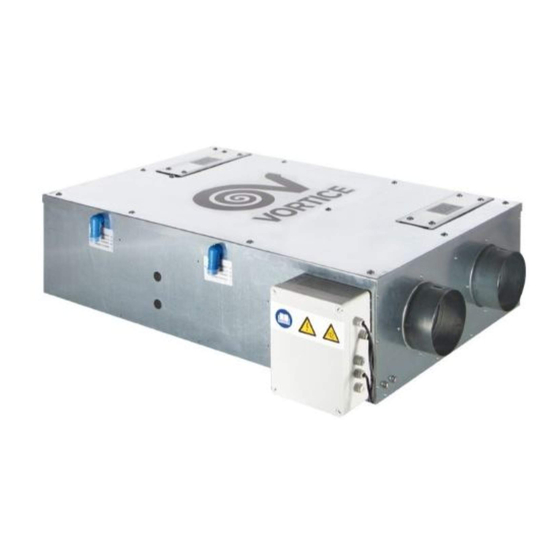
ITALIANO Struttura e Dotazione Le principali parti componenti dell’apparecchio sono: • Scocca esterna realizzata in acciaio zincato. • Scambiatore di calore, in polistirene, del tipo a flussi in controcorrente, la cui particolare morfologia garantisce un’elevatissima efficienza di scambio termico. I modelli ‘H’ sono equipaggiati con uno scambiatore entalpico, che è in grado di trasferire anche l’umidità... -
Page 6: Installazione
(H05VV-F 2x0,75) non fornito Montaggio a soffitto Sono possibili diverse modalità di montaggio: VORTICE suggerisce di applicare l’apparecchio a soffitto utilizzando le apposite staffe in dotazione (fig.5). In ogni caso dopo il montaggio accertarsi che l’apparecchio sia perfettamente in bolla, al fine di garantirne il perfetto funzionamento. - Page 7 ITALIANO ∆ h > 50 mm ≥ 60 mm Accessibilità L’apparecchio deve essere facilmente accessibile nel caso di interventi di servizio/manutenzione. In particolare il controsoffitto ospitante l’apparecchio deve prevedere una botola di ispezione di adeguate dimensioni, che renda possibile agire sullo sportello di accesso alle parti elettriche/elettroniche e ai filtri. Non sarà quindi necessaria la disinstallazione dell’apparecchio dal controsoffitto sia per le operazioni di manutenzione ordinaria (sostituzione filtri), che di alcune operazioni straordinarie (p.es.
- Page 8 ITALIANO Collegamenti elettrici: Nota: per il collegamento del preriscaldatore utilizzare un cavo H05VV-F 2x0,75 GNYE RETE RETE 220-240V ~50-60Hz PRERISC. PRERISC. 220-240V ~50/60Hz BOOST BOOST TERRA TERRA Codici colore Interruttore di rete a due poli BK= nero Preriscaldatore BU= azzurro (bobina relè...
-
Page 9: Installazione Hmi
ITALIANO Installazione HMI Insieme alla macchina è possibile ordinare le scatole di installazione per il display remoto HMI. Di seguito le scatole disponibili a seconda del modello scelto. 22462 - PSC-W Colore bianco 22732 - SCP503 da abbinare alla scatola 22732 o 22461 22463 - PSC-B Colore Nero... - Page 10 ITALIANO Collegamento cavo preheater...
-
Page 11: Utilizzo
OFF, il ventilatore di estrazione (Exh) continua a funzionare per 2 minuti alla velocità di boost per smaltire l’eventuale condensa accumulata. È possibile l’abbinamento di un pre-riscaldatore VORTICE, la cui installazione è demandata all’installatore. La distanza minima del pre-riscaldatore dall’apparecchio è di 500 mm. - Page 12 ITALIANO NOTA: Il funzionamento automatico del “By-Pass” viene disattivato quando: - la Temperatura dell’ Aria Esterna risulta inferiore ai 15°C. - è attiva la funzione di “No-Frost”. - Successivamente all’attivazione o disattivazione del bypass, l’apparecchio mantiene lo stato di bypass ‘attivo’ o ‘disattivo’ per 60 minuti, a meno che l’utente intervenga.
-
Page 13: Configurazione App
ITALIANO Configurazione App Scarica l’APP VORTICE HRU Registrazione Dopo avere scaricato la App da App Store o Google Play, prima di procedere con la configurazione, assicurarsi di essere connessi alla rete Wi-Fi di casa. 1. Aprire la App. 2. Iniziare la registrazione cliccando su “Registrati”. - Page 14 ITALIANO Configurazione 5. Cliccare su “Iniziamo”. 6. Assegnare nome sistema (ad esempio: “Casa”, “Ufficio”, ecc..) e cliccare su “Procedi”. 7. Attivare la geolocalizzazione e cliccare “consenti” per rilevare la posizione del sistema HRU. Poi cliccare su “Procedi”.
- Page 15 ITALIANO Creare il proprio ambiente Come primo passo, impostare la modalità notte e personalizzare il proprio ambiente. 8. Impostare la fascia oraria 9. Creare la propria stanza 10. Scegliere la tipologia di che coinciderà con la virtuale corrispondente ambiente tra Standard e modalità...
- Page 16 ITALIANO 13. Selezionare la rete 14. Selezionare “Continua”. 15. Inserire il nome (SSID) e VORTICE - HRU*. la password della rete alla quale si connette il recuperatore e cliccare su “Procedi”. *le tre cifre e la lettera dopo “HRU” identificano la rete in modo univoco.
-
Page 17: Funzionamento Via App
ITALIANO 18. Attendere la registrazione del recuperatore su cloud 19. Completare la registrazione di tutti i recuperatori e cliccare su “Procedi”. connessi prima di procedere all’attivazione del Sistema HRU (cliccare su “Attiva sistema”). Funzionamento via App Programmi preimpostati Tramite l’App è possibile selezionare quattro programmi: “Automatico”, “Buonanotte”, “Fuori Casa”, “Off”. Programma AUTO Programma BUONANOTTE •... - Page 18 ITALIANO • Programma “Fuori Casa” Una volta cliccato il pulsante “Fuori Casa” appare una schermata che permette di impostare il periodo di tempo dopo il quale il programma sarà disattivato (per lasciarlo sempre attivo selezionare ‘Mai’). Nota: Se l’utente si allontana almeno 500m dall’ambiente dove il sistema è...
- Page 19 ITALIANO • Programma “OFF” Il recuperatore si spegne. Nota 1 Il recuperatore si spegne anche nei seguenti casi: • Tramite il pulsante “Attivo / Disattivo” - vedere in seguito la sezione “funzionamento manuale”. • In automatico quanto interviene il controllo automatico delle temperature esterne. Vedere in seguito la descrizione della funzione.
- Page 20 ITALIANO Funzionamento Se il recuperatore sta funzionando con il programma “Fuori Casa” selezionato, si esegue il controllo degli inquinanti rilevati dal servizio di monitoraggio atmosferico ogni 15 minuti, a partire da mezzanotte (ora UTC). La scala dei valori del servizio di monitoraggio esprime la qualità dell’aria in percentuale: più è alta più l’aria è buona. Si verificano due casi: 1) Se la qualità...
- Page 21 ITALIANO Quando sono attive le modalità “Bypass” o “Nofrost” compare un punto esclamativo (!) a fianco del simbolo del recuperatore (“H”) e nella schermata del funzionamento manuale compaiono le notifiche corrispondenti: Risoluzione errori dispositivo Procedura risoluzioni problemi 1) In caso di un’eventuale guasto al sistema, un punto esclamativo (!) appare a fianco del simbolo del recuperatore (“H”). 2) Cliccando sul pulsante “notifiche”, si apre lo storico delle notifiche del sistema.
- Page 22 Guasto sensore Errore 005 Errore hardware temperatura interna Guasto sensore temperatura esterna Contattare il Servizio Assistenza Autorizzato VORTICE. Guasto sensore temperatura exhaust Guasto sensore temperatura supply Il recuperatore è in blocco. È in corso la funzione di “no-frost timeout”. Errore 006 Allarme No-Frost Aspettare un’ora e verificare che il sistema riattivi...
-
Page 23: Display Esterno Hmi
ITALIANO Dispaly esterno HMI Interfaccia utente L’interfaccia utente è composta da un display grafico e alcuni tasti, così come riportato nella figura che segue. Attraverso l’interfaccia utente è possibile eseguire le seguenti operazioni: • Selezionare la modalità di funzionamento • Regolazione Velocità •... - Page 24 ITALIANO Di seguito sono riportati alcuni esempi di schermate HOME. Bypass NoFrost Allarme! Ext -3°C Int 22°C Sup 18°C 27/03/2022 12:30 27/03/2022 12:30 Ext 5°C Accensione/spegnimento dell’apparecchio Qualora l’apparecchiatura sia spenta (spegnimento solo tramite WiFi), la pagina “HOME” visualizzerà al centro la scritta “OFF”.
- Page 25 ITALIANO Pagina “Menu uso” Per accedere al Menù utente o al Menù installatore: dalla pagina “Menù principale”, scegliere la riga “Menu uso” e premere il tasto []. Viene richiesto l’inserimento di una password per accedere al Menù utente o al Menù installatore. Le credenziali per accedervi vengono di seguito riportate: •...
- Page 26 ITALIANO Attraverso questa nuova pagina, è possibile gestire: • Setp Byp SETP BYP [ ▲ ] La modalità “By-pass” si attiva in funzione della temperatura: “Setp Byp” selezionabile in un range variabile tra 15°C e 30°C (valore di default 18°C). •...
- Page 27 ITALIANO Pagina “Menu di No Frost” Dal “Menu uso Installatore’, è possibile selezionare “No Frost’, per accedere al “Menu di No Frost”. Premendo il tasto [] appare: Condizioni di fabbrica NO FROST [ ▲ ] UN-BALAN. SI (abilitato) UN-BALAN. HEATER NO (non abilitato) HEATER Å...
- Page 28 ITALIANO Pagina “Menu di Regolazione Velocità” Dal “Menu uso Installatore’, è possibile selezionare “Velocità”, per accedere al “Menu di Regolazione Velocità”. VELOCITÀ [ ▲ ] [ ▲ ] VSUP1 VEXH1 VSUP2 VEXH2 VSUP3 VEXH3 VSUPB VEXHB In funzione delle portate d’impianto, è possibile regolare le velocità dei motori selezionando: VSUP1 = mandata aria pulita in casa (velocità...
- Page 29 ITALIANO Allarme: No Frost - Aspettare un’ora L’apparecchiatura è dotata di sonde di temperatura, che misurano le temperature dell’aria. In caso si temperature troppo basse, compare in “HOME” il “No Frost”, “Allarme!” “Blocco!” e nella pagina “Allarmi” la nota: “Antigelo Aspettare 1 ora”. Premendo il tasto [] appare: Antigelo Allarmi [ ▲...
- Page 30 ITALIANO Allarme: “Sonda Sup guasta” Un guasto del sensore della temperatura aria di mandata genera questa segnalazione. Dopo aver risolto il problema (tramite intervento dell’Assistenza Tecnica) è possibile resettare l’errore (risposta “YES” su “CALL SERVICE”). ALLARME [ ▲ ] Sonda Sup contatta assistenza Allarme: Sonda T sup (T <...
-
Page 31: Manutenzione/Pulizia
ITALIANO Pagina “Info” Dalla pagina “Menù principale”, scegliere la riga “Info” e premere il tasto []. La pagina “Info” contiene, dall’alto in basso, le seguenti informazioni: • Versione firmware interfaccia utente; • Versione firmware scheda elettronica di controllo. MENU PRIN MENU USO S: X.X Y.Y ALLARME... -
Page 32: Description And Use
(See “Use” for a more detailed description of the various functions). Remember to install VORTICE IoT devices in areas with good Wi-Fi signal coverage. This will ensure that the device constantly communicates with the cloud and works effectively for the best possible user experience. - Page 33 Ensure that only genuine original VORTICE spares are used for any repairs. • If the power supply cable is damaged, have it replaced without delay by a VORTICE authorised Technical Support Centre. • Should the appliance be dropped or suffer heavy impact, have it checked without delay by a VORTICE authorised Technical Support Centre.
-
Page 34: Items Supplied
ENGLISH individuals with disabilities. Items supplied The main parts of the appliance are: • An outer casing made using galvanised steel. • A polystyrene counter cross flow heat exchanger, whose particular morphology guarantees a very high heat exchange efficiency. H models are equipped with an enthalpy exchanger, which is also able to transfer the humidity present in the air. -
Page 35: Installation
Ceiling installation Various mounting options available: VORTICE recommends fixing the appliance to the ceiling, using the special brackets supplied (Fig.5). In any event, after mounting the appliance, check that it is perfectly level in order to ensure faultless operation. The ducts used for conveying air must be of the correct size. - Page 36 ENGLISH ∆ h > 50 mm ≥ 60 mm Accessibility The device must be easily accessible for service/maintenance work. In particular, the false ceiling housing the device must have an inspection hatch of an adequate size to allow access to the electrical/electronic parts and filters. In this way, the device will not have to be removed from the false ceiling for either routine maintenance operations (filter replacement) and some special operations (e.g.
- Page 37 ENGLISH Electrical connections: Note: use a H05VV-F 2x0.75 cable to connect the preheater. GNYE MAINS MAINS 220-240V ~50/60Hz PREH. PRERISC. 220-240V ~50-60Hz BOOST BOOST TERRA TERRA Mains 2 poles switch Preheater (bobina relè remota 220-240Vac ~50/60Hz) Dry contact (remote switch/relay ) Remote HMI...
-
Page 38: Hmi Installation
ENGLISH HMI installation Installation boxes for the HMI remote display can be ordered together with the machine. Here are the boxes available depending on the model chosen. 22462 - PSC-W white color 22732 - SCP503 to be combined with boxes 22732 or 22461 22463 - PSC-B black color to be combined... - Page 39 ENGLISH Preheater cable connection...
-
Page 40: Use
(Exh) will continue to run for 2 minutes at boost speed to dispose of any accumulated condensate. It is possible to pair use with a VORTICE preheater. This device shall be installed by an installer. The minimum distance of the pre-heater from the device is 500 mm. - Page 41 ENGLISH NOTE: Automatic “By-pass” operation is deactivated when: - The Outdoor Air Temperature is lower than 15°C. - The "No Frost" function is active. - Following activation or deactivation of the by-pass, the device maintains the by-pass status “on” or “off” for 60 minutes, unless the user intervenes.
-
Page 42: App Configuration
ENGLISH App configuration Download VORTICE HRU App Registration After downloading the App from the App Store or Google Play, before proceeding with the configuration make sure you are connected to the Wi-Fi network of the room where the heat recovery unit is installed. - Page 43 ENGLISH Configuration 5. Click “Let’s 6. Assign a name to the started started”. system (for example: “Home”, “Office”, etc.) and click on “Proceed”. 7. Activate geolocation and click “allow” to detect the location of the HRU system. Then click on “Proceed”.
- Page 44 ENGLISH Creating your own environment As a first step, set the night mode and customise your environment. 8. Set the time range that will 9. Create your own virtual 10. Choose the type of room coincide with night mode room corresponding to between Standard (silent), selecting a start...
- Page 45 ENGLISH 13. Select the VORTICE - 14. Select “Continue”. 15. Enter the name (SSID) HRU* network. and password of the network to which the recovery unit will connect and click on “Proceed”. *the three digits and the letter after “HRU” uniquely identify the network.
-
Page 46: Functioning Via App
ENGLISH 18. Wait for the recovery unit to be registered on the 19. Complete the registration of all connected recovery cloud and click on “Proceed”. units before proceeding with activation of the HRU System (click on “Activate system”). Operation via App Pre-set programs Four programs can be selected via the App: “Auto”, “Night”, “Away”, “Off”. - Page 47 ENGLISH • AWAY program Once you have clicked on the “Away” button, a screen appears that allows you to set the period of time after which the program will be deactivated (to always leave it on, select “Never”). Note: If the user moves at least 500m away from the room where the system is installed, a notification on the App will appear reminding you to activate the “Away”...
- Page 48 ENGLISH • “OFF” program The heat recovery unit switches off. Note 1 The heat recovery unit also switches off in the following cases: • By means of the "On / Off" button - see the “Manual operation” section below. • In automatic mode when automatic control of the outdoor temperatures intervenes. See the description of the function below.
- Page 49 ENGLISH The scale of values of the monitoring service expresses the air quality in percentage: the higher it is, the better the air is. Two cases can occur: 1) If the air quality is good, the operation is identical to the “Away” program. 2) If the air quality of the outside environment is polluted, the following conditions occur: •...
- Page 50 ENGLISH When the “Bypass” or “Nofrost” modes are active, an exclamation point (!) appears next to the recuperator symbol (“H”) and the corresponding notifications are displayed on the manual operation screen. Device troubleshooting Troubleshooting procedure 1) In the event of a system fault, an exclamation mark (“!”) will appear next to the the heat recovery unit symbol ("H"). 2) Click on the “notifications”...
- Page 51 Indoor temperature Error 005 Hardware error sensor failure Outdoor temperature sensor failure Contact the VORTICE S.p.A. Authorised Service Centre. Exhaust temperature sensor failure Supply temperature sensor failure The heat recovery unit is in lockout; the "no-frost timeout" function is running.
-
Page 52: Outer Display (Hmi)
ENGLISH Outer Display (HMI) User interface The user interface is used by means of a graphic display and some keys as shown in the figure below. The following operations can be performed through the user interface: • Operating mode selection. •... - Page 53 ENGLISH Some examples of the HOME screen are shown below. Bypass NoFrost Alarm! Ext -3°C Int 22°C Sup 18°C 27/03/2022 12:30 27/03/2022 12:30 Ext 5°C Equipment start-up/shut-down If the equipment is switched off (only via WiFi), the "HOME" page will display "OFF" at the centre. To switch on equipment: press the [▲] key from the "HOME"...
- Page 54 ENGLISH "Operations menu" page To access the User menu or the Installer menu: from the "Main menu," select the line "Operations menu" and press the []. key. You will be asked to enter a password to access the User menu or Installer menu. The credentials for access to them are as follows: •...
- Page 55 ENGLISH From this new page you can manage: • Setp Byp SETP BYP [ ▲ ] "Bypass" mode activates based on the temperature: “Setp Byp” is selectable in a range between 15°C and 30°C (default 18°C). • MBUS ID (Modbus ID) MBUS ID [ ▲...
- Page 56 ENGLISH “No Frost menu” page Select "No Frost" from the Installer “Use menu" to access the "No Frost Menu." Press the [] key and the following will appear: Factory default conditions NO FROST [ ▲ ] UN-BALAN. YES (enabled) UN-BALAN. HEATER NO (disabled) HEATER Å...
- Page 57 ENGLISH “Speed Adjustment Menu” page Select "Speed" from the Installer “Use menu" to access the speed adjustment menu. SPEED [ ▲ ] [ ▲ ] VSUP1 VEXH1 VSUP2 VEXH2 VSUP3 VEXH3 VSUPB VEXHB Motor speed can be adjusted depending on the system flow rates, selecting: VSUP1 = Clean air outlet inside the room (minimum speed ‘1’) VEXH1 = Stale air outlet to outside.
- Page 58 ENGLISH Alarm: No Frost - Wait one hour The device is provided with temperature probes which measure air temperature. If temperatures are too low, “No Frost”, “Alarm!” “Block!” appear on the "HOME" page and the following note appears on the "Alarm" page: “Wait 1 hour”. Press the [] appare: No frost Alarms [ ▲...
- Page 59 ENGLISH Alarm: Sup Probe fault A fault on the supply air temperature sensor generates this signal. After having resolved the problem (through Technical Service intervention), you can reset the error (answer "YES" for "CALL SERVICE"). [ ▲ ] Alarm: T sup probe (T < 5°C) A locking error message is generated if the T measured by the supply air temperature sensor falls below 5°C.
-
Page 60: Maintenance / Cleaning
ENGLISH "INFO" page Select the "Info" line and press the [] key on the "MAIN MENU" page. The “Info” page contains the following information from top to bottom: • User interface firmware version; • Electronic control board firmware version. MAIN MENU Maintenance / cleaning Before commencing any servicing operation, make sure that the appliance is disconnected from the electrical power supply. -
Page 61: Descriptión Y Uso
(consulte «Uso» para obtener una descripción más detallada de las diversas funciones). Los dispositivos VORTICE IoT deben instalarse en áreas donde haya buena cobertura de la señal WiFi. Esto garantizará que el dispositivo se comunique constantemente con la nube y funcione de manera eficaz, para la mejor experiencia posible de uso. - Page 62 • En caso de mal funcionamiento y/o avería del aparato, consultar inmediatamente con el Centro de Asistencia técnica autorizado de VORTICE y solicitar, para la reparación, el uso de repuestos originales VORTICE. • En caso de daño del cable de alimentación, sustituirlo de inmediato. Esta sustitución deberá realizarse en un Centro de Asistencia VORTICE.
-
Page 63: Esctructura Y Dotación
ESPAÑOL Estructura y Dotación Las principales partes componentes del aparato son: • Una carcasa externa de acero galvanizado • El intercambiador de calor, de poliestireno, de tipo con flujos en contracorriente, cuya morfología particular garantiza una elevada eficiencia de intercambio térmico. Los modelos H están equipados con un intercambiador de entalpía, que también es capaz de transferir la humedad presente en el aire. -
Page 64: Instalación
(H05VV-F 2x0,75) no suministrado Montaje al techo Existen diferentes posibilidades de montaje. VORTICE sugiere aplicar el aparato al techo usando los estribos específicos en dotación (fig.5). De todos modos, después del montaje asegurarse que el aparato esté perfectamente nivelado, a fin de garantizar su perfecto funcionamiento. - Page 65 ESPAÑOL ∆ h > 50 mm ≥ 60 mm Accesibilidad El acceso al aparato debe ser fácil, teniendo en cuenta las futuras intervenciones de reparación/mantenimiento. En especial, el falso techo que sujeta el aparato debe prever una trampilla de inspección con las medidas adecuadas, que permita alcanzar la puerta de acceso a las partes eléctricas/electrónicas y a los filtros.
- Page 66 ESPAÑOL Conexiones eléctricas: Nota: para conectar el precalentador utilice un cable H05VV-F 2x0,75. GNYE ALIMENTACIÓN ALIMENTACIÓN 220-240V ~50-60Hz PRECAL. PRERISC. 220-240V ~50/60Hz BOOST BOOST TERRA TERRA CÓDIGO DE COLORES Interruptor de red de 2 polos BK= negro Precalentador BU= azul (remoto 220-240Vac ~50/60Hz bobina relè) BN= marrón Contacto limpio (interruptor/ relè...
-
Page 67: Instalación De Hmi
ESPAÑOL Instalación de HMI Las cajas de instalación para la pantalla remota HMI se pueden pedir junto con la máquina. Aquí están los cuadros disponibles según el modelo elegido. 22462 - PSC-W Color blanco 22732 - SCP503 para combinar con la caja 22732 o 22461 22463 - PSC-B Colore Negro... - Page 68 ESPAÑOL Conexión cable precalentador...
-
Page 69: Uso
OFF a través de WIFI, el ventilador de extracción (Exh) continúa funcionando durante 2 minutos a velocidad de boost para eliminar la condensación acumulada. Es posible asociar un precalentador VORTICE, cuya instalación se solicitará al instalador. La distancia mínima del precalentador al aparato es de 500 mm. - Page 70 ESPAÑOL NOTA: el funcionamiento automático del «By-Pass» se desactiva cuando: - la temperatura del aire exterior es inferior a los 15°C. - está activada la función de «No-Frost». - después de la activación o desactivación del bypass, el aparato mantiene el estado de bypass 'activo' o 'inactivo' durante 60 minutos, salvo intervención del usuario.
-
Page 71: Configuración App
ESPAÑOL Configuración App Descargar VORTICE HRU App Registro Después de descargar la aplicación desde App Store o Google Play, antes de continuar con la configuración, asegúrese de estar conectado a la red Wi-Fi de casa. 1. Abrir la App 2. Iniciar registro haciendo clic en «Sign... - Page 72 ESPAÑOL Configuración 5. Hacer clic en «Let’s get 6. Asignar un nombre al sistema started» (por ejemplo: «Casa», (‘comenzamos’). «Oficina», etc.) y hacer clic en «Proceed» (‘proceder’). 7. Activar la geolocalización y hacer clic en «allow» (‘permitir’) para detectar la posición del sistema HRU.
- Page 73 ESPAÑOL Crear tu propio ambiente Como primer paso, configurar el modo noche y personalizar tu propio ambiente. 8. Establecer la franja horaria que 9. Crear tu propia habitación 10. Elegir el tipo de ambiente coincidirá con el modo noche virtual correspondiente entre Estándar y Confort (silencioso) seleccionando una...
- Page 74 ESPAÑOL 13. Seleccionar 14.Seleccionar «Continue» 15. Introducir nombre VORTICE - HRU*. (‘continúa’). (SSID) y la contraseña de la red a la que está conectada la unidad de recuperación y hacer clic «Proceed» (‘proceder’). * los tres dígitos y la letra después...
-
Page 75: Funcionamiento Vía App
ESPAÑOL 18. Esperar al registro del recuperador en la nube y 19. Completar el registro de todas las unidades de hacer clic en «Proceed» (‘proceder’). recuperación conectadas antes de proceder con la activación del Sistema HRU (hacer clic en «Activate the system», ‘Activar sistema’). - Page 76 ESPAÑOL • Program “Away” (‘Fuera de casa’) Una vez pulsado el botón «Away» (‘Fuera’), aparece una pantalla que permite configurar el periodo de tiempo tras el cual se desactivará el programa (para dejarlo siempre activo, seleccionar «never» / 'Nunca'). Nota: si el usuario se aleja de casa al menos 500 m, aparece una notificación recordándole que active el programa «Away»...
- Page 77 ESPAÑOL • Programa “OFF” (‘Apagado’) El recuperador se apaga. Nota 1 El recuperador también se apaga en los siguientes casos: • Usando el botón «Activo/Inactivo» - consulte la sección «funcionamiento manual» a continuación. • En automático cuando interviene el control automático de las temperaturas exteriores. Ver la descripción de la función a continuación.
- Page 78 ESPAÑOL La escala de los valores del servicio de monitorización expresa la calidad del aire en porcentaje: cuanto más alta es, mejor es el aire. Se pueden dar dos casos: 1) Si la calidad del aire es buena, el funcionamiento es idéntico al programa «Away / Fuera de Casa». 2) Si la calidad del aire del ambiente exterior está...
- Page 79 ESPAÑOL Cuando los modos «Bypass» o «No-frost» están activos, aparece un signo de exclamación (!) junto al símbolo del recuperador («H») y las notificaciones correspondientes se muestran en la pantalla de funcionamiento manual: Resolución de errores del dispositivo Procedimiento de resolución de problemas 1) En caso de fallo del sistema, aparece un signo de exclamación (!) junto al símbolo del recuperador («H»).
- Page 80 Error de hardware de temperatura interna Fallo del sensor de temperatura externa Póngase en contacto con el Servicio de Asistencia Autorizado VORTICE. Fallo del sensor de temperatura exhaust o de escape Fallo del sensor de temperatura supply o de suministro.
-
Page 81: Pantalla Hmi Externa
ESPAÑOL Pantalla HMI externa Interfaz usuario La interfaz de usuario se realiza mediante visor gráfico y algunas teclas, como se muestra en la figura siguiente.A través de la interfaz de usuario, es posible realizar las siguientes operaciones: • Seleccionar el modo de funcionamiento. •... - Page 82 ESPAÑOL A continuación, se recogen algunos ejemplos de pantallas de INICIO. Bypass NoFrost Alarm! Ext -3°C Int 22°C Sup 18°C Ext 5°C 27/03/2022 12:30 27/03/2022 12:30 Encendido/apagado del aparato Cuando el aparato está apagado (apagar solo a través de WiFi), la página de INICIO mostrará en el centro la palabra "OFF".
- Page 83 ESPAÑOL Página “Menú uso” Para acceder al Menú usuario o al Menú instalador: desde la página "Menú principal", elegir la línea "Menú uso" y pulsar la tecla []. Se solicita la introducción de una contraseña para acceder al Menú Usuario o al Menú Instalador. •...
- Page 84 ESPAÑOL A través de esta nueva página, es posible gestionar: SETP BYP • Setp Byp [ ▲ ] La modalidad “By-pass” se activa en función de la temperatura: “Setp Byp” seleccionable en un rango variable entre 15°C y 30°C (valor por defecto 18ºC).
- Page 85 ESPAÑOL Página “Menú de No Frost” Desde el "Menú uso Instalador", es posible seleccionar "No Frost" para acceder al "Menú de No Frost". Pulsando la tecla [] aparece: Condiciones de fábrica NO FROST [ ▲ ] UN-BALAN. SI (activado) UN-BALAN. HEATER NO (desactivado) HEATER Å...
- Page 86 ESPAÑOL Página “Menú de Regulación Velocidad” Desde el "Menú uso Instalador", es posible seleccionar "Velocidad" para acceder al "Menú de Regulación Velocidad". SPEED [ ▲ ] [ ▲ ] VSUP1 VEXH1 VSUP2 VEXH2 VSUP3 VEXH3 VSUPB VEXHB En función de los caudales de la instalación, es posible regular las velocidades de los motores seleccionando: VSUP1 = Envío de aire limpio a casa (velocità...
- Page 87 ESPAÑOL Alarma: No Frost - Esperar una hora El aparato está dotado de sondas de temperatura, que miden las temperaturas del aire. En caso de temperaturas demasiado bajas, aparece en la página de INICIO "No Frost", "¡Alarma!" “¡Bloqueo!” y en la página “Alarmas”...
- Page 88 ESPAÑOL Alarma: “Sonda Sup averiada” Un fallo del sensor de la temperatura del aire de impulsión genera este aviso. Tras haber resuelto el problema (por medio de la intervención de la Asistencia Técnica) es posible restablecer el error (respuesta «YES» en «CALL SERVICE»). [ ▲...
-
Page 89: Mantenimiento Y Limpieza
ESPAÑOL Pagina “Info” Desde la página "Menú principal", elegir la línea "Info" y pulsar la tecla []. La página "Info" contiene, de arriba a abajo, la siguiente información: • Versión firmware interfaz de usuario; • Versión firmware tarjeta electrónica de control. MAIN MENU Mantenimiento y limpieza Antes de comenzar cualquier operación, comprobar que el producto esté... -
Page 90: Leírás És Működés
érzékelővel a levegőminőség érzékelésére és egy külső légköri felügyeleti szolgáltatással (A különböző funkciók részletesebb leírásához lásd a „Használat” bekezdést). A VORTICE IoT -eszközöket olyan helyre kell telepíteni, ahol jó wifi lefedettség van. Ez biztosítja, hogy az eszköz folyamatosan kommunikáljon a felhővel és hatékonyan tudjon működni, a lehető... - Page 91 • H a tápvezeték megsérül, akkor azonnal cseréltesse ki VORTICE Kijelölt Ügyfélszolgálati Központjában bármilyen kockázat megelőzése érdekében. • Ha a termék leesik vagy erős ütés éri, akkor azonnal ellenőriztesse a VORTICE egyik kijelölt Műszaki ügyfélszolgálati Központjában. • A berendezést úgy szerelje fel, hogy az biztosítsa a normális feltételek melletti működést, senki ne kerülhessen a mozgásban vagy feszültség alatt álló...
-
Page 92: Szerkezet És Berendezések
Győződjön meg arról, hogy a csövek a teljes hosszukban alá legyenek támasztva. SZÁJAK A készülék 4 darab, 125 mm-es (VORT HRI 200 FLAT IoT / H) és 150 mm-es (VORT HRI 350 FLAT IoT) nyílással van felszerelve. Minden kimeneti nyíláson címke jelzi a légáramlás irányát. -
Page 93: Telepítés
érdekében. előmelegítő kábel (H05VV-F 2x0,75) nem tartozék Szerelés mennyezetre Eltérő szerelési módok lehetségesek: A VORTICE a szállítmánnyal kapott kengyelekkel való felszerelést javasolja mennyezeti telepítés esetén (5. ábra). Mindenesetre a szerelés után ellenőrizze, hogy a berendezés teljesen vízszintesen legyen, hogy biztosíthassa a működését. - Page 94 MAGYAR ∆ h > 50 mm ≥ 60 mm Hozzáférhetőség A berendezés legyen könnyen elérhető szerviz/karbantartás céljából. Különösen a berendezést tartó álmennyezeten legyen megfelelő méretű ellenőrző csapda, amelyen keresztül az elektromos/elektronikus részekhez és a szűrőkhöz hozzáférhet. Így nem szükséges leszerelni a berendezést az álmennyezetről a rendszeres karbantartás céljából (szűrőcsere), vagy a rendkívüli karbantartáshoz (pl.
- Page 95 MAGYAR Elektromos csatlakozások Megjegyzés: az előmelegítő csatlakozásához használja a H05VV-F 2x0,75 kábelt. GNYE HÁLÓZAT HÁLÓZAT 220-240V ~50-60Hz ELŐMELEGÍTŐ PRERISC. 220-240V ~50/60Hz BOOST BOOST TERRA TERRA Színkódok 2 pólusú hálózati megszakító BK= fekete előmelegítő (távoli relé tekercs 220-240Vac) BU= kék BN= barna Száraz érintkező...
-
Page 96: Hmi Telepítés
MAGYAR HMI telepítés A távoli kijelzőhöz tartozó telepítődobozok a géppel együtt rendelhetők. Az alábbiakban a kiválasztott modelltől függően a rendelkezésre álló dobozok láthatók. 22462 - PSC-W Fehér színű 22732 - SCP503 a 22732 vagy a 22461 dobozhoz társítva 22463 - PSC-B Fekete szín\ű... - Page 97 MAGYAR Előmelegítő kábel csatlakoztatása...
-
Page 98: Használat
WIFI-n keresztül az OFF pozíciót választja, az elszívó ventilátor (Exh) 2 percig tovább üzemel gyorsított fordulatszámon, hogy a felgyülemlett kondenzvizet elvezesse. Lehetőség van a VORTICE előmelegítő társítására, amelynek beszerelése a telepítő feladata. Az előmelegítő minimális távolsága a berendezéstől legyen legalább 500 mm. - Page 99 MAGYAR MEGJEGYZÉS: Az „elkerülő” automatikus működése kikapcsol, amikor: - a külső levegő hőmérséklete 15°C-nál alacsonyabb. - be van kapcsolva a fagyásgátló funkció. - Az elkerülő be- vagy kikapcsolása után a berendezés 60 percig fenntartja az ’bekapcsolt’ vagy ’kikapcsolt’ elkerülő állapotot, kivéve, ha a felhasználó közbelép. - A hőmérsékletérzékelők hibája esetén az elkerülő...
-
Page 100: App Konfigurálása
MAGYAR App konfigurálása Letöltés VORTICE HRU App Regisztráció Miután letöltötte az alkalmazást az App Store-ból vagy a Google Play-ből, a konfigurálás folytatása előtt győződjön meg arról, hogy csatlakozik-e az otthoni Wi-Fi hálózathoz. 1. Nyissa meg az app-ot. 2. Indítsa el a regisztrációt a „Sign Up”... - Page 101 MAGYAR Konfigurálás 5. Kattintson a „Let’s get 6. Nevezze rendszert started” (‘Kezdés’) (például: “Otthon” , “Iroda” , stb..) lehetőségre. és kattintson a „Proceed” (‘Folytatás’) gombra. 7. Kapcsolja be a helymeghatározást, és kattintson az „Allow” (‘Engedélyezés’) gombra a HRU rendszer helyének meghatározásához.
- Page 102 MAGYAR Hozzon létre saját környezetet Első lépésként, állítsa be az éjszakai módot és szabja személyre a környezetét. 8. Állítsa éjszakai 9. Hozzon létre saját virtuális szobát, 10. Válassza ki a szoba típusát a (csendes) üzemmódnak amely megfelel annak a szobának, Standard és Comfort...
- Page 103 MAGYAR 13. Válassza a VORTICE - 14. Válassza a „Continue” 15. Adja meg annak a hálózatnak a HRU* hálózatot. (‘Folytatás’) gombot. nevét (SSID) és jelszavát, amelyhez hővisszanyerő csatlakozni fog, majd kattintson a „Proceed” (‘Folytatás’) gombra. *A három számjegy és a „HRU”...
-
Page 104: Működés App-On Keresztül
MAGYAR 18. Várja meg a hővisszanyerő regisztrációját a 19. A HRU rendszer bekapcsolása előtt fejezze be az felhőben, és kattintson a „Proceed” (‘Folytatás’) összes csatlakoztatott hővisszanyerő regisztrációját gombra. (kattintson a „Activate the system’ (‘Rendszer bekapcsolása’) gombra. Működés app-on keresztül Előre beállított programok Az app-on keresztül négy program választható... - Page 105 MAGYAR • Away (Házon kívül) program Amikor a „Away’ (Házon kívül) gombra kattint, megjelenik egy képernyő, amelyen beállíthatja, hogy a program mennyi idő elteltével lesz kikapcsolva (ha mindig bekapcsolva szeretné hagyni, válassza a „Never” (Soha) lehetőséget. Megjegyzés: Ha a felhasználó legalább 500 méterre eltávolodik a háztól, megjelenik egy értesítés, amely emlékezteti a használót a “Házon kívül”...
- Page 106 MAGYAR • „OFF” program A hővisszanyerő kikapcsol. 1 megjegyzés A hővisszanyerő a következő esetekben is kikapcsol: • A “Active/Inactive’ (Be / Ki) gombbal -lásd a „Kézi működés”" című részt alább. • Automatikusan, amikor a külső hőmérséklet automatikus vezérlése bekapcsol. Lásd alább a funkció...
- Page 107 MAGYAR ellenőrzését 15 percenként, éjféltől (UTC-idő szerint) kezdődően végzi. A figyelő szolgáltatás értékeinek skálája százalékban fejezi ki a levegő minőségét: minél magasabb, annál jobb a levegő. Két eset fordul elő: 1) Ha a levegő minősége jó, a működés megegyezik a “Away’ (Házon kívül) programmal. 2) Ha a külső...
- Page 108 MAGYAR Ha az „Elkerülő” vagy a „Fagyásgátló” üzemmódok be vannak kapcsolva, a hővisszanyerő szimbóluma („H”) mellett felkiáltójel (!) jelenik meg, és a kézi működés képernyőjén a kapcsolódó értesítések jelennek meg: A berendezés hibáinak elhárítása Problémamegoldási eljárás 1) Rendszerhiba esetén a hővisszanyerő szimbóluma („H”) mellett felkiáltójel (!) jelenik meg. 2) Az ”értesítések”...
- Page 109 IoT modul kommunikációs hiba is fennáll, kapcsolja ki és újra be a hővisszanyerőt. Beltéri hőmérséklet-érzékelő Hiba 005 Hardverhiba meghibásodás Kültéri hőmérséklet-érzékelő meghibásodás Vegye fel a kapcsolatot a VORTICE hivatalos szervizközpontjával. Exhaust-hőmérséklet-érzékelő meghibásodás Supply-hőmérséklet-érzékelő meghibásodás. A hővisszanyerő blokkolva van. a Hiba 006 Fagyásgátló...
-
Page 110: Távkijelző Hmi
MAGYAR Távkijelző HMI Felhasználói interfész A felhasználói interfész grafikus kijelzővel és néhány gombbal lehetséges, az alábbi ábra szerint. A felhasználói interfészen keresztül az alábbi műveleteket hajthatja végre: • Válassza ki az üzemmódot. • Sebesség beállítása. • Hőmérséklet-szabályozás. • Riasztások kezelése. A gombok és a kijelző... - Page 111 MAGYAR Ezt követően a HOME képernyő néhány példája látható. Bypass NoFrost Alarm! Ext -3°C Int 22°C Sup 18°C 27/03/2022 12:30 27/03/2022 12:30 Ext 5°C A berendezés bekapcsolása/kikapcsolása Ha a berendezés ki van kapcsolva (kikapcsolás csak WiFi-n keresztül), akkor a „HOME” oldal közepén megjelenik a „Kikapcsolt”...
- Page 112 MAGYAR „Használat menü” oldal A Felhasználói menü vagy a T elepítő menü használatához: a „Fő menü” oldalról válassza a „Használat menü” pontot és nyomja meg a [] gombot. Ekkor adja meg a Felhasználó menübe vagy a T elepítő menübe lépéshez szükséges jelszót. A belépéshez szükséges adatok: •...
- Page 113 MAGYAR Ezzel az új oldallal a következőket kezelheti: • Setp Byp SETP BYP [ ▲ ] Az „Elkerülő” üzemmód a hőmérséklettől függően kapcsol be: „Stp Byp” 15°C és 30°C hőmérséklet között választható (alapértelmezett érték 18°C). • MBUS ID (Modbus ID) MBUS ID [ ▲...
- Page 114 MAGYAR „NO FROST” menü oldal A telepítő „használati menüből” válassz a „No frost” menüt, és lépjen a „No frost” menübe. Nyomja meg a [] gombot, és akkor megjelenik a: NO FROST [ ▲ ] Gyári beállítások UN-BALAN. UN-BALAN. IGEN (ha bekapcsolt) HEATER Å...
- Page 115 MAGYAR „Sebességszabályozás” menü oldal A telepítő „használati menüből” válassza a „Sebesség” menüt, és lépjen a „Sebességszabályozás” menübe. SPEED [ ▲ ] [ ▲ ] VSUP1 VEXH1 VSUP2 VEXH2 VSUP3 VEXH3 VSUPB VEXHB A berendezés hozamától függően állíthatja be a motorok sebességét: VSUP1 = Tiszta levegő...
- Page 116 MAGYAR Riasztás: No frost - várjon egy órát A berendezésen hőmérsékletszondák vannak, amelyek a külső hőmérsékletet mérik. T úl alacsony hőmérséklet esetén megjelenik a „HOME” oldal, a „No frost” és a „Riasztás!” „Blokk!” és a „Riasztás” oldalon a következő megjegyzés: „No frost, várjon 1 órát” Nyomja meg a [] gombot, és akkor megjelenik a: No frost Alarms [ ▲...
- Page 117 MAGYAR Riasztás: „Sup. szonda meghibásodott” A szívóág levegő hőmérsékletérzékelő meghibásodása váltja ki ezt a jelzést. A probléma elhárítása után (a Műszaki Ügyfélszolgálat segítségével), alaphelyzetbe állíthatja a rendszert („ Y ES” vagy „CALL SERVICE” válasz). [ ▲ ] Riasztás: T sup szonda (T < 5°C) Ha az előremenő...
-
Page 118: Karbantartás / Tisztítás
MAGYAR „Info” oldal A „Fő menü” oldalról válassza ki az „Info” sort és nyomja meg a [ ] gombot. Az „Info” oldalon fentről lefelé a következő információkat láthatja: • Felhasználói interfész firmware verzió. • Elektromos vezérlő kártya firmware verzió. MAIN MENU Karbantartás / tisztítás Bármilyen folyamat megkezdése előtt ellenőrizze, hogy a termék legyen leválasztva az elektromos hálózatról. - Page 119 VORTICE S.p.A. se réserve le droit d'apporter toutes les variations afin d'améliorer ses produits en cours de commercialisation. VORTICE S.p.A. behält sich vor, alle eventuellen Verbesserungsänderungen an den Produkten des Verkaufsangebots vorzunehmen. VORTICE S.p.A. se reserva el derecho a hacer cambios en los productos para su mejora en cualquier momento sin previo aviso. VORTICE S.p.A.
- Page 122 TAGLIANDO INTERVENTO IN GARANZIA CERTIFICATE OF WORK PERFORMED UNDER GUARANTEE COUPON INTERVENTION SOUS GARANTIE DATA INTERVENTO TIMBRO CENTRO ASSISTENZA DATE OF WORK - DATE INTERVENTION STAMP OF TECHNICAL ASSISTANCE CENTRE - CACHET SERVICE APRES-VENTE TAGLIANDO INTERVENTO IN GARANZIA CERTIFICATE OF WORK PERFORMED UNDER GUARANTEE COUPON INTERVENTION SOUS GARANTIE DATA INTERVENTO TIMBRO CENTRO ASSISTENZA...
- Page 123 Send the guarantee Please send the guarantee to chiusa a: in sealed envelope to: the retailer’s address in the Vortice S.p.A. Vortice Limited country where the appliance Strada Cerca 2 Beeches House has been purchased. Frazione di Zoate Eastern Avenue 20067 Tribiano Milano.
- Page 124 GARANZIA - GUARANTEE - GARANTIE DA CONSERVARE TO BE RETAINED A CONSERVER DATA ACQUISTO ANNI Purchase date - Date d’achat ATTENTION: pour béné cier de la garantie, le présent certificat doit obligatoirement accompagner l’appareil présumé défectueux. Le certificat doit porter le cachet du revendeur et la date d’achat.
Need help?
Do you have a question about the VORT HRI 200 FLAT IoT and is the answer not in the manual?
Questions and answers