Gardena A 1020 Sensor 1835 - Automatic Irrigation Set Manual
- Operating instructions manual (84 pages) ,
- Operating instructions manual (80 pages)
Advertisement
Welcome to the Garden of GARDENA
 Please read these operating instructions carefully and observe the information they contain. Use these operating instructions to familiarise yourself with the GARDENA Automatic Irrigation Set, its proper use and the notes on safety.
 For safety reasons, children under the age of 16 as people, who are not familiar with the operating instructions should not use the Automatic Irrigation Set.
→ Please keep these instructions in a safe place.
Where to use Your GARDENA Automatic Irrigation Set
Intended use:
The GARDENA Automatic Irrigation Set includes a Water Timer and a Soil Moisture Sensor. It is designed to be used solely outdoors in domestic and private gardens and in greenhouses to control sprinklers and watering systems taking into account the soil moisture level.
Please note:
It is not permitted to use the Automatic Irrigation Set for industrial or commercial applications and in conjunction with chemicals, foodstuffs, highly combustible or explosive substances.
Safety instructions
Batteries:
For reasons of operational reliability the Water Timer should only be operated with one 9 V alkaline battery type IEC 6LR61 and the Soil Moisture Sensor with two 1.5 V (alkaline) round cells type IEC LR 14.
To prevent failure of the Water Timer / Soil Moisture Sensor due to weak batteries in conjunction with a lengthy absence, batteries should be replaced in due course. This will depend on the previous operating life of the batteries and the probable length of absence, which should not exceed a year in total.
Setting up:

The Automatic Irrigation Set must not be used indoors.
→ Only use the Automatic Irrigation Set outdoors.
The Water Timer must only be set up vertically with the sleeve nut to the top to prevent water penetrating into the battery compartment.
The minimum water output to ensure that the Water Timer functions correctly is 20 l / h. For example, at least 10 x 2-litre Drip Heads are required to control the Micro-Drip-System.
The max. temperature for the water flow is 40°C.
→ Only use clear fresh water.
The minimum operating pressure is 0.5 bar, the maximum operating pressure is 12 bar.
Avoid tensile strain.
→ Do not pull the hose connected to the Water Timer.
Programming
→ Programme the Water Timer with the tap turned off. In this way you can avoid getting wet when trying out the manual On / Off function (man. On / Off). You can remove the control unit from the housing to program the Water Computer. For entering the watering data, you can remove the control panel from the casing.
Soil Moisture Sensor:
The Soil Moisture Sensor is equipped with a safety switch. If the sensor cable is damaged or the batteries flat, the Soil Moisture Sensor is not recognised by the Water Timer any more. If watering is controlled by the Soil Moisture Sensor ( ) an emergency mode is activated: watering every 24 hours with the set watering duration, max. 30 minutes.
If watering is time-controlled the programme is run without the sensor.
The spread of moisture in the soil after watering or rainfall is rather slow. In the worst-case scenario it may happen that irrigation and a rain shower overlap until the required soil moisture is attained.
Function
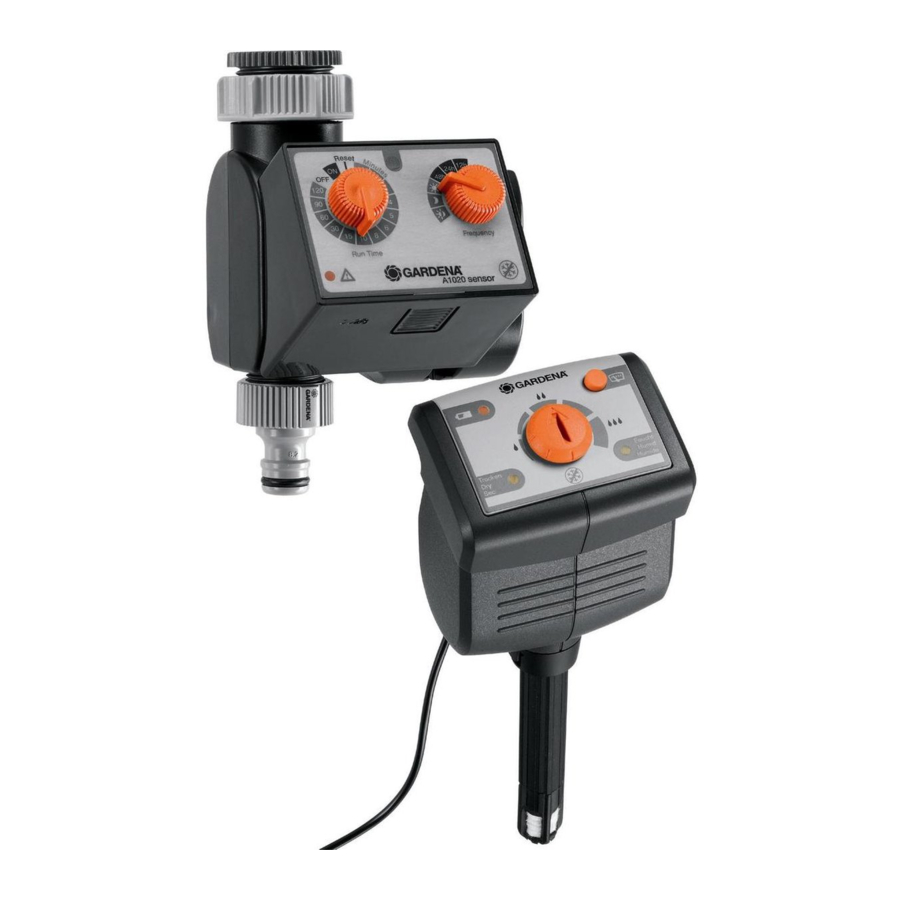
Control panel of the Soil Moisture Sensor:

The Soil Moisture Sensor measures the soil moisture at the root level of the plants. With the GARDENA Soil Moisture Sensor the soil moisture level is taken into consideration for watering. The Soil Moisture Sensor measures the soil moisture automatically approximately every 10 minutes and sends the measured results to the Water Timer.
| 1 | Indicator button: | Activates display of moisture level last measured. |
| 2 | "Dry" LED | Indicates that the Soil Moisture Sensor is measuring dry in relation to the switching controller  . . |
| 3 | "Damp" LED: | Indicates that the Soil Moisture Sensor is measuring damp in relation to the switching controller . |
| 4 | Switching controller: | Sets the soil moisture level at which watering is to take place. |
| 5 |  Battery LED: | If the battery LED flashes, the batteries have to be replaced. |
If the batteries are flat and are not replaced, the connected Water Timer will function with the watering programme selected.
→ Replace batteries (see Maintenance "Replace batteries of Soil Moisture Sensor ").
Control panel of the Water Timer:

With the GARDENA Automatic Irrigation Set you can take soil moisture into account for controlled watering. The watering time and the watering duration can be set individually.
| 6 | Run Time button: | Used to set the watering duration. |
| 7 | Frequency button: | Used to set the watering cycle. |
| 8 | Light Sensor: | day / night recognition (dependent on the lighting conditions). |
| 9 | Error LED: | Indicates that the battery is almost empty or that the Soil Moisture Sensor is not connected or not properly connected. |
If the battery is almost empty the programme is not activated any more. The valve cannot be opened manually any more.
→ Replace battery (see Maintenance "Replace battery of the Water Timer" ).
Initial Operation
Insert battery into Water Timer:
Water Timer:
→ For inserting the battery, please see Maintenance "Replace battery of the Water Timer" ).
Connect adapter cable of the Soil Moisture Sensor:


- Press unlock button
![]() and remove control panel
and remove control panel ![]() from the Water Timer.
from the Water Timer. - Insert short adapter cable in sensor connection
![]() .
. - Plug control panel
![]() onto the Water Timer again.
onto the Water Timer again.
Connecting your Water Timer to tap:

The Water Timer is fitted with a sleeve nut ![]() for taps with a 33.3 mm (G1") thread. The adapter supplied
for taps with a 33.3 mm (G1") thread. The adapter supplied ![]() allows the Water Timer to be connected to taps with a 26.5 mm (G 3 /4 ") thread.
allows the Water Timer to be connected to taps with a 26.5 mm (G 3 /4 ") thread.
- Only for taps with a 26.5 mm (G 3 /4 ") thread: Screw the adapter
![]() onto the tap by hand (do not use pliers).
onto the tap by hand (do not use pliers). - Screw the sleeve nut
![]() of the Water Timer onto the thread of the tap by hand (do not use pliers).
of the Water Timer onto the thread of the tap by hand (do not use pliers). - Screw the threaded tap connector
![]() onto the Water Timer.
onto the Water Timer.
Fit anti-theft device (optional):

To secure your Water Timer against theft, you can obtain the GARDENA anti-theft device Art. 1815-00.791.00 from GARDENA Service.
→ Screw clamp ![]() with screw
with screw ![]() firmly to the back of the Water Computer.
firmly to the back of the Water Computer.
Use clamp e.g. for fixing a chain. It is no longer possible to remove the screw after it has been screwed in.
Insert batteries into Soil Moisture Sensor:
Soil Moisture Sensor:
→ For inserting the batteries, please see Maintenance "Replace batteries of Soil Moisture Sensor" ).
Select correct location for Soil Moisture Sensor:
Correct location: The Soil Moisture Sensor must be positioned at a location in the watering area which is exposed to the same climatic conditions as the plants (sun, wind, rain, etc.).
Incorrect location: The Soil Moisture Sensor should not be covered by neighbouring plants. Areas of shade should be avoided. To rule out erroneous reaction results caused by waterlogging, the Soil Moisture Sensor should not be positioned in dips in the ground.
"Plant" Soil Moisture Sensor:

The tip of the sensor will only measure the soil moisture correctly if the sensor tip is in full contact with the ground on all sides! No air should be trapped at the sensor tip in the ground.
- Dig a funnel-shaped hole in the ground
![]() at least 12 cm deep.
at least 12 cm deep. - Break up the soil
![]() removed and take out any stones.
removed and take out any stones. - If the soil is dry, moisten.
- Replace the damp broken-up soil
![]() in the funnel-shaped hole without packing tight.
in the funnel-shaped hole without packing tight. - Immerse entire sensor tip
![]() in water (felt must be wet).
in water (felt must be wet). - Insert sensor cable (long)
![]() in the sensor socket
in the sensor socket ![]() of the Soil Moisture Sensor (on purchase this is already inserted).
of the Soil Moisture Sensor (on purchase this is already inserted). - Insert the Soil Moisture Sensor to the upper edge of the sensor
![]() in the broken-up soil
in the broken-up soil ![]() . Here the sensor tip
. Here the sensor tip ![]() must be in full contact with the damp soil on all sides.
must be in full contact with the damp soil on all sides. - Press down the soil
![]() around the sensor
around the sensor ![]() lightly.
lightly.
The Soil Moisture Sensor should not stand loose in the ground. - Water the area around the Soil Moisture Sensor with approx. 1 litre of water.
Depending on the ground it may take several hours until the Soil Moisture Sensor measures the actual soil moisture.
Connect GARDENA Micro-Drip-System:
To ensure that the quantity of water delivered is registered by the sensor tip when using the GARDENA Micro-Drip-System, a drip head must be installed directly above the sensor.
→ Fit a Supply Pipe 4.6 mm (3 /16 ") with drip head to the drip head holder ![]() of the Soil Moisture Sensor.
of the Soil Moisture Sensor.
Connect adapter cable:

- Lay the sensor cable
![]() in / on the ground so that it cannot be damaged or trip people up. The cable should be laid in the ground in a bed of sand to prevent any damage being caused by stones.
in / on the ground so that it cannot be damaged or trip people up. The cable should be laid in the ground in a bed of sand to prevent any damage being caused by stones. - Fit adapter cable (short)
![]() to sensor cable
to sensor cable ![]() (on purchase this is already fitted).
(on purchase this is already fitted).
If the sensor cable is not long enough, it can be extended with the GARDENA Extension Cable Art. 1186 (up to 105 m).
 in / on the ground so that it cannot be damaged or trip people up. The cable should be laid in the ground in a bed of sand to prevent any damage being caused by stones.
Operation
Set watering programme:
Water Timer:
To create the watering programme, the control panel can be removed from the casing by pressing the unlock button so that mobile programming is possible (see 4. Initial operation " Connect adapter cable of the Soil Moisture Sensor " ).
The watering programme is run only if the Soil Moisture Sensor reports "dry" to the Water Timer and the control panel has been properly plugged in. If the Soil Moisture Sensor reports "damp" while the programme is running, watering is stopped.
Watering controlled by Soil Moisture Sensor:

- Turn Frequency button
![]() to the desired watering cycle (e.g.
to the desired watering cycle (e.g. ![]() day).
day). day
![]()
Watering by day when the Soil Moisture Sensor reports "dry". night
![]()
Watering by night when the Soil Moisture Sensor reports "dry". day & night
![]()
Watering whenever the Soil Moisture Sensor Sensor reports "dry". - Turn Run Time button
![]() to the desired watering duration (e.g. 30 minutes). Watering starts within the set watering cycle.
to the desired watering duration (e.g. 30 minutes). Watering starts within the set watering cycle.
- Turn Run Time button


If watering is controlled by the Soil Moisture Sensor a watering break of 2 hours is activated every time water has been delivered (so, the soil moisture level can be balanced).
Example:
Watering cycle =  (day),
Watering duration = 30 minutes.
Watering is activated when the Soil Moisture Sensor reports "dry" during the day, and stops depending on the soil moisture level, but for no longer than the the set duration (in this example 30 minutes).
Time-controlled watering:

- Turn Frequency button
![]() to the desired watering cycle (e.g. 12 hours).
to the desired watering cycle (e.g. 12 hours). 12h watering every 12 hours 24h watering every day 48h watering every 2 days
 to the desired watering cycle (e.g. 12 hours).
 - Turn Run Time button
![]() to Reset to enter the watering start time (time of programming).
to Reset to enter the watering start time (time of programming). - Turn Run Time button
![]() to the desired watering duration (e.g. 15 minutes).
to the desired watering duration (e.g. 15 minutes).
Watering is activated depending on the time of programming.
Example:
Watering cycle = 12 hours,
Watering duration = 15 minutes.
Watering is activated every 12 hours (starting from the current time) if the Soil Moisture Sensor reports "dry" and stops depending on the soil moisture, but for no longer than the set duration (in this example 15 minutes).
The Run Time button  can be used also to change the watering duration of a running programme. If the new watering duration is shorter than the watering duration already passed, watering is stopped in the next minute of run time.
Manual watering:

The valve can be opened or closed manually at any time. Even a programme-controlled open valve can be closed prematurely.
Open valve manually:
→ Turn Run Time button to ON.
The valve opens and closes automatically after 30 minutes.
Close valve manually:
→ Turn Run Time button to OFF.
The valve closes.
Reset:
If the Run-Time button is turned to Reset the internal time control of the Water Timer restarts and the 2 hour watering break is reset.
Soil Moisture Sensor:
The water requirement of plants depends on many factors, e.g. type of plant, soil, sunshine, wind. To find the suitable switching point of the Soil Moisture Sensor, it has to be observed during irrigation over a period of approx. 1 – 2 weeks and re-adjusted if necessary. If the soil moisture has exceeded the switching point selected, the watering programme of the Water Timer is terminated prematurely or an outstanding irrigation process blocked.
Select presetting of switching controller:
On delivery, the switching controller is set to the centre position, which is suitable for normal non-forest soils (loamy humus).
For sandy soils the switching controller ![]() should be set slightly to the right (damper).
should be set slightly to the right (damper).
For potting soil the switching controller ![]() should be set slightly to the left (drier).
should be set slightly to the left (drier).
Set switching point of Soil Moisture Sensor:

Increase soil moisture level:
→ If the soil seems too dry for an application (type of soil or plant species), turn the switching controller  to the right towards "Damp" (e.g. with a coin).
Reduce soil moisture level:
→ If the soil seems too damp for an application (type of soil or plant species), turn the switching controller to the left towards "Dry" (e.g. with a coin).
Display soil moisture:

The soil moisture can be displayed at any time with the Soil Moisture Sensor. When the Soil Moisture Sensor shows "Damp" ![]() , watering is not carried out.
, watering is not carried out.
→ Press indicator button ![]() .
.
The soil moisture value last measured is indicated for 1 minute with the relevant LED ( "Dry" ![]() or "Damp"
or "Damp"  ).
).
During the minute in which the measured result is displayed, the switching controller can be used to find the relevant switching point by turning the switching controller until the display changes from "Dry"  to "Damp" or vice versa. If the display does not change, the ground is either very dry or very damp.
Usage:
To keep the soil moisture level as constant as possible, irrigation should be carried out with short watering cycles and short watering times. This especially applies to flower boxes on balconies, which have a watering time of < 5 min.
Storage / Overwintering:

The storage location must not be accessible to children.
- Remove batteries from the Soil Moisture Sensor and Water Timer.
- Store Water Timer and Soil Moisture Sensor in a dry place protected from frost.
Disposal:
(in accordance with RL 2002 / 96 / EC)


Return spent batteries to one of the sales outlets or dispose of batteries via your municipal recycling collection centre. Only dispose of battery once discharged.
The product must not be added to normal household waste. It must be disposed of in line with local environmental regulations.
→
Make sure that the unit is disposed of via your municipal recycling collection centre.
Maintenance
Replace battery of the Water Timer:


The Water Timer may be operated only with a 9 V alkaline battery type IEC 6LR61.
- Press unlock button
![]() and remove control panel
and remove control panel ![]() from the Water Timer.
from the Water Timer. - Insert battery
![]() in the battery compartment.
in the battery compartment.
When doing so ensure correct polarity (+ /-). - Plug control panel
![]() onto the Water Timer again.
onto the Water Timer again.
 and remove control panel
  from the Water Timer.
Test new battery:
- Open the tap.
- Turn Run-Time button
![]() to ON.
to ON.
Valve opens. - Turn Run-Time button
![]() to OFF.
to OFF.
Valve closes.
To prevent damage caused by water flowing out, ensure proper draining at the Water Timer (connect hose, place a bucket below, etc.).
Replace batteries of the Soil Moisture Sensor:

- Unlock battery cover
![]() with a coin (or large screwdriver) by turning clockwise.
with a coin (or large screwdriver) by turning clockwise. - Remove battery cover
![]() (using a screwdriver if necessary).
(using a screwdriver if necessary). - Remove battery holder
![]() and insert 2 batteries (round cells 1.5 V alkaline type IEC LR14). When doing so, ensure correct polarity (+ / -).
and insert 2 batteries (round cells 1.5 V alkaline type IEC LR14). When doing so, ensure correct polarity (+ / -). - Insert battery holder
![]() in Soil Moisture Sensor. When doing so, make sure that cables are not trapped.
in Soil Moisture Sensor. When doing so, make sure that cables are not trapped. - Insert catch lug
![]() of battery cover
of battery cover ![]() in housing slot
in housing slot ![]() and press down battery cover
and press down battery cover ![]() . When doing so, make sure that O-ring is positioned correctly.
. When doing so, make sure that O-ring is positioned correctly. - Relock battery cover
![]() with a coin (or large screwdriver) by turning anticlockwise.
with a coin (or large screwdriver) by turning anticlockwise.
 in housing slot
 Clean control panels:
The control panels should be cleaned when soiled (particularly the Light Sensor).
No caustic / abrasive cleaning agents should be used.
→ Clean control panel with a damp cloth (do not use solvent).
Clean / replace sensor tip:

Whenever the Soil Moisture Sensor is relocated, the sensor tip should be cleaned / replaced. The felt on the tip should not come into contact with grease.
→ Clean sensor tip  with clear water.
If the felt becomes damaged, the sensor tip can be re-ordered from GARDENA Service.
→ Unscrew sensor tip and screw on new tip.
Clean dirt filter:

The dirt filter should be controlled regularly and cleaned if necessary.
- Unscrew sleeve nut
![]() of the Water Timer manually from the thread of the tap (do not use pliers).
of the Water Timer manually from the thread of the tap (do not use pliers). - Remove dirt filter of the sleeve nut and clean it.
- Screw sleeve nut
![]() of the Water Timer onto thread of the tap again manually (do not use pliers).
of the Water Timer onto thread of the tap again manually (do not use pliers).
 of the Water Timer manually from the thread of the tap (do not use pliers).
Troubleshooting
| Fault | Possible cause | Remedy |
Manual watering not possible | Water tap is closed. | → Open tap. |
| Battery of the Water Timer spent / inserted incorrectly / wrong battery used. | → Replace battery of the Water Timer / insert correctly / use alkaline battery. | |
| Watering is not switched on although soil is dry | Soil Moisture Sensor is in a dip in the ground. | → Reposition Soil Moisture Sensor at correct location (see 4. Initial Operation "Select correct location for Soil Moisture Sensor" ). |
| Switching controller too far to the left on "Dry". | → Turn switching controller to the right accordingly. | |
| Battery of the Water Timer spent / inserted incorrectly / wrong battery used. | → Replace battery of the Water Timer / insert correctly / use alkaline battery. | |
| Two-hour pause in irrigation after irrigation controlled by Soil Moisture Sensor. | → Increase watering time so that watering is only required every 2 hrs. | |
Watering is not switched on although soil is dry | Valve has been closed manually. | → Turn Run Time button to a watering duration. |
| The control panel has not been inserted correctly. | → Insert control panel correctly. | |
Watering is switched on although soil is damp | Soil Moisture Sensor not positioned in watering area. | → Position Soil Moisture Sensor in watering area. |
| Switching controller too far to the right on "Damp". | → Turn switching controller to the left accordingly. | |
| Defective or loose sensor cable. | → Check sensor cable and connections. | |
| Air trapped at sensor tip. | → Remove trapped air (see Initial Operation " "Plant" Soil Moisture Sensor " ). | |
| Automatic Irrigation Set does not close | Minimum flow rate below below 20 l / h. | → Connect more drip heads. |
Battery display of Soil Moisture Sensor flashing | Batteries of Soil Moisture Sensor spent / inserted incorrectly / wrong batteries used. | → Replace batteries ofSoil Moisture Sensor / insert correctly / use alkaline batteries. |
| Soil Moisture Sensor defective. | → Contact GARDENA Service. | |
Error indicator of Water Timer flashing | Batteries of Soil Moisture Sensor spent / inserted incorrectly / wrong battery used. | → Replace batteries of Soil - Moisture Sensor / insert correctly / use alkaline battery. |
| Batteries of Soil Moisture Sensor are flat. | → Replace batteries of Soil Moisture Sensor. | |
| Cable of Soil Moisture Sensor defective. | → Replace cable of Soil Moisture Sensor. | |
| Defective or loose sensor cable. | → Check sensor cable and connections. |
In the event of other faults please contact GARDENA Service. A Repairs should only be carried out by GARDENA service centres or dealers authorised by GARDENA.
Accessories
| GARDENA Extension Cable (length: 10 metres) | Used to extend sensor cable to max. 105 metres. | Art. 1186 |
| GARDENA sensor tip with felt | For replacement of damaged sensor tip. | Obtainable via GARDENA Service |
Technical Data
| A 1020 Sensor (Art. 1835) | |
| Water Timer | |
| Min. / max. operating pressure: | 0.5 bar / 12 bar |
| Minimum flow rate: | 20 l / h |
| Max. liquid temperature: | 40°C |
| Temperature: | 5 – 60°C |
| Programme-controlled watering durations: | 1, 2, 3, 4, 5, 6, 8, 10, 15, 30, 60, 90, 120 minutes |
| Brightness-controlled watering cycles: | by day, by night, permanently |
| Programme-controlled watering cycles: | every 12 hours, every 24 hours, every 48 hours |
| Battery: | 1 × Typ IEC 6LR61 (9 V alkaline 500 mAh) |
| Operating life of battery: | approx. 1 year (with alkaline battery) |
| Soil Moisture Sensor | |
| Sensor cable: | 5 m |
| Adapter cable: | 20 cm |
| Temperature range: | 5 – 60°C |
| Batteries: | 2 x round cells type IEC LR14 (1.5 V alkaline 7.8 Ah) |
| Operating life of batteries: | approx. 1 year (with alkaline battery) |
Service / Warranty
Warranty
GARDENA guarantees this product for 2 years (from date of purchase). This guarantee covers all serious defects of the unit that can be proved to be material or manufacturing faults. Under warranty we will either replace the unit or repair it free of charge if the following conditions apply:
- The unit must have been handled properly and in keeping with the requirements of the operating instructions.
- Neither the purchaser or a non-authorised third party have attempted to repair the unit.
As a wear part the sensor tip with felt is not covered by the guarantee. This manufacturer's guarantee does not affect the user's existing warranty claims against the dealer / seller. If a fault occurs with your Automatic Irrigation Set, please return the faulty unit together with a copy of the receipt and a description of the fault, with postage paid to one of the GARDENA Service Centres listed on the back of these operating instructions.

Documents / ResourcesDownload manual
Here you can download full pdf version of manual, it may contain additional safety instructions, warranty information, FCC rules, etc.
Download Gardena A 1020 Sensor 1835 - Automatic Irrigation Set Manual
Advertisement


Need help?
Do you have a question about the A 1020 Sensor 1835 and is the answer not in the manual?
Questions and answers