Gardena C 1030 Plus Water Computer Manual
- Operating instructions manual (15 pages) ,
- Operating instructions manual (15 pages) ,
- Operating instructions manual (24 pages)
Advertisement
- 1 Notes on these Operating Instructions
- 2 Proper Use
- 3 Technical Data
- 4 How the Water Computer Works
- 5 Summary of Operating Instructions
- 6 Function Keys / Display of the Water Computer
- 7 Preparations for Use
- 8 Programming Your Water Computer
- 9 Read/Change Program
- 10 Manual Program-Independent man On/Off Operation
- 11 Battery
- 12 Notes on Safety and Operation
- 13 Options
- 14 Faults
- 15 Documents / Resources
Notes on these Operating Instructions
Please read these operating instructions carefully and observe the notes given. Use these operating instructions to familiarise yourself with the Water Computer, the unit's features and proper use as well as with the notes on safety.
 For safety reasons children and young people under 16 and anyone who is not familiar with these operating instructions may not use the Water Computer.
Keep these operating instructions in a safe place.
Proper Use
The GARDENA Water Computer Plus C 1030 is suitable and determinated for private use in domestic and hobby gardens, exclusively for outdoor use, to control sprinklers and watering systems.
The Water Computer must not be used for industrial purposes or in conjunction with chemicals, foodstuffs, easily flammable and explosive materials.
Compliance with the operating instructions provided by the manufacturer is a prerequisite for proper use of the GARDENA Water Computer.
The operating instructions also contain operating, servicing and maintenance conditions.
Technical Data
| Operating pressure: | 0,5-12 bar |
| Minimum flow rate: | 20 l/h |
| Flow medium: | clean fresh water |
| Max. water temperature: | 40°C |
| Number of program-controlled watering cycles per day: | up to 3 |
| Watering cycles per week: | every day, every 2nd, 3rd or 7th day |
| Watering time per program: | 1 min. to 7 hrs 59 mins. |
| Battery: | 1 x 9 V alkali-manganese (alkaline) type IEC 6LR61 |
| Service life of the battery: | approx. 1 year |
How the Water Computer Works
Your GARDENA Water Computer allows you to water your garden completely automatically any time you choose up to 3 times a day, whether you are using a sprinkler, a sprinkler system installation or a drip-head watering system.
Your Water Computer waters your garden completely automatically according to the program you choose. You can use your Water Computer to water your garden early in the morning or late at night when water evaporates the least or when you are on holiday.
You simply program the watering start, watering time and watering day(s) or cycles.
Summary of Operating Instructions
Inserting the Battery
Only use a 9 V alkali-manganese (alkaline) battery type IEC 6LR61. Observe the polarity (+/– markings).
Programming the Water Computer
Select the individual program steps in succession using the Menu/O.K. key.
You can change the program data using the On/Off ▲ key.
The main display (time) can be accessed using the Menu/O.K. key.
Entering the Time and Day of the Week
- Time – hours
- Time – minutes
- Day of the week
Entering the Watering Data
- Starting time – hours
- Starting time – minutes
- Watering time – hours
- Watering time – minutes
- Watering cycle
On/Off-Prog
Off: The watering program is switched off (e.g. during a rainy spell)
On: The watering program is switched on (normal operation)
Manual On/Off Operation
Press the On/Off key once to open the valve and press again to close it.
The opening time is pre-set at the factory to 30 minutes and cannot be changed!
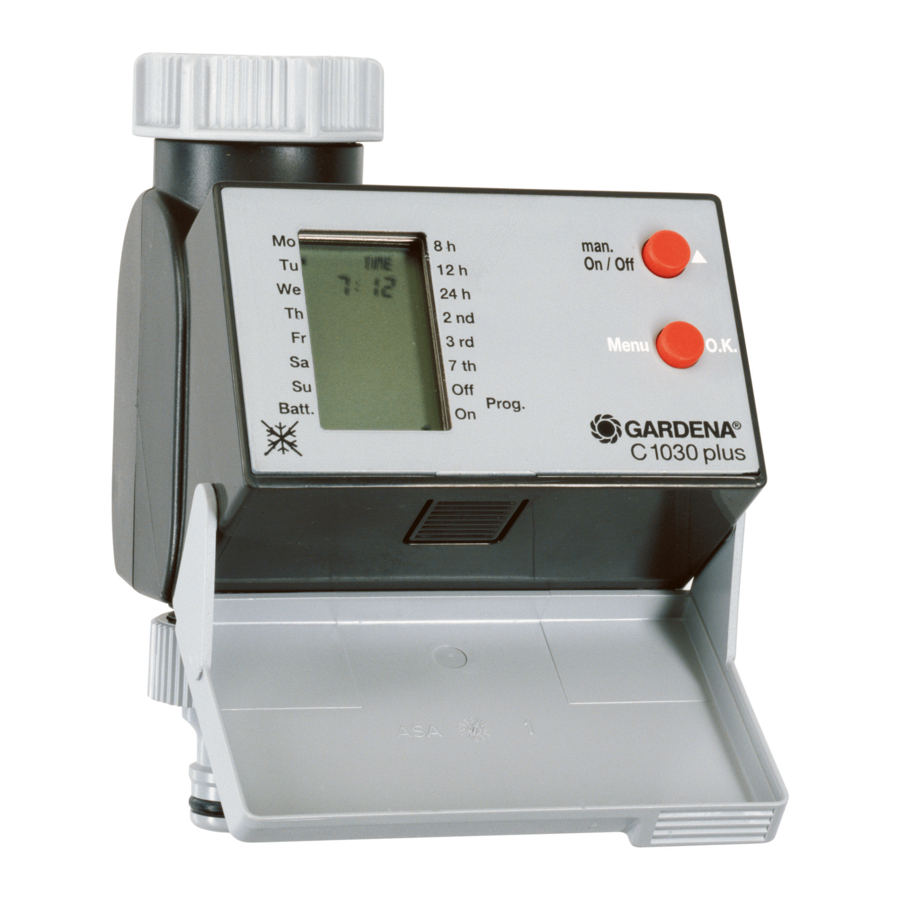
Function Keys / Display of the Water Computer
Function Keys

- man On/Off ▲
To change the individual data you have entered (e.g. hours, minutes, days etc.); to quickly run through the data, press and hold the key down. - Menu O.K.
To move to the next step of the program and simultaneously accept and confirm data you have set using the On/Off key.
LCD Display
Note: In the entry mode the respective data flashes.
- TIME (current data: time, day of the week)
| Hours | Hours of the current time. |
| Minutes | Minutes of the current time. |
| Seconds | Dots between the hours and minutes flash when you have entered or changed the current time (hour/minute/ day of the week). |
| Day (Mo, Tu, etc.) | Indicates the current day of the week (date/time). |
- START TIME (Watering Starting Time)
| Hours | Hour for the watering starting time. |
| Minutes | Minute for the watering starting time. |
| Seconds | Dots between the hours and minutes flash during automatic watering. |
- RUN TIME (Watering Time)
| Hours | Hours for the watering time. |
| Minutes | Minutes for the watering time. |
- Watering Cycles
Shows the watering cycles you set in the program mode: every 8, 12, 24 hours, or every 2, 3, 7 days.
- On/Off-Prog
Status indicator:
Off No watering (e.g. during a rainy spell).
On Watering programs are run.
- Batt.
Flashes when the battery power is too low. Change the battery!
Other Features
- Release button
To release the control unit.

- Connection
For GARDENA Soil Moisture Sensor (Art. Nº 1188) and GARDENA Rain Sensor (Art. Nº 1189). - Battery compartment
To insert a 9 V battery in the back of the control unit. - Connection socket
Socket to connect the control unit. - Sleeve nut incl. filter
To connect the water computer to the tap.

Accompanying Accessories
- G ¾ Adapter for sleeve nut
To connect the water computer to taps with a G ¾ thread. - GARDENA threaded tap connector
Fits GARDENA System hose connectors.
Option
- Anti-theft protection
With special one-way screw and bracket. Available from GARDENA Service.


Other Products Which can be Connected
Fig. E: GARDENA Soil Moisture Sensor (Art. No. 1188)

Fig. F: GARDENA Rain Sensor (Art. No. 1189)

Fig. G: GARDENA Automatic Water Distributor (Art. No. 1198)
")
Preparations for Use
Inserting the battery
Only use a 9 V alkali-manganese (alkaline) battery type IEC 6LR61.
Observe the +/– markings.
When using the Water Computer for the first time all LCD symbols light up for 2 seconds when the battery is inserted (Fig. 1).

Fig. 1 All LCD symbols
The unit is then ready for data input (Fig. 2).

Fig. 2 Unit ready for data input
Connecting to the Tap
The Water Computer is fitted with a sleeve nut for taps with 33.3 mm (G1) thread.
Adaptor for G¾ thread (26.5 mm)
The adaptor supplied allows the Water Computer to be connected to taps with a G¾ thread (26.5 mm). If you are using the adaptor, screw the adaptor onto the tap before screwing the Water Computer onto the adaptor.

Attach and screw on manually. Do not use pliers!
Checking the New Battery
To check the new battery, turn on the tap and set the Water Computer to On (valve opens) and then shortly afterwards to Off (valve closes). If the battery capacity is too low a warning tone which beeps at intervals will sound.
To ensure that the water does not cause any damage make sure that the water flow is directed away from the Water Computer (connect hose, stand a bucket underneath, etc.).
If the battery symbol does not appear, the battery has sufficient power and your water computer is now ready for use.
Programming Your Water Computer

You can remove the control unit from the housing using the release button  as shown in Fig. B and program your computer somewhere other than where it is to be used, i.e. away from the tap.

Entering the Current Data (Time/Day)
- Press Menu/O.K. 1 second. The hours (TIME) flash.
- Enter the hours using On/Off ▲, e.g. 17:00.
- Press Menu/O.K. to allow you to enter the minutes.
![]()
Range: 0-23
- Enter the minutes using On/Off ▲, e.g. 23; press Menu/O.K. to allow you to enter the weekday.
Monday (Mo) is followed by Tuesday (Tu) etc.
![]()
- Enter the weekday using On/Off ▲, e.g. Fr for Friday.
![]()
- Press Menu/O.K. to confirm the entered data and to move to START TIME (hour setting).


Entering the Watering Data (Starting Time, Watering Time, Days)
- Set the hour for the starting time (START TIME) using On/Off ▲, e.g. 21.
Confirm the data you have entered and move to the minutes for the starting time (START TIME) using Menu/O.K.
![]()
Range: 0-23
- Enter the minutes for the starting timeusing On/Off ▲, e.g. 30.
Confirm the data you have entered and move to the watering time (hour) using Menu/O.K.
![]()
Range: 00 - 59
- Enter the hours for the watering time (RUN TIME) using On/Off ▲, e.g. 0 hours.
Confirm the data you have entered and move to the watering time (minutes) using Menu/O.K.
![]()
Range: 0 - 7
- Enter the minutes for the watering time using On/Off ▲, e.g. 15 minutes.
Confirm the data you have entered and move to the watering cycle using Menu/O.K.
![]()
Range: 00 - 59 The maximum watering time you can set is 7 hours and 59 minutes.


Setting the Water Cycles
- Enter the watering cycles using On/Off ▲, e.g. watering every 24 hours (24 h).
- Confirm the data you have entered and move to On/Off-Prog. using Menu/O.K.
![]()
You can set the watering for every 8, 12, 24 hours (8 h, 12 h, 24 h), or every 2, 3 or 7 days (2nd, 3rd, 7th).

On/Off-Prog.
You can activate or deactivate the watering program using On/Off-Prog.
- Choose the setting using On/Off ▲:
Off = Automatic watering is turned off, e.g. during a rainy spell.
On = Watering programs are run.
![]()
- Confirm the data you have entered and move back the normal display screen using Menu/O.K.
You have completed the programming.
The dots between the hours and minutes flash when you have finished programming the computer, the clock is running.
![]()


Note: You can move to the next program level (current data, watering data, On/Off-Prog., normal display) at any time during programming by pressing the Menu/O.K. key.
If there is an interval between data entry of more than 60 seconds the water computer automatically leaves the programming mode and the LCD shows the current time (normal display).
You have now successfully programmed your water computer, i.e. the integrated valve opens and closes completely automatically and your garden is watered at the times you have programmed.
Display During Automatic Watering

(Fig. Display during automatic watering)
Example:
- It is Friday (Fr) 18:45, the water computer is programmed for watering every 2 days (2nd).
- On/Off-Prog. is set to On (watering desired).
- The remaining watering time (RUNTIME) is 50 minutes.
- The dots between the hours and minutes are flashing. – The clock is running.
- The RUN TIME is counting down.
After the RUN TIME has finished the display shows normal operation.
If the valve is opened by a program it can be closed prematurely at any time by pressing the On/Off key 1 without influencing the program data (starting time, watering time and watering days).
Read/Change Program
You can run through the program levels to check the data you have entered by repeatedly pressing the Menu key and select and check the program steps by pressing O.K.
You can change the watering programs as described under "Programming".
Manual Program-Independent man On/Off Operation
After you have entered data, you can operate your water computer manually at any time, independent of the programmed watering times, by pressing the man On/Off key  .
.
Press the man On/Off key once to open the water flow. Press the same key again to close the valve.
If you do not manually close the valve, for safety reasons, watering is ended automatically after 30 minutes. The remaining watering time (RUN TIME) is shown on the LCD display.

If the valve is opened manually and the manual watering time and a programmed watering time overlap, the programmed watering is suppressed.
Battery
Status Indicator
If the battery voltage falls below a certain level the Batt. indicator appears  . It is possible to initiate watering manually even if the battery capacity is too low (valve no longer opens), but programmed watering times, however, are not initiated. Even if the battery capacity is too low to run a program, if the valve is open it will be closed.
The battery voltage is tested during the opening pulse. In this way you can test the capability of the battery at any time. To do this, simply press the man On/Off key  . If the valve opens and the Batt. indicator does not appear then the battery does not have to be changed.
Changing the Battery
If you exchange the battery within 100 seconds, the data you have entered will be saved (program saved). When the battery is removed the LCD display extinguishes and programs will not run while the battery is being changed. When you have inserted a new battery, we recommend that you check the data as described under "Read/Change Program".
If you do not insert a new battery within 100 seconds, or if the battery power was already so low that the valve no longer opened, the water computer is RESET (all program data is deleted).You must re-program your water computer. The current date / time which was previously displayed remain unchanged within the given time.
Notes on Safety and Operation
For safety reasons only a 9 V alkali-manganese battery (alkaline) type IEC 6LR61 must be used.
- The minimum water output to ensure that the Water Computer functions correctly is 20-30 l/h. For example, at least 10 x 2-litre Drip Heads are required to control the Micro-Drip-System.
- The battery must be exchanged in time to prevent the Water Computer failing due to a low battery when you are away for longer periods of time. Make sure that the time the battery has been in operation and the time you are planning to be away does not add up to more than a year.
- The functional safety of the Water Computer depends on the capability of the battery. The Water Computer will only run for approx. a year if the alkali-manganese battery has a nominal voltage of at least 9 V. Check the battery before you buy it.
- To prevent water penetrating the battery compartment, the Water Computer may only be installed in a perpendicular position with the sleeve nut pointing upwards.
- Program the Water Computer with the tap turned off. In this way you can avoid getting wet when trying out the "man On/Off" function. You can remove the control unit from the housing to program the Water Computer.
- The control unit must be attached to the Water Computer during operation.
- Only use the Water Computer outdoors.
![]()
The Water Computer must not be used indoors. - The Water Computer must be stored in a dry place away from frost before the frosty season begins.
- The cover provided for the operating display must be used as shown in Fig. B.To protect the operating display against the weather the cover must be flipped over when you have finished programming the computer (Fig. B).
Stick the programming help provided on the inside of the display cover. - At high temperatures (over 60°C at the display) the LCD display may extinguish. This does not affect the program in any way.
When the computer cools down the LCD display illuminates again. - The max. temperature for the water flow is 40°C.
- The minimum operating pressure is 0,5 bar, the maximum operating pressure is 12 bar.
- Check the filter in the sleeve nut C regularly and clean if necessary.
- Avoid tensile strain. Do not pull the hose connected to the Water Computer.
- Only use clear fresh water.
Options
Anti-Theft Protection
To protect your Water Computer against theft, the GARDENA anti-theft protection  (1815-00.791.00) is available at GARDENA Service. The bracket on the anti-theft protection is fitted onto the back of the unit. Note that the screw included cannot be loosened once it has been screwed in. The bracket can be used, for example, to attach a chain.
See (Fig. D)
GARDENA Soil Moisture Sensor
Together with the GARDENA Soil Moisture Sensor (Art. No. 1188) watering is controlled considering the soil moisture.
See (Fig. E)
Assembly
The Soil Moisture Sensor is connected to the socket  on the back of the control unit
See (Fig. A).
How it Works
If the connected Soil Moisture Sensor indicates there is sufficient moisture then the watering program is either interrupted or not initiated.
Note: Manual watering (man On/Off) is still possible.
GARDENA Rain Sensor
Together with the GARDENA Rain Sensor (Art. No. 1189) watering is controlled considering natural precipitation.
See (Fig. F).
Assembly
The Rain Sensor, as an alternative to the Soil Moisture Sensor, can be connected to the connection socket 0 on the back of the control unit See (Fig. A).
How it Works
If the rain sensor indicates an adequate amount of rain, then the watering program is interrupted or not initiated.
Note: Manual watering (man On/Off) is still possible.
GARDENA Automatic Water Distributor
Connecting the GARDENA Automatic Water Distributor (Art. No. 1198) allows you to control up to 6 watering lines with your Water Computer Plus C 1030.
See (Fig. G).
Each output can be watered every 2nd day. Therefore, 3 outputs can be watered every day every 8 hours.
This is ideal where there is an insufficient amount of water or where individual areas of the garden have varying water requirements. It allows all watering lines to be operated one after another.
Faults
| Fault | Possible Cause | Remedy |
| LCD display not lit. | Battery inserted incorrectly | Check + / – markings. |
| Flat battery. | Insert a new alkaline battery and test by pressing the On key. | |
| Temperature at display is above 60°C. | Display illuminates again when temperature falls, test function by pressing On / Off. | |
| Not able to enter watering data (hours, minutes, (starting time, time, days). | Current data hours, (minutes, day) not complete. | Set current data. |
| Not able to open manually using man key. | Weak battery, Batt. indicator appears. | Insert a new alkaline battery. |
| Tap turned off. | Turn on tap. | |
| Watering not initiated. | Weak battery, Batt. indicator appears. | Insert a new alkaline battery. |
| Watering data (starting time / duration / days) not complete. | Check data and complete if necessary. | |
| On / Off-Prog. active – set to Off. | Restart the program: Set to On (see "On/Off-Prog."). | |
| Data input / changes made while the program was starting or immediately before. | Input / change data before or after the set start times. | |
| Valve was opened by manual On, program was not executed. | Avoid possible program overlaps. | |
| Tap turned off. | Turn on tap. | |
| Soil Moisture / Rain Sensor indicates sufficient moisture. | If dry, check setting / position of the Soil Moisture / Rain Sensor. | |
| Battery flat after working for a short time. | Not an alkaline battery. | Use an alkaline battery. |
| Undefined LCD display after battery has been changed. | Battery was not changed RESET the water within 100 seconds or the battery was already run down so that there was no longer an opening pulse. | computer by simultaneously pressing the ▲ and O.K. keys. Re-enter data as described. |
If you have any problems with your Water Computer, please contact our Customer Service.
Disposal (in accordance with RL2002/96/EC)

Device may not be added to normal household refuse but must be disposed of in the technically correct way.
We expressly point out that, in accordance with the product liability law, we are not liable for any damage caused by our units if it is due to improper repair or if parts exchanged are not original GARDENA parts or parts approved by us, and, if the repairs were not carried out by a GARDENA Service Centre or an authorised specialist.
The same applies to spare parts and accessories.

Documents / ResourcesDownload manual
Here you can download full pdf version of manual, it may contain additional safety instructions, warranty information, FCC rules, etc.
Advertisement


Need help?
Do you have a question about the C 1030 Plus and is the answer not in the manual?
Questions and answers