Gardena 4040 Modular Watering Controller Manual
- Operating instructions manual (9 pages) ,
- Bedienungsanleitung (10 pages) ,
- Operating instructions manual (100 pages)
Advertisement
Introduction
 Please read these operating instructions carefully and observe the information they contain. Use these operating instructions to familiarise yourself with the product, the proper use and the safety instructions.
Please keep these operating instructions in a safe place.
 For safety reasons, children and young people under the age of 16, as well as people not familiar with these operating instructions, should not use this product. A Persons with reduced physical or mental abilities may use the product only if they are supervised or instructed by a responsible person.
Where to Use Your GARDENA Watering Controller
Proper use
The watering controller is suitable for indoor and outdoor use.
This Watering Controller is part of a garden irrigation system. Recommended accessories: the watering valve (24V) Art. 1278, the valve boxes Art. 1254 /1255 and the connection cable Art. 1280 and the cable clips Art. 1282.

These products allow you to set up fully automatic irrigation systems, which can be designed to cater for varying water requirements of different plant areas and ensure that the entire system functions correctly in case of insufficient water supply.
Compliance with the operating instructions provided by GARDENA is a prerequisite for proper use of the Watering Controller.
Please note: The Watering Controller must only be used for controlling 24 V (AC) valves.
Safety Instructions
Watering Controller:
The Watering Controller must only be operated with the 24-V (AC) power supply unit provided.
- Protect the 24-V (AC) power supply unit from moisture when connected.
The Watering Controller (without power supply unit) is splash proof. - Avoid, however, spraying the Watering Controller directly with water.
To prevent loss of data if a power failure occurs, only use a 9 V alkaline battery IEC 6LR61 to buffer data. We recommend using batteries manufactured by Duracell and Energizer (do not use rechargeable batteries).
Function
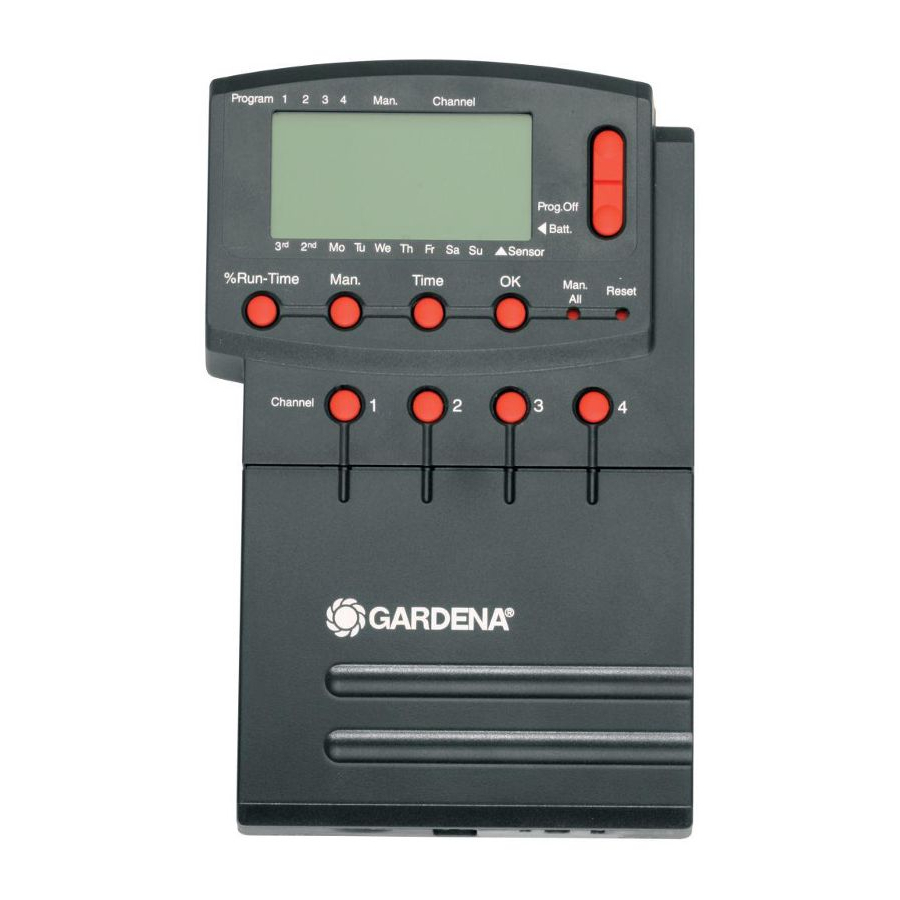
Key assignment

- %Run-Time key:
Calls up the %Run Time function. - Man key:
Opens/closes individual channels manually. - Time key:
isplays the time. - OK-key:
Confirms the settings you selected using the ▲-▼ keys. - Man. All key:
Opens/closes all the channels automatically in sequence. - ▲-▼ keys:
For changing or advancing specified data already entered (if you press and hold down one of the ▲-▼ keys you can change data in the quick run-through mode). - Reset key:
Deletes all program data. - Channel key:
Calls the channels.
Watering Controller display

- Program Display:
Indicates which program of the particular channel the Watering Controller is currently executing. If several channels are opened at the same time, the program indicator is no longer displayed. - Key Lock:
To enable/disable the key lock, press the Man key and the OK key simultaneously (the Reset key cannot be locked). - Manual Control Display:
The display shows Man when manual control is activated. - Channel Mode Display:
Modes: open, locked and program overlap. - Watering Display:
If a channel is just being opened, the drops on the watering display flash alternately.

- %Run-Time Function:
Duration of watering can be set between 10 - 200% for all channels. - Prog. Off
Watering programmes disabled (%Run Time function: 0%). - Battery Status Display:
If the Batt.-display is flashing, the battery is almost flat and must be replaced.
If the battery display does not change, the battery is flat or none is inserted.
The Batt.-display is reset by changing the battery. - Sensor Display:
If the sensor is inserted and produces the status report moist, the sensor display appears. - Days of the week/Watering cycles:
To display the current day or the watering days and watering cycles programmed (3rd every 3rd day/2nd every 2nd day). - Fault or message display:
To display a fault or message.
Putting into Operation
Before programming your Watering Controller, install a 9-V battery to prevent loss of data if a power failure occurs.
Connecting your Watering Controller:

- Raise cover
![]() and pull downwards.
and pull downwards. - Insert the cable of the power supply unit into the 24VAC terminals and screw tight.
The wiring diagram is located inside the cover![]() .
. - Insert cables for the valves (e. g. 7-wire GARDENA connectioncable Art. 1280 for up to 6 valves) in the clips with the numbers and C and screw tight. (see also "Connect valves").
- If necessary, insert the sensor cable (e. g. GARDENA moisturesensor Art.1187) in the sensor connection
![]() .
. - If you intend to use the master channel (e. g. Art.1273), insert the cable for the master channel into the terminals labelled M and C (Pump) and screw tight. (see "Master Channel").
- Insert battery into the battery compartment
![]() .
.
Observe correct polarity. - Push cover on to the connection box.
- Plug the mains plug of the 24 V (AC) power supply unit into a 230 V mains socket.
 and pull downwards.
 .
. .
.After this it is necessary to choose between a 24 hour or 12 hour display and the time must be set (see Operation "Setting the time").
Connect extension module:

The GARDENA extension modules Art.1277 with 2 channels are available as an optional extra. Up to 4 expansion modules can be connected and in this way 12 channels can be controlled via the base unit.
- Break off bar
![]() from the watering controller (or already connected expansion module).
from the watering controller (or already connected expansion module). - Insert connection links
![]() into the watering controller (or an expansion module already connected) and push the expansion module on.
into the watering controller (or an expansion module already connected) and push the expansion module on. - Secure expansion module via the clamps
![]() .
. - Connect the expansion module cable
![]() using the connector
using the connector ![]() (if connecting another expansion module, connect the expansion modules using the expansion module connector
(if connecting another expansion module, connect the expansion modules using the expansion module connector ![]() ).
).
The expansion modules are detected immediately by the watering controller when connected. - Push on cover of watering controller and the expansion module.
 from the watering controller (or already connected expansion module).
 into the watering controller (or an expansion module already connected) and push the expansion module on.
 .
. using the connector
  (if connecting another expansion module, connect the expansion modules using the expansion module connector
  ).
).Master Channel:

The master channel is a channel that can be operated at the same time as other channels. This is important, for example, if you want to use a pump to supply your irrigation system with water and if the pump should always be activated each time an irrigation valve is activated. The master channel closes 20 seconds before the end of the program so that the system is not under pressure.
The pump can be operated, for example, using the GARDENA Pump Control Art.1273 that is connected to the master channel.
Connecting valves:

Example: with 2 valve boxes V3 (Art. 1255)
Labelling the valves:
- Label the valves (1-6), so that the channels (1-4) of the Watering Controller and the channels (5 and 6) of the expansion module can be clearly assigned to the valves.
Connecting the valves to the Valve Box: - Connect one cable of the valve V1 to the cable terminal 1 of the valve box.
- Connect the other cable of the valve V1 to a cable terminal C of the valve box (All 4 cable terminals C are interconnected and equivalent to one another).
- Connect one cable of the valve V2 to the cable terminal 2 of the valve box.
- Connect the other cable of the valve V2 to a cable terminal C of the valve box.
Other valves can be connected similarly to V1 and V2.
Connecting the Watering Controller to the Valve Box: - Connect a cable terminal C of the Watering Controller to a cable terminal C of the valve box. Both cable clips C are connected to each other and equivalent.
- Connect the cable terminal of channel 1 to the cable terminal 1 of the valve box.
- Connect the cable terminal of channel 2 to the cable terminal 2 of the valve box.
Other channels can be connected similarly to the channels1 and 2.
Cable cross-section of the connection cable:
The maximum permissible distance between the Watering Controller and the valve depends on the cross-section of the connection cable. For a distance of 30 m, the cross section is 0.5 mm2 and 0.75 mm2 for a distance of 45 m. No more than 3 valves must be in operation at the same time.
The GARDENA connection cable Art. 1280 is 0.5 mm2 in size and is 15 m long. The connection cable can be connected so that it is watertight using the cable clip Art. 1282.
Mounting wall bracket:

 If using the expansion module 2040:
Hold the drilling template supplied against the wall and mark the holes with a pen.
- Screw the mounting plate
![]() for the watering controller (and, if applicable, the mountings for the expansion modules) to the wall.
for the watering controller (and, if applicable, the mountings for the expansion modules) to the wall. - Hook the watering controller (with expansion module, if applicable) from above into the mounting plate
![]() so that its back is against the mounting plate (and into the mountings for the expansion modules if applicable).
so that its back is against the mounting plate (and into the mountings for the expansion modules if applicable).
 for the watering controller (and, if applicable, the mountings for the expansion modules) to the wall.
Operation
Time and Day of the Week
You must set the current time and day of the week before you can set the watering programs.
Valves which are already open are closed automatically after one minute if the time is changed.
Setting the time format when using the equipment for the first time:

- Plug in the power supply unit (without battery). TIME and 24 H flash in the display.
- Set 24 or 12 hour display with the ▲-▼ keys and confirm with the OK key. TIME and the hours (e.g. 0) flash on the display.
Setting the time and day of the week:

- Press TIME-Key.
- Set the hour for the time using the ▲-▼ keys (e.g. 12 hours) and confirm your entry by pressing the OK key. TIME and the minutes flash on the display.
- Set the minutes for the time using the ▲-▼ keys (e.g. 30 minutes) and confirm your entry by pressing the OK key. TIME and the day of the week flash on the display.
- Set the day of the week using the ▲-▼ keys (e.g. FR Friday) and confirm your entry by pressing the OK key.
![]()
The time and the day of the week have been set.

Watering Programs
Setting the watering programs:

Prerequisite: you must set the current time and day of the week before you can set the watering programs.
To give you a better overview of your irrigation system and to make it easier to enter the watering data, we recommend entering the data for your valves on the watering plan included in the appendix of these operating instructions. A maximum of 6 channels can be open at the same time.
You can save 4 watering programs for each channel (a maximum of 4 programs x 12 channels = 48 programs).
If programs overlap, the channel status display flashes to indicate this and ERROR (but the programs are still performed).  Make sure no programs overlap.
Selecting the Channel and Program Memory Location:
- Press the Channel key for the relevant channel (e.g. Channel 2).
Channels (e.g. 2) appears in the display and program 1 flashes. - Select the program memory location using the ▲-▼ keys (e.g. program memory location 3) and confirm your selection by pressing the OK key.
START TIME and the hours flash on the display.
Setting the Watering Start Time: - Set the hours for the watering start time using the ▲-▼ keys (e.g. 16 hours) and confirm your entry by pressing the OK key
START TIME and the minutes flash on the display. - Set the minutes for the watering start time using the ▲-▼ keys (e.g.30 minutes) and confirm your entry by pressing the OK key.
RUN TIME and hours flash on the display.
Setting the Watering Duration: - Set the hours for watering duration using the ▲-▼ keys (e.g. 1 hour) and confirm you entry by pressing the OK key.
RUN TIME and minutes flash on the display. - Set the minutes for watering duration using the ▲-▼ keys (e.g. 20 minutes) and confirm your entry by pressing the OK key.
The arrow![]() above the watering cycle flashes on the display.
above the watering cycle flashes on the display.
Setting the Watering Cycle:- Every 2nd or 3rd day (from the current day)
- Select any day of the week (daily watering also possible with this setting)
- (a) Watering Cycle every 2nd or 3rd Day: Using the ▲-▼ keys, set the arrow ê to 2nd or 3rd (e.g. 2nd = every 2nd day) and confirm your selection by pressing the OK key. The watering program is saved and the display shows the watering cycle (e.g. 2nd) and the preview for the week (e.g. Fr, Su, Tu, Th ).
![]()

The days in the preview for the week are always with respect to the day of the week set in the system (e.g. Fr).
Set up more watering programs or return to the actual time using the Time key.
– or –
(b) Watering Cycle for Any Day of the Week:
Using the ▲-▼ keys, set the arrow  to the desired day of the week (e.g. Mo = Monday) and select ■/deselect the day by pressing the OK key.
When you have selected all the desired days of the week (e.g. Mo, We, Fr), press the ▲ key until the arrow over Su disappears.
The watering program is saved and the display shows the watering cycle (e.g. Mo, We, Fr).
Set up more watering programs or return to the actual time using the Time key.
%Run-Time-Funktion
You must select the %Run-Time > 0% you wish to activate before the watering programs can run.
Programmed watering periods

The times of all stored watering programmes can be reduced centrally in intervals of 10%, from 200% down to 10%, without having to change each interval programme. This is ideal if you wish to water your garden less in the Autumn than in the Summer.
| 10 - 200% Run-Time = Watering programs enabled |
| 0% Run-Time = Prog. Off = Watering programs disabled |
Watering programs disabled:

If the %Run-Time-function has been set to 0% Run-Time (watering programs disabled), all the channels flash and the Prog. Off symbol appears in the normal display.
- Press % Run-Time key.
- Select required percentage for the programmed watering 2. period with the ▲-▼ keys (e.g. 60% Run-Time) and confirm with the O.K. key.
The display moves to the actual time.
Programming the watering computer is now completed, i.e. the valves installed open/close entirely automatically and therefore water at the programmed times. If the watering time is not equal to 100%, the %symbol appears in the display for the actual time.
Note: If you change the watering time percentage, your Water Computer will still display the watering time you originally programmed for the individual watering programs. When setting up/modifying a program, this is automatically set to 100% RunTime. The % Run-Time does not apply to manual watering.
Displaying the actual watering period:
The actual watering period is the percentage proportion of the programmed watering period. E. g. if 1 hour is set as the programmed watering period and 50% Run-Time, the actual watering period of 30 minutes is displayed.
- Keep %Run-Time-button pressed and press the Channelbutton required
- Select program memory location with the ▲-▼ keys.
All 48 programs can be selected one after the other with the ▲-▼ keys.
Changing an existing watering program:
You can change an existing program stored in one of the 4 program memory locations without having to create the program from scratch.
The data for the watering starting time, duration, and cycle are preset; therefore you only need to change the specific values of the watering program you want to change. You can transfer all other values from "Setting the Watering Program"by pressing the OK key.
Ending the programming mode prematurely:
You can exit the programming mode prematurely at any time.
 Press the Time key.
The display shows the current time and day of the week.
Reset:
The Watering Controller is reset to the default setting and all program data is deleted.

Keep Reset key pressed for 5 seconds.
- All symbols of the display light up for 2 seconds.
- The program data for all programs is deleted.
- The actual time and the day of the week are retained.
A reset can be triggered at any time. After this it is necessary to set the time (see Operation "Setting the time and day of the week").
Manual watering
Manual watering:

- Press the Man key. The manual displayMan ■appears and all the channels flash in the display.
- Press the relevant Channel key (e.g. channel 4).
RUN TIME and hours flash on the display. - Press the Man key if you want to irrigate for 0:30 minutes
– or –
set the manual watering duration using the ▲-▼ keys (e.g. 1:15) and confirm your entry by pressing the OK key.
Manual watering starts.
Water all channels manually:

When all the channels are to be enabled manually one after the other, it is possible to do this using the Man. All key. During this process, all the channels are opened manually one after the other corresponding to the manual watering period.
 Press the Man. All-key.
SPEC is displayed and watering starts with channel 1.
The Man. All key must be pressed to end watering prematurely.
Blocking channels:

If watering is not necessary e.g. because of a relatively long period of rain, all the channels can be blocked via the % Run Time function (see "%Run-Time function").
Individual channels can be blocked as follows:
- Press and hold down the OK key and then press the relevant Channel key. (e.g. Channel 2).
The blocked channel and Prog. Off flash in the display. - To reactivate the channel again, press and hold down the OK key and then press the relevant Channel key.
Tip: Should you have any questions about operating or programming your Watering Controller, please do not hesitate to contact your nearest GARDENA Service Centre. We will be happy to help you.
Trouble-Shooting
Replacing the fuse:

- Check battery status in the display and replace battery if necessary.
- Unplug the mains plug of the 24 V (AC) power supply unit.
- Raise cover
![]() and pull downwards.
and pull downwards. - Remove the fuse
![]() and install a new fuse (2.5 A slow-blowing fuse).
and install a new fuse (2.5 A slow-blowing fuse). - Push cover
![]() on to the connection box.
on to the connection box.
![]()
- Plug the mains plug of the 24 V (AC) power supply unit into a 230 V mains socket.
 and pull downwards.
 and install a new fuse (2.5 A slow-blowing fuse).
 on to the connection box.
| Fault | Possible Cause | Remedy |
| No display | External temperature below 0°C or above +60°C. | Wait until the external air temperature returns to the operating temperature range. |
| LCD display shows ERROR FUSE | The fuse has blown. |
|
| LCD display shows ERROR noAC (the programs are retained) | The power supply unit is not plugged in. | Plug the power supply unit into a mains socket. |
| Valve cabling has a short-circuit. | Connect valve cables correctly (see 4. Putting into Operation "Connect valves"). | |
| The power supply is overloaded because valves from other manufacturers have been used. | Only so many valves may be opened at the same time that the total power consumption does not exceed 900 mA. |
In the event of other faults please contact GARDENA Service.
Repairs should only be carried out by GARDENA service centres or dealers authorised by GARDENA. 7. Putting Out of Operation
Putting Out of Operation
Wintering:
The watering controller is frost-proof down to –20°C. No measures are required when frost commences.
Check battery status display before the power supply unit is disconnected.

Only dispose of batteries when they are flat.
Return flat batteries to the place you bought them
or
dispose of them properly at your local recycling/disposal centre.
Disposal:
(in accordance with RL 2002 / 96 / EC)

The product must not be added to normal household waste. It (in accordance with must be disposed of properly.
Technical Data
| Power supply from power supply unit: | 24V (AC) 900 mA (sufficient for 6 GARDENA Watering Valves Art.1278) |
| Power supply for memory in case of mains power failure: | Alkaline battery 9V IEC 6LR61 |
| Life of the battery: | At least 1 year (to retain data if there is a mains failure) |
| Operating temperature range: | From 0°C to +60°C |
| Temperature range for storage: | –20°C to +70°C |
| Air humidity: | 20% to 95% relative humidity |
| Soil moisture/rain sensor connection: | GARDENA-specific |
| Program saved when replacing battery: | Yes (if power supply unit connected) |
| Number of channels: | 4 channels and one master channel, with max. 4 expansion modules Art.1277 enabling expansion to 12 channels and one master channel. |
| Number of program-controlled watering cycles per channel: | Up to 4 |
| Watering duration per program: | 1 minute to 4 h 59 min. (100% Run-Time) 2 minutes to 9 h 58 min. (200% Run-Time) |
Service/ Warranty
Warranty
GARDENA guarantees this product for 2 years (from date of purchase). This guarantee covers all serious defects of the unit that can be proved to be material or manufacturing faults. Under warranty we will either replace the unit or repair it free of charge if the following conditions apply:
- The unit must have been handled properly and in keeping with the requirements of the operating instructions.
- Neither the purchaser or a non-authorised third party have attempted to repair the unit.
GARDENA will not replace Watering Controllers with defects resulting from incorrect installation of the battery or leaking batteries.
This manufacturer's guarantee does not affect the user's existing warranty claims against the dealer/seller.
If you have any problems with your watering controller, please contact our Customer Service or return the defective unit together with a short description of the problem directly to one of the GARDENA Service Centres listed on the back of this leaflet.

Documents / ResourcesDownload manual
Here you can download full pdf version of manual, it may contain additional safety instructions, warranty information, FCC rules, etc.
Advertisement


Need help?
Do you have a question about the 4040 Modular and is the answer not in the manual?
Questions and answers