Advertisement
Table of Contents
- 1 Main Features
- 2 Before You Begin
- 3 Low Battery Warning
- 4 How to Use the Table Stand or Wall Mounting
- 5 The Reset Button
- 6 Getting Started
- 7 Reading the Kinetic Wave Display
- 8 Wireless Transmission
- 9 Note on C and F
- 10 Calendar Clock Display Modes
- 11 About Radio Reception
- 12 Selecting the Time Zone
- 13 Setting the Alarm
- 14 Specifications
- 15 Customer Assistance
- 16 Warranty
- Download this manual
Multi-Channel Indoor & Outdoor
Thermometer with Cable Free
Radio Controlled
MODEL: RMR166
USER'S MANUAL
INTRODUCTION
Thank you for purchasing the RMR-166 Multi-Channel Indoor-
Outdoor Thermometer with 433MHz Cable Free
sensor and
Radio Controlled
This basic package consists of the main temperature and calendar
clock unit and a wireless remote temperature sensor, model THN-
138. The main unit can support up to three Cable Free
sensors. Additional remote sensors are available.
The main unit has a large easy-read LCD screen that displays the
indoor temperature, clock with calendar and temperature data
transmitted by the remote sensor to the main unit. In addition, the
RMR-166 will store in memory the maximum and minimum
indoor temperatures and temperatures transmitted from the remote
sensor.
The RMR-166 clock is a
automatically synchronizes current time and date with radio signals
received from the US Atomic Clock, one of the world's most
accurate timepieces. To learn more about the US Atomic Clock
visit the US Department of Commerce's National Institute of Stan-
dards and Technology website at www.nist.gov. Other features
include three-language display choice, four-step crescendo daily
alarm and easy-change display modes.
™
Sensor &
™
Clock
™
temperature
™
calendar clock.
™
radio-controlled
clock. The clock
R
remote
L
K
O
P
1
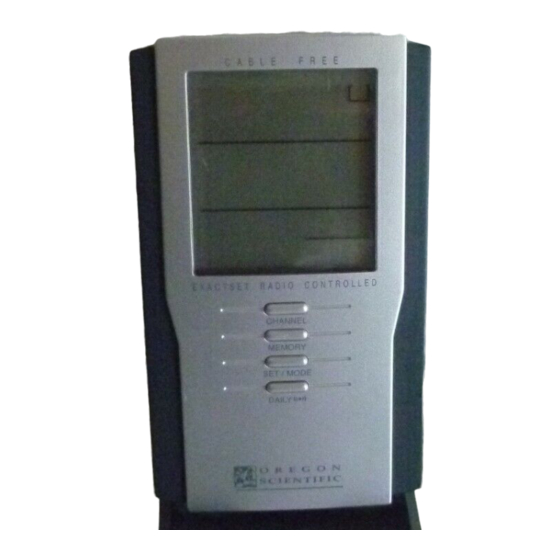
MAIN FEATURES
C A B L E
A
B
C
D
AM
E X A C T S E T
R A D I O
E
CHANNEL
MEMORY
H
SET / MODE
DAILY
Model No. RMR166
AL
ZONE
C
ON/OFF
F
Remote Thermometer
RMR166
Tested To Comply
With FCC Standards
FOR HOME OR OFFICE USE
-D
F R E E
CHANNEL
F
P M
C
E
J
M
D
C O N T R O L L E D
G
I
M
N
Q
Advertisement
Table of Contents

Related Manuals for Oregon Scientific RMR166


Summary of Contents for Oregon Scientific RMR166
-
Page 1: Main Features
E X A C T S E T R A D I O C O N T R O L L E D CHANNEL MEMORY SET / MODE DAILY Model No. RMR166 ZONE ON/OFF Remote Thermometer RMR166 Tested To Comply With FCC Standards... - Page 2 A. THREE-LINE LCD DISPLAY Easy- read display of remote sensor and indoor temperatures, and calendar clock functions B. [ ] REMOTE SENSOR LOW BATTERY ICON Indicates the remote-sensor battery power is low and batteries need replacing C. [ ] MAIN UNIT LOW BATTERY ICON Indicates the main unit battery power is low and batteries need replacing D.
-
Page 3: Before You Begin
REMOTE SENSOR FEATURES 4 3 3 M H Z C A B L E F R E E A. LED LIGHT Flashes when the remote sensor transmits data to the main unit B. CHANNEL SLIDE SWITCH Assigns and identifies the channel of the remote sensor C. -
Page 4: Low Battery Warning
2. Install 2 AA (UM-3) size alkaline batteries according to the polarities as shown. Press [RESET]. ZONE Remote Thermometer FOR HOME OR OFFICE USE 3. Replace the battery compartment door. LOW BATTERY WARNING The RMR-166 features low battery warning icons for the main unit and remote sensor(s). -
Page 5: How To Use The Table Stand Or Wall Mounting
battery warning icon for the remote sensor first line of the LCD and will identify the affected remote sensor by its assigned channel number. HOW TO USE THE TABLE STAND OR WALL MOUNTING The main unit has a removable table stand to support the unit on a flat surface or the unit can be mounted on a wall using the recessed screw hole. -
Page 6: Reading The Kinetic Wave Display
LCD screen. The main unit will automatically update its readings approximately every 30-seconds. If no signals are received, blanks "----" will be displayed and the kinetic wave icon will show " ". Press [CHANNEL] and [MEMORY] at the same time for about 30-seconds to trigger a signal search. -
Page 7: Wireless Transmission
The maximum and minimum recorded indoor temperatures and those of each remote sensor are automatically stored in memory. To display the indoor recorded temperatures, press [MEMORY] once to display the maximum (MAX) temperature and once again for the minimum (MIN) temperature. To display temperature data from a remote sensor, select the channel of that remote sensor. -
Page 8: Calendar Clock Display Modes
[DAILY ( differs from The split-second, precise timeliness of RMR166 is achieved through its internal radio receiver that responds to a special 60kHz frequency radio signal generated by the US Atomic Clock. The RMR-166 synchronizes the time and date with the Atomic Clock's signal and also automatically adjusts for daylight savings time. -
Page 9: Selecting The Time Zone
Signal Strength Indicator Icons: - Strong Signal - Weak Signal - No Reception - Receiving Signal CLOCK & CALENDAR FUNCTIONS As the RMR-166 is an Radio Controlled™ clock, it does not need manual setting. However, instructions to set the clock manually included and follow: Manually Setting the Clock: 1. -
Page 10: Setting The Alarm
3. The time zone selected will appear to be darkened on the map. To see the time in a different time zone: 1. Press and release [ZONE] until the desired time zone will be shown darkened on the display panel. The correct time for that zone will automatically be displayed. -
Page 11: Specifications
PRECAUTIONS This product has been designed and manufactured to give you years of service if it is carefully handled. Please follow these few precautions: 1. Do not immerse the unit in water. 2. Do not clean the unit with abrasive or corrosive materials. They may scratch the plastic parts and corrode the electronic circuit. -
Page 12: Customer Assistance
Consult the dealer of an experienced radio/TV technician for (without battery) help. 80 g (without battery) Company Name: Oregon Scientific, Inc. 5.66” (L) x 3.36” (W)x Address: 19861 SW 95th Place, Tualatin, Oregon 97062, USA 0.98” (T) Telephone Number: 1-800-853-8883 141.5(L) x 84(W) x... - Page 13 should be directed to the place of retail purchase for exchange. Should this not be possible, contact our customer care department for assistance and a return material authorization. No returns may be made without a return authorization. Please retain your retail receipt as you may be asked to provide a copy of it for proof of date purchased.
Need help?
Do you have a question about the RMR166 and is the answer not in the manual?
Questions and answers
How to calibrate Oregon Sci rmr166 with thn138 sensor
The Oregon Scientific RMR166 with THN138 sensor does not require manual calibration. It automatically receives time from the US Atomic Clock and matches the temperature unit (°C or °F) with the main unit. To ensure proper operation:
1. Install 2 AA alkaline batteries in the sensor and set the desired channel (1, 2, or 3).
2. Place the sensor within 21–32 yards of the main unit with a clear transmission path.
3. Use the Temperature Slide Switch to select °C or °F on both units. If they differ, the sensor will follow the main unit's setting.
4. Press [RESET] after battery installation.
No manual calibration steps are listed or required.
This answer is automatically generated