Table of Contents
Advertisement
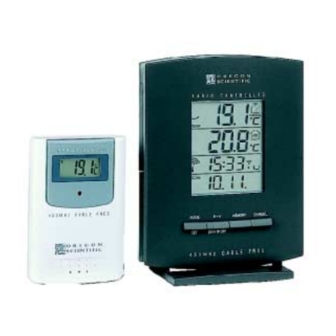
MAIN FEATURES
Multi-Channel IN-OUT Thermometer
with Cable Free Sensor and RF Clock
MODEL: RMR112
USER'S MANUAL
INTRODUCTION
Congratulations on your purchase of the RMR112 Multi-Channel
In-Out Thermometer with 433MHz cable free sensor and
radio-controlled calendar clock.
The basic package comes with a main unit, which is the
temperature and calendar clock station, and a remote unit, the
thermo sensor.
The main unit has large read-outs for indoors temperature,
calendar clock and temperatures collected and transmitted by the
remote unit. The main unit can support up to three remote units.
The main unit is capable of keeping track of the maximum and
minimum temperature of different sites. And no wire installation
is required and the RMR112 operates at 433MHz.
As for the calendar clock, it is radio-controlled. It automatically
synchronizes its current time and date when it is brought within an
approximate 1500km radius of the radio signal generated from
Frankfurt, Germany (DCF77).
You can also set the calendar clock manually when it is off range.
Other features include four-language display, four-step crescendo
dual alarms and interchangeable display modes.
1
Advertisement
Table of Contents

Related Manuals for Oregon Scientific RMR112


Summary of Contents for Oregon Scientific RMR112
-
Page 1: Product Features & Overview
Cable Free Sensor and RF Clock MODEL: RMR112 USER'S MANUAL INTRODUCTION Congratulations on your purchase of the RMR112 Multi-Channel In-Out Thermometer with 433MHz cable free sensor and radio-controlled calendar clock. The basic package comes with a main unit, which is the temperature and calendar clock station, and a remote unit, the thermo sensor. -
Page 2: Remote Unit View
A FOUR-LINE DISPLAY Facilitates easy reading of remote and indoors temperatures and calendar clock B CHANNEL BUTTON Selects among different channels C MEMORY BUTTON Recalls the maximum or minimum temperature of individual channels D ALARM [24HR OFF] BUTTON Sets the time for the alarms E MODE/SET BUTTON Toggles the display modes and confirms entry while setting the values for display... -
Page 3: Battery And Channel Installation: Remote Unit
A LCD Displays the current temperature monitored by the remote unit B LED INDICATOR Flashes when the remote unit transmits a reading C/ F SLIDE SWITCH Selects between Centigrade ( C) and Fahrenheit ( F) D CHANNEL SLIDE SWITCH Designates the remote unit Channel 1, Channel 2 or Channel 3 E RESET BUTTON Returns all settings to default values... -
Page 4: Low Battery Warning
Note that once a channel is assigned to a remote unit, you can only change it by removing the batteries or resetting the unit. BATTERY INSTALLATION: MAIN UNIT 1. Slide open the battery compartment door. 2. Install 2 alkaline batteries (UM-3 or “AA” size 1.5V) strictly according to the polarities shown. -
Page 5: Reset Button
THE RESET BUTTON This button is only used when the unit is operating in an unfavor- able way or malfunctioning. Use a blunt stylus to hold down the button. All settings will return to their default values. GETTING STARTED Once batteries are in place for the remote units, they will start trans- mitting temperature readings at 30-second intervals. -
Page 6: Kinetic Wave Display
HOW TO READ THE KINETIC WAVE DISPLAY The kinetic wave display shows the signal receiving status of the main unit. There are three possible forms: The unit is in searching mode. Temperature readings are securely registered. No signals. MAXIMUM AND MINIMUM TEMPERATURES The maximum and minimum recorded indoor temperatures and those of each channel will be automatically stored in memory. -
Page 7: About Radio Reception
CALENDAR CLOCK DISPLAY MODES The RMR112 supports four display modes in the sequence of: MODE 1. Hour-Minute-Second (of local time) -------------------------------------------- Day-Month (of local time) MODE 2. Hour-Minute-Day of the Week (of local time) -
Page 8: To Set Clock
HOW TO SET AND ARM THE ALARMS button for three seconds. The RMR112 has two alarms, ALARM 1 and ALARM 2. They can be invoked together or independently. To set an alarm, 1. Press [24HR select ALARM 2. -
Page 9: How To Stop An Alarm
4. Press [24HR OFF]. The minute digits will blink. 5. Enter the minutes using or . 6. Press [24HR OFF] to exit. The alarm ON icon for the alarm chosen will be displayed indicat- ing the alarm set above is now armed. You can also arm or disarm an alarm by pressing the AL ON/OFF button. -
Page 10: Specifications
SPECIFICATIONS Temperature Measurement Main unit Indoor Temperature measurement Proposed operating range Temperature resolution Remote Temperature measurement Proposed operating range Temperature resolution Remote unit Proposed operating range Temperature resolution RF Transmission Frequency No. of Remote unit RF Transmission Range Temperature sensing cycle Radio Controlled Clock Maintime set and synchronized by Radio Signal DCF77 for Continental/ Central Europe... -
Page 11: Note On Compliance
NOTE ON COMPLIANCE Warming: Changes or modifications to this unit not expressly approved by the party responsible for compliance could void the user’s authority to operate the equipment. R&TTE Compliance Note This device complies with the essential requirements of Article 3 of the R&TTE 1999/5/EC Directive, if used for its intended use and that the following standard(s) has been applied: Electromagnetic compatibility (Article 3.1.b of the R&TTE...
Need help?
Do you have a question about the RMR112 and is the answer not in the manual?
Questions and answers