
Related Manuals for Oregon Scientific RMR802


Summary of Contents for Oregon Scientific RMR802
- Page 1 Solar Indoor and Outdoor Thermometer with RF Clock Model:RMR802 / RMR802A USER MANUAL...
-
Page 2: Table Of Contents
Solar Indoor and Outdoor Thermometer with RF Clock Model:RMR802 / RMR802A USER MANUAL CONTENTS Overview ... 2 Front View ... 2 Back View ... 2 Remote Sensor ... 3 Getting Started ... 3 Solar Panel ... 3 Insert Batteries ... 3 Remote Sensor ... -
Page 3: Overview
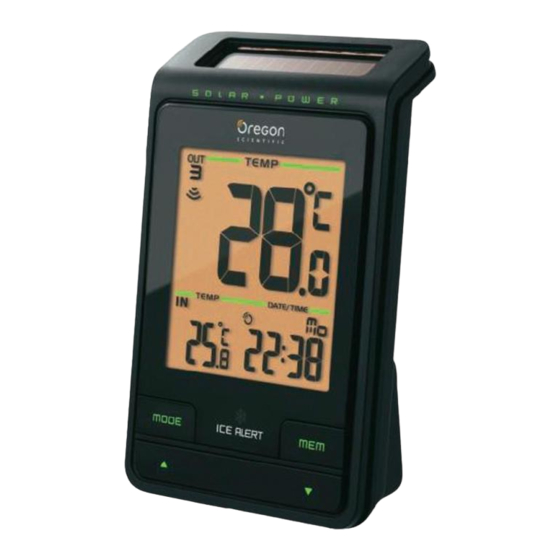
OVERVIEW FRONT VIEW 1. Solar panel 2. Remote sensor reception indicator 3. Clock signal reception indicator 4. Indoor temperature 5. MODE: Change settings / display : Increase / decrease value; activate / deactivate clock reception signal; between outdoor channels (1-3) 7. -
Page 4: Remote Sensor
1. RESET: Reset unit to default settings 2. EU / UK: Select the nearest radio signal (RMR802 only) 3. °C / °F: Select temperature unit REMOTE SENSOR 1. LED status indicator 2. Wall mount hole 3. Battery compartment 4. RESET hole 5. -
Page 5: Sensor Data Transmission
CLOCK CLOCK RECEPTION This product is designed to synchronize its clock automatically with a clock signal. RMR802: Slide EU / UK to select the signal received. • EU: DCF-77 signal: within 1500 km (932 miles) of Frankfurt, Germany. -
Page 6: Manually Set Clock
(day – month / month – day), month, day and language. RMR802: Time zone offset sets the clock +/- 23 hours from the received clock signal time. RMR802A: Select the time zone: (P) Pacific, (E) Eastern, (C) Central or (M) Mountain. -
Page 7: Ice Warning
ICE WARNING If the sensor falls between 3°C to -2 °C (37°F to 28°F), the green LED indicator will flash, and will stop flashing once the temperature is out of this range. NOTE As ice alert is only applicable to channel 1, to prevent flashing of LED, select channel 2 or 3 on outdoor sensor. -
Page 8: Specifications
Hereby, Oregon Scientific, declares that this Solar Indoor and Outdoor Thermometer with RF Clock (Model: RMR802 / RMR802A) is in compliance with the essential requirements and other relevant provisions of Directive 1999/5/EC. A copy of the signed and dated Declaration of Conformity is available on request via our Oregon Scientific Customer Service. -
Page 9: Fcc Statement
Address: 19861 SW 95 Oregon 97062 USA Telephone No.: 1-800-853-8883 declare that the product Product No.: RMR802 / RMR802A Product Name: Solar Indoor and Outdoor Thermometer with RF Clock Manufacturer: IDT Technology Limited Address: Block C, 9/F, Kaiser Estate,Phase 1,41 Man Yue St., Hung Hom, Kowloon,... - Page 10 Solar termómetro interior y exterior con hora atómica Modelo: RMR802 / RMR802A MANUAL DE USUARIO CONTENIDOS Resumen ... 2 Vista Frontal ... 2 Vista Trasera ... 2 Sensor Remoto ... 3 Para Empezar ... 3 Panel Solar ... 3 Cómo Introducir Las Pilas ... 3 Sensor Remoto ...
- Page 11 RESUMEN VISTA FRONTAL 1. Panel solar 2. Indicador de recepción del sensor remoto 3. Indicador de recepción de la señal del reloj 4. Temperatura interior 5. MODE: Cambiar configuración / pantalla : Subir o bajar ajuste ; activar o desactivar la señal de recepción del reloj ;...
-
Page 12: Sensor Remoto
1. RESET: unidad vuelve predeterminados 2. EU / UK: Seleccionar la señal de radio más cercana (sólo RMR802) 3. °C / °F: Selección de unidad de temperatura SENSOR REMOTO 1. Indicador LED de estado 2. Orificio para montaje en pared 3. -
Page 13: Transmisión De Datos Del Sensor
3. Seleccione un número de canal y pulse RESET. 4. Cierre el compartimento de las pilas. 5. Coloque el sensor en un radio de 30 m (98 pies) de la unidad principal usando el montaje en pared o el soporte para mesa. CONSEJO El lugar ideal para colocar el sensor sería al exterior de la casa a una altura inferior a 1.5 m, en un lugar resguardado de la luz directa del sol y de la lluvia... -
Page 14: Reloj
12 ó 24 horas, hora, minuto, año, modo de calendario (día – mes / mes – día), mes, día e idioma. RMR802: La zona horaria ajusta el reloj a + / -23 horas de la hora recibida por la señal del RMR802A: Elija la zona horaria: P (Pacífico), C (Central),... -
Page 15: Temperatura
TEMPERATURA Selección de unidad de temperatura: Pulse °C / °F. Para alternar entre las lecturas de los sensores exteriores: Pulse repetidamente. O bien Pulse + MEM y manténgalos pulsado durante 2 segundos para iniciar la alternancia automática de canales exteriores. Para alternar entre registros actuales, mínimos y máximos: Pulse MEM repetidamente. -
Page 16: Ficha Técnica
Cobertura de transmisión Rango de temperatura Alimentación SOBRE OREGON SCIENTIFIC Visite nuestra página web (www.oregonscientific.com) para conocer más sobre los productos de Oregon Scientific. Si está en EE.UU y quiere contactar directamente con nuestro Departamento de Atención al Cliente, or favor visite www2.oregonscientific.com/service/support.asp... - Page 17 Por medio de la presente Oregon Scientific declara que el Solar termómetro interior y exterior con hora atómica (Modelo: RMR802 / RMR802A) cumple con los requisitos esenciales y cualesquiera otras disposiciones aplicables o exigibles de la Directiva 1999/5/ CE. Tiene a su disposición una copia firmada y sellada de la Declaración...
- Page 18 Sonnen Innen- und Außenthermometer mit Funkuhr Modell: RMR802 / RMR802A BEDIENUNGSANLEITUNG INHALT Übersicht ... 2 Vorderansicht ... 2 Rückansicht ... 2 Funksendeeinheit ... 3 Erste Schritte ... 3 Sonnenkollektor ... 3 Batterien einlegen ... 3 Funksendeeinheit ... 3 Datenübertragung der Sendeeinheit ... 4 Uhr ...
- Page 19 ÜBERSICHT VORDERANSICHT 1. Sonnenkollektor 2. Empfangsanzeige für Funksendeeinheit 3. Indikator für Zeitsignalempfang 4. Innentemperatur 5. MODE: Einstellungen / Anzeige ändern Einstellung erhöhen Zeitempfangssignal aktivieren / deaktivieren; Zwischen Außenkanälen (1-3) wechseln 7. Außentemperatur 8. Zeitzone (nur RMR802A) 9. Uhrzeit mit Wochentag 10.
-
Page 20: Funksendeeinheit
1. RESET: Gerät auf Standardeinstellungen zurücksetzen 2. EU nächstgelegene auswählen (nur RMR802) 3. °C / °F: Temperatureinheit auswählen FUNKSENDEEINHEIT 1. LED-Statusindikator 2. Öffnung für Wandmontage 3. Batteriefach 4. RESET-Öffnung 5. CHANNEL-Schalter ERSTE SCHRITTE SONNENKOLLEKTOR Der Sonnenkollektor ist eine Energiesparfunktion, die die Basiseinheit auf umweltfreundliche Weise mit zusätzlichem Strom versorgt und die Lebensdauer der... -
Page 21: Datenübertragung Der Sendeeinheit
TIPP Die ideale Platzierung der Sendeeinheit wäre eine beliebige Stelle an der Außenseite Ihres Hauses in einer Höhe von etwa 150 cm, die vor direkter Sonnenbestrahlung und Feuchtigkeit geschützt ist, um präzise Messwerte zu gewährleisten. 1.5 m (5 ft) HINWEIS Verwenden Sie Alkaline-Batterien für längere Betriebsdauer sowie Lithium-Batterien für Endverbraucher bei Temperaturen unter dem Gefrierpunkt. -
Page 22: Die Uhr Manuell Einstellen
Stunde, Kalendermodus (Tag – Monat / Monat – Tag), Monat, Tag und Sprache. RMR802: Der Zeitzonenausgleich stellt die Uhr auf bis zu +/- 23 Stunden von der empfangenen Signalzeit ein. RMR802A: Wählen Sie die Zeitzone aus: (P) Pacific, (E) Eastern, (C) Central oder (M) Mountain. -
Page 23: Frostwarnung
So wechseln Sie zwischen den Messwerten jedes Außensensors: Drücken Sie wiederholt auf ODER Halten Sie + MEM 2 Sekunden lang gedrückt, um den autom. Wechsel der Außenkanäle zu veranlassen. So wechseln Sie zwischen den aktuellen, minimalen und maximalen Speicherdaten: Drücken Sie wiederholt auf MEM. So löschen Sie die Daten: Halten Sie MEM gedrückt. - Page 24 entnehmen Sie bitte der Pflegeanleitung Ihres Möbelherstellers. • Der Inhalt dieser Anleitung darf ohne Genehmigung des Herstellers nicht vervielfältigt werden. • Verbrauchte Batterien gehören nicht in den Hausmüll. Bitte geben Sie sie bei einer Sammelstelle für Altbatterien bzw. Sondermüll ab. •...
- Page 25 Für internationale Anfragen besuchen Sie bitte unsere Website: www2.oregonscientific.com/about/international. EU-KONFORMITÄTSERKLÄRUNG Hiermit erklärt Oregon Scientific, dass das Sonnen Innen- und Außenthermometer mit Funkuhr (Model:RMR802 / RMR802A) mit den grundlegenden Anforderungen und anderen relevanten Vorschriften der Richtlinie 1999/5/ EG übereinstimmt. Eine Kopie der unterschriebenen und mit Datum versehenen Konformitätserklärung...
- Page 26 Thermomètre solaire intérieur et extérieur avec heure radio pilotée Modèle: RMR802 / RMR802A MANUEL DE L’UTILISATEUR TABLE DES MATIERES Vue D’ensemble ... 2 Face Avant ... 2 Face Arrière... 2 Sonde sans fil ... 3 Pour Commencer ... 3 Panneau Solaire ... 3 Insérer les Piles ...
-
Page 27: Vue D'ensemble
VUE D’ENSEMBLE FACE AVANT 1. Panneau solaire 2. Indicateur de réception de la sonde à distance 3. Indicateur de réception du signal de l’horloge 4. Température intérieure MODE : Changer les réglages / l’affichage : Augmente / diminue les réglages ; active / désactive le signal de réception de l’horloge;... -
Page 28: Sonde Sans Fil
1. REINITIALISER (RESET): Réinitialiser l’appareil aux réglages par défaut 2. EU / UK: Sélectionne le signal radio le plus proche (modèle RMR802 uniquement) 3. °C / °F: Sélectionner l’unité de mesure de température SONDE SANS FIL 1. Indicateur d’état LED 2. -
Page 29: Transmission Des Données Du Capteur
2. Insérez les piles, en respectant les polarités. 3. Sélectionnez un canal puis appuyez sur RESET. 4. Fermez le couvercle du compartiment des piles. 5. Installez le capteur à 30 m maximum (98 pieds) de l’appareil principal à l’aide du support de table ou de la fixation murale. -
Page 30: Horloge
RMR802: La fonction fuseau horaire règle l’horloge à +/- 23 heures de l’heure du signal reçu. RMR802A: Sélectionnez le fuseau horaire : Heure Pacifique (P), des Montagnes (M), Centrale (C) ou de la Côte Est (E). -
Page 31: Température
Pour sélectionner le mode d’affichage: Appuyez sur MODE pour choisir l’affichage de l’horloge avec les secondes / jours de la semaine / calendrier. TEMPERATURE Pour sélectionner l’unité de température: Appuyez sur °C / °F. Pour alterner entre les relevés de chaque sonde extérieure : Appuyez plusieurs fois sur Appuyez et maintenez... -
Page 32: Caractéristiques
• Le poser sur certaines surfaces en bois peut endommager la finition du meuble, et Oregon Scientific ne peut en être tenu responsable. Consultez les mises en garde du fabricant du meuble pour de plus amples informations. • Le contenu du présent manuel ne peut être reproduit sans la permission du fabriquant. - Page 33 EUROPE - DECLARATION DE CONFORMITE Par la présente Oregon Scientific déclare que l’appareil Thermomètre solaire intérieur et extérieur avec heure radio pilotée (Modèle: RMR802 / RMR802A) est conforme aux exigences essentielles et aux autres dispositions pertinentes de la directive 1999/5/CE. Une copie signée et datée de la déclaration de conformité...
- Page 34 Termometro IN/OUT con orologio e alimentazione a energia solare Modello: RMR802 / RMR802A MANUALE PER L’UTENTE INDICE Panoramica ... 2 Vista Anteriore ... 2 Vista Posteriore ... 2 Sensore Remoto ... 3 Operazioni Preliminari ... 3 Pannello Solare ... 3 Inserimento Delle Batterie ...
-
Page 35: Panoramica
PANORAMICA VISTA ANTERIORE 1. Pannello solare 2. Indicatore della ricezione del sensore remoto 3. Indicatore della ricezione del segnale orario 4. Temperatura interna 5. MODE: consente di modificare le impostazioni / la visualizzazione dei dati sul display : consente di aumentare o diminuire l’impostazione e di attivare o disattivare il segnale di ricezione dell’ora;... -
Page 36: Sensore Remoto
2. EU / UK: consente di selezionare il segnale radio più vicino (solo il modello RMR802) 3. °C / °F: consente di selezionare l’unità di visualizzazione della temperatura SENSORE REMOTO 1. Indicatore LED di stato 2. Foro per fissaggio a parete 3. -
Page 37: Trasmissione Dei Dati Del Sensore
4. Chiudere il vano batterie. 5. Posizionare il sensore entro 30 m dall’unità principale utilizzando il supporto da tavolo o il foro per il montaggio a parete. SUGGERIMENTO La collocazione ideale del sensore è un luogo all’esterno dell’abitazione ad un’altezza non inferiore a 1 ½... -
Page 38: Orologio
(giorno – mese / mese – giorno), mese, giorno e lingua. RMR802: La differenza di fuso orario imposta l’orologio a + / - 23 ore dall’ora del segnale ricevuto. RMR802A: Selezionare la zona relativa al fuso orario: (P) Pacific, (E) Eastern, (C) Central oppure (M) Mountain. -
Page 39: Temperatura
TEMPERATURA Selezione delle unità di visualizzazione della temperatura: Premere °C / °F. Per alternare le rilevazioni di ciascun sensore esterno: Premere ripetutamente OPPURE Tenere premuto + MEM per 2 secondi per avviare l’alternanza automatica dei canali esterni. Alternanza delle rilevazioni attuale, minima e massima: Premere ripetutamente MEM. -
Page 40: Specifiche Tecniche
DICHIARAZIONE DI CONFORMITA’ UE Con la presente Oregon Scientific dichiara che questo prodotto (Modello:RMR802 / RMR802A) è conforme ai requisiti essenziali ed alle altre disposizioni pertinenti stabilite dalla direttiva 1999/5/CE. Una copia firmata e datata della Dichiarazione di Conformità è disponibile, su richiesta, tramite il servizio clienti della Oregon Scientific. - Page 41 Binnen- en buitenthermometer op zonne-energie met Atoomtijd Model: RMR802 / RMR802A HANDLEIDING INHOUD Overzicht ... 2 Voorkant ... 2 Achterkant ... 2 Buitensensor ... 3 Starten ... 3 Zonnepaneel ... 3 Plaats De Battierijen ... 3 Buitensensor ... 3 Sensor Gegevens Verzending ... 4 Klok ...
- Page 42 OVERZICHT VOORKANT 1. Zonnepaneel 2. Ontvangstindicator buitensensor 3. Ontvangstindicator van kloksignaal 4. Binnentemperatuur 5. MODE: Instellingen / Scherm Aanpassen : Verhogen / verlagen instelling; aanzetten / uitzetten klok ontvangstsignaal; buitenkanalen (1-3) 7. Buitentemperatuur 8. Tijdzone (alleen RMR802A) 9. Klok met dag van de week 10.
-
Page 43: Buitensensor
1. RESET: apparaat standaardinstellingen 2. EU / UK: Selecteer dichtstbijzijnde kloksignaal (alleen RMR202) 3. °C / °F: Temperatuureenheid Selecteren BUITENSENSOR 1. Statusindicator LED 2. Muurbevestigingsgat 3. Batterijvak 4. RESET gat 5. KANAAL schakelaar STARTEN ZONNEPANEEL Het zonnepaneel dient ter energiebesparing, en is een milieuvriendelijke oplossing om het basisstation van extra terugzetten stroom te voorzien, zodat de batterijen langer meegaan. -
Page 44: Sensor Gegevens Verzending
U kunt het best verschillende plekken uitproberen om de beste voor uw sensor te vinden. KLOK KLOK ONTVANGST Dit product is ontworpen om zijn klok automatisch te synchroniseren door middel van een kloksignaal. RMR802: Schuif de EU / UK schakelaar naar het te ontvangen signaal. -
Page 45: Klok Handmatig Instellen
(dag – maand / maand – dag), maand, dag en taal. RMR802: De tijdzone stelt de klok in op tot + / -23 uur van het ontvangen kloksignaal. RMR802A: Selecteer de tijdzone: (P) Westkust, (E) Oostkust, (C) Centraal, of (M) Gebergte. -
Page 46: Vorstwaarschuwing
Om te kiezen tussen huidige, minimum en maximum gegevens: Druk herhaaldelijk op MEM. Om de gegevens te wissen: Houd MEM ingedrukt. VORSTWAARSCHUWING Als de sensor op kanaal 1 tussen de 3°C tot –2°C (37°F tot 28°F) komt, zal de indicator-LED gaan knipperen, en hij zal weer stoppen wanneer de temperatuur weer buiten deze zone gaat. -
Page 47: Specificaties
EU-VERKLARING VAN CONFORMITEIT Bij deze verklaart Oregon Scientific dat deze Binnen- en buitenthermometer op zonne-energie met Atoomtijd (Model: RMR802 / RMR802A) voldoet aan de essentiële 122 ºF) eisen en aan de overige relevante bepalingen van Richtlijn 1999/5/EC. Een kopie van de getekende en gedateerde Conformiteits verklaring is op verzoek beschikbaar via onze Oregon Scientific klanten service. - Page 48 Solar termômetro de interior e exterior com relógio atômico Modelo: RMR802 / RMR802A MANUAL DO USUÁRIO ÍNDICE Visão Geral ... 2 Vista Frontal ... 2 Vista Traseira ... 2 Sensor Remoto ... 3 Primeiros Passos ... 3 Painel Solar ... 3 Inserção De Pilhas ...
- Page 49 VISÃO GERAL VISTA FRONTAL 1. Painel solar 2. Indicador de recepção do sensor remoto 3. Indicador de recepção do sinal do relógio 4. Temperatura interna 5. MODE: altera os ajustes / display : aumenta / diminui o ajuste; ativa / desativa o sinal de recepção do relógio;...
-
Page 50: Sensor Remoto
2. EU / UK: seleciona o sinal de rádio mais próximo (RMR802 apenas) 3. °C / °F: seleciona a unidade de temperatura SENSOR REMOTO 1. Indicador LED de status 2. Orifício para montagem em parede 3. Compartimento de pilhas 4. Orifício de RESET 5. -
Page 51: Transmissão De Dados Do Sensor
RELÓGIO RECEPÇÃO DO RELÓGIO Este produto foi projetado para sincronizar seu relógio automaticamente com um sinal do relógio. RMR802: Deslize EU / UK para selecionar o sinal recebido. • EU: Sinal DCF-77: dentro de 1500 km (932 milhas) de Frankfurt, Alemanha. -
Page 52: Ajuste Manual Do Relógio
(dia - mês / mês - dia), mês, dia e idioma. RMR802: O deslocamento do fuso horário faz um ajuste em + / - 23 horas com base na hora do sinal do relógio recebido. -
Page 53: Aviso De Gelo
AVISO DE GELO Se a temperatura do sensor do canal 1 cair e ficar entre 3°C e -2 °C (37°F e 28°F), o indicador LED piscará e parará de piscar uma vez que a temperatura ficar fora de faixa. NOTA Já que o alerta de gelo só é aplicável ao canal 1, para evitar que o LED fique piscando, selecione o canal 2 ou 3 no sensor externo. -
Page 54: Especificações
DECLARAÇÃO DE CONFORMIDADE DA UE Oregon Scientific declara que este(a) Solar termômetro onças) de interior e exterior com relógio atômico (Modelo: RMR802 / RMR802A) está conforme com os requisitos essenciais e outras provisões da Diretriz 1999/5/CE. Uma cópia assinada e datada da Declaração de Conformidade está... - Page 55 Sol inomhus och utomhustermometer med radiokontrollerad klocka Modell: RMR802 / RMR802A BRUKSANVISNING INNEHÅLL Produktöversikt ... 2 Vy Framsida ... 2 Vy Baksida ... 2 Trådlös sensor ... 3 Att Komma Igång ... 3 Solpanel ... 3 Sätt i batterier ... 3 Trådlös sensor ...
- Page 56 PRODUKTÖVERSIKT VY FRAMSIDA 1. Solpanel 2. Mottagningsindikator för fjärrsensor 3. Indikator för radiomottagningssignal 4. Inomhustemperatur 5. MODE: Ändra display / inställningar : Öka / minska inställning, aktivera / avaktivera klockmottagning; utomhuskanaler (1-3) 7. Utomhustemperatur 8. Tidszon (endast RMR802A) 9. Klocka med veckodag 10.
-
Page 57: Trådlös Sensor
1. RESET: Återställ enheten till fabriksinställning 2. EU / UK: Välj närmsta radiosignal (endast RMR802) 3. °C / °F: Välj temperaturenhet TRÅDLÖS SENSOR 1. LED indikator 2. Väggmonteringshål 3. Batterifack 4. RESET knapp 5. Kanalomkopplare ATT KOMMA IGÅNG SOLPANEL Solpanelen är en energisparande funktion, som är ett miljövänligt sätt att tillföra ytterligare kraft till... -
Page 58: Sensor Dataöverföring
KLOCKA KLOCKMOTTAGNING Denna produkt är avsedd att synkronisera klockan automatiskt med en klocksignal. RMR802: Ställ EU / UK för att välja önskad signal. • EU: DCF-77 signal: inom 1500 km från Frankfurt, Tyskland. -
Page 59: Manuell Inställning Av Klockan
4. Ordningen för inställningarna är: tidszon, 12/24 tim format, timme, minut, år, datum mode (dag – månad / månad – dag), månad, dag och språk. RMR802: Tidszonsinställningen kan användas för att ställa klockan upp till + / -23 timmar från den mottagna klocktiden. -
Page 60: Halkvarning
HALKVARNING Om sensorn på kanal 1 mäter mellan 3°C och -2 °C kommer LED-indikatorn att blinka, och kommer att sluta blinka när temperaturen är utanför detta område. NOTERA Då isvarning endast fungerar på kanal 1 bör du för att undvika att LED-skärmen blinkar, välja kanal 2 eller 3 som utomhussensor. -
Page 61: Specifikationer
EU-FÖRSÄKRAN OM ÖVERENSSTÄMMELSE Härmed intygar Oregon Scientific att denna Sol inomhus och utomhustermometer med radiokontrollerad klocka (Modell:RMR802 / RMR802A) står I överensstämmelse med de väsentliga egenskapskrav och övriga relevanta bestämmelser som framgår av direktiv 1999/5/EG. En signerad kopia av “DECLARATION OF CONFORMITY”... - Page 62 © 2009 Oregon Scientific. All rights reserved. P/N: 300102249-00001-10...
Need help?
Do you have a question about the RMR802 and is the answer not in the manual?
Questions and answers