
Subscribe to Our Youtube Channel
Related Manuals for Seneca R-P Series


Summary of Contents for Seneca R-P Series
- Page 1 USER MANUAL SERIES R-P I/O WITH PROFINET IO PROTOCOL SENECA S.r.l. Via Austria 26 – 35127 – Z.I. - PADOVA (PD) - ITALY Tel. +39.049.8705355 – 8705355 Fax +39 049.8706287 www.seneca.it ORIGINAL INSTRUCTIONS...
- Page 2 Set-up must be performed only after correct installation and the user must follow all the operations described in the installation manual carefully. Seneca is not responsible for failures, breakages and accidents caused by ignorance or failure to apply the stated requirements.
- Page 3 User Manual R-P SERIES Document revisions DATE REVISION NOTES AUTHOR 20/02/2023 First revision Supported devices: R-32DIDO-1-P, R-16DI-8DO-P, R-8AI-8DIDO-P 02/03/2023 Chapter 'Protection of digital outputs' added 16/03/2023 Added chapter on FW Update Moved chapter on configuring gsdml file parameters Added info on the procedure to reset the configuration to factory default...
-
Page 4: Table Of Contents
6.2. INSERTION OF THE SIEMENS PLC IN THE PROJECT ......................12 6.3. INSERTION OF THE PROFINET SENECA IO ........................15 6.4. CONFIGURATION OF THE PARAMETERS OF THE SENECA DEVICE ................18 6.5. CONFIGURATION PARAMETERS OF THE GSDML FILE ....................19 6.5.1. R-32DIDO-P ..................................19 6.5.2. - Page 5 User Manual R-P SERIES 9. SEARCH AND MODIFICATION OF THE DEVICE IP WITH SENECA DISCOVERY TOOL ..........................49 FIRMWARE UPDATE....................50 www.seneca.it ALL RIGHTS RESERVED. NO PART OF THIS PUBLICATION MAY Doc: MI-00605-3-IT Page 5 BE REPRODUCED WITHOUT PRIOR PERMISSION.
-
Page 6: Introduction
Use the installation manual for more information. ATTENTION! In any case, SENECA s.r.l. or its suppliers will not be responsible for the loss of data/revenue or consequential or incidental damages due to negligence or bad/improper management of the device, even if SENECA is well aware of these possible damages. -
Page 7: Protection Of Digital Outputs
User Manual R-P SERIES 2.2.1. PROTECTION OF DIGITAL OUTPUTS The outputs are protected against overload and against overtemperature, they open cyclically until the fault is repaired or the output opens. The limit current is between 0.6 and 1.2 A. 2.2.2. I/O REACTION TIME With an update time of the Profinet IO cycle set at 2ms (default) we obtain that: The switching of a digital input is updated in the communication in maximum 4ms. -
Page 8: Analogue Input Update Time
User Manual R-P SERIES 2.4.1. ANALOGUE INPUT UPDATE TIME The sampling time of the analogue inputs depends on the ADC sampling time. If an analogue input is disabled, its acquisition time must not be counted. The refresh time of an analogue channel is: [ ����... -
Page 9: Resetting The Device To Factory Configuration
Where x.y are the last two values of the MAC ADDRESS. This way it is possible to install more I/O of the R series and then configure the IP with the Seneca Discovery Device software even on networks without a DHCP server. -
Page 10: Access To The Web Server
User Manual R-P SERIES ATTENTION! BEFORE ACCESSING THE WEB SERBER, DISCONNECT THE DEVICE FROM THE PROFINET NETWORK The main purpose of the web server is to: -Configure the Profinet name of the device without using an external development environment (Tia Portal, Codesys,…) -
Page 11: Example Of Creating A Project With Siemens Plc (Tia Portal 16)
Creating a new project: 6.1. INSTALLING THE GSDML FILE Install the GSDML file of the Seneca product (it is possible to obtain the file on the web page of the device on www.seneca.it site): Point to the directory where the file is and press OK, then the list of GSD files in the folder will appear: www.seneca.it... -
Page 12: Insertion Of The Siemens Plc In The Project
User Manual R-P SERIES Click on "install". 6.2. INSERTION OF THE SIEMENS PLC IN THE PROJECT Now insert the Siemens PLC (in our example a SIEMATIC S7 1200), click on "Add new device ...": www.seneca.it ALL RIGHTS RESERVED. NO PART OF THIS PUBLICATION MAY... - Page 13 User Manual R-P SERIES Confirm and the PLC will be added to the rack: Now click on the PLC and select Profinet interface -> Ethernet addresses www.seneca.it ALL RIGHTS RESERVED. NO PART OF THIS PUBLICATION MAY Doc: MI-00605-3-IT Page 13...
- Page 14 User Manual R-P SERIES Set the IP you want (in this case 192.168.90.44) and the PLC subnet: www.seneca.it ALL RIGHTS RESERVED. NO PART OF THIS PUBLICATION MAY Doc: MI-00605-3-IT Page 14 BE REPRODUCED WITHOUT PRIOR PERMISSION.
-
Page 15: Insertion Of The Profinet Seneca Io
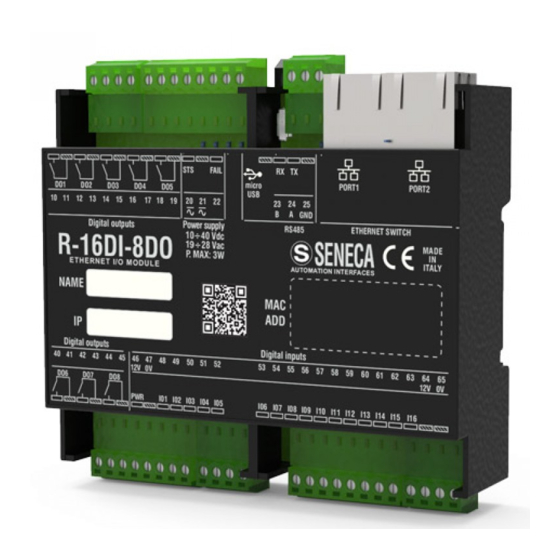
INSERTION OF THE PROFINET SENECA IO On the right, select "Hardware Catalogue" and then under "Additional Field Device" -> PROFINET IO -> I/O -> Seneca R-Series-> Header module (in the example an R-16DI-8DO device is shown): www.seneca.it ALL RIGHTS RESERVED. NO PART OF THIS PUBLICATION MAY... - Page 16 User Manual R-P SERIES Drag the device to the network view: Now associate it to the PLC by clicking with the left mouse on "Not assigned" and then select the PLC: www.seneca.it ALL RIGHTS RESERVED. NO PART OF THIS PUBLICATION MAY...
- Page 17 R-P SERIES Click twice on the Seneca device and configure the IP address here too (for example 192.168.90.48): In Profinet the devices are identified by their name, so right click on the Seneca device and select "Assign device name" ATTENTION! DO NOT INSERT SPECIAL CHARACTERS IN THE PROFINET NAME OF THE DEVICE www.seneca.it...
-
Page 18: Configuration Of The Parameters Of The Seneca Device
Scan the network with "Update list" and set (if necessary) the device name with "Assign name". 6.4. CONFIGURATION OF THE PARAMETERS OF THE SENECA DEVICE It is also possible to directly configure the device IO without any external software. To configure the device, click on the IO so that the "Unit parameters" appear: At the next start, the PLC will send the desired configuration to the device. -
Page 19: Configuration Parameters Of The Gsdml File
User Manual R-P SERIES 6.5. CONFIGURATION PARAMETERS OF THE GSDML FILE 6.5.1. R-32DIDO-P SET DIGITAL IO INPUT/OUTPUT Selects whether the selected input will work as an input or output. SET DIGITAL INPUT NORMALLY HIGH/LOW If selected as digital input, it configures whether the input is normally high or low. -
Page 20: R-8Ai-8Dido-P
User Manual R-P SERIES Set whether the digital output watchdog is to activated. When enabled, if within the timeout time there has been no communication from the master to the device, the outputs go into a Fail state. This mode allows to obtain a safe system in case of malfunction of the master. - Page 21 User Manual R-P SERIES Set the type of measurement for the selected input. It is possible to choose between the following types of input: +-30V +-100mV +-20 mA Thermocouple PT100 2 wires (for use as a cold junction and only for input 1) PT100 3 wires (for use as a cold junction and only for input 1).
- Page 22 User Manual R-P SERIES In the case of thermocouple measurement, it enables or disables the automatic cold junction offset of the device. If channel 1 has been configured as PT100 cold junction measurement, this sensor will be used for the offset and not the one inside the instrument.
-
Page 23: R-32Dido-P I/O Data
User Manual R-P SERIES 6.6. R-32DIDO-P I/O DATA Define the PLC tags directly in the "standard tag table": Now let's add the variables related to the IO, the addresses are shown here: Bytes I1 to I4 contain the inputs (bit 0 is IO1, bit 1 is IO2 etc ...) Bytes Q1 to Q4 contain the outputs (bit 0 is IO1, bit 1 is IO2 etc ...), obviously only the outputs are writable. - Page 24 User Manual R-P SERIES Below is the default mapping of available IOs: INGRESSO/USCITA INDIRIZZO DEFAULT INDIRIZZO DEFAULT IO CONFIGURATO IO CONFIGURATO COME COME INGRESSO USCITA I1.0 Q1.0 I1.1 Q1.1 I1.2 Q1.2 I1.3 Q1.3 I1.4 Q1.4 I1.5 Q1.5 I1.6 Q1.6 I1.7 Q1.7...
- Page 25 User Manual R-P SERIES ATTENTION! An IO configured as an input cannot be controlled as an output. An IO configured as an output cannot be read as an input. Always following our example (16 inputs and 16 outputs) we define the 16 inputs and 16 outputs in the standard variables table: Now compile, send the project and go online with the PLC.
-
Page 26: R-16Di-8Do-P I/O Data
User Manual R-P SERIES Under the "Control value" column you can read the I/O value in real time. To control the outputs, it is necessary to enter "TRUE” or “FALSE” in the "Command value" column and then press the icon with the lightning bolt to order the writing. Note the status of the LED relating to the commanded output. - Page 27 User Manual R-P SERIES So bytes I1 and I2 contain the 16 inputs, byte Q1 the 8 outputs: After this operation, define a new control table: Click on "Add new control table" and then insert the variables Since you have already defined them previously, just select the ones we want to monitor from the list: www.seneca.it...
- Page 28 User Manual R-P SERIES Once you have added all of them you will get: Now compile, send the project and go online with the PLC (all operations seen previously). www.seneca.it ALL RIGHTS RESERVED. NO PART OF THIS PUBLICATION MAY Doc: MI-00605-3-IT Page 28 BE REPRODUCED WITHOUT PRIOR PERMISSION.
- Page 29 User Manual R-P SERIES Once online, press the glasses icon to update the status of the variables: Under the "Control value" column you can read the I/O value in real time. www.seneca.it ALL RIGHTS RESERVED. NO PART OF THIS PUBLICATION MAY...
- Page 30 User Manual R-P SERIES To control the outputs, it is necessary to enter "TRUE" in the "Command value" column and then press the icon with the lightning bolt to order the writing: In the "Control value" column, the outputs are now correctly read to "True".
-
Page 31: R-8Ai-8Dido-P I/O Data
User Manual R-P SERIES 6.8. R-8AI-8DIDO-P I/O DATA Define the PLC tags directly in the "standard tag table": Add the tags related to the IO (in the example it is an R-16DI-8DO that is 16 digital inputs and 8 digital outputs). -
Page 32: Compilation And Sending Of The Project To The Siemens Plc
User Manual R-P SERIES I1.4 Q1.4 I1.5 Q1.5 I1.6 Q1.6 I1.7 Q1.7 The default mapping of the analogue IOs is as follows: ANALOGUE DEFAULT ADDRESS INPUT INPUT AIN1 AIN 2 AIN 3 AIN 4 AIN 5 IW10 AIN 6 IW12... - Page 33 User Manual R-P SERIES Before sending the project to the PLC, you are asked to select the ethernet interface and start the search, in order to select the PLC and press "Load". Once the project has been sent, RUN the PLC: And go ON-Line so as to check if there are any errors: www.seneca.it...
- Page 34 User Manual R-P SERIES If everything is correct you will get a green icon next to the Seneca device: www.seneca.it ALL RIGHTS RESERVED. NO PART OF THIS PUBLICATION MAY Doc: MI-00605-3-IT Page 34 BE REPRODUCED WITHOUT PRIOR PERMISSION.
-
Page 35: Example Of Creating A Project With Plc Codesys 3.5
User Manual R-P SERIES EXAMPLE OF CREATING A PROJECT WITH PLC CODESYS 3.5 Create a new standard project: 7.1.1. INSERTION OF THE CODESYS PLC IN THE PROJECT Configure the PLC by selecting it in the tree on the left and then browsing the network: www.seneca.it... - Page 36 User Manual R-P SERIES Select the PLC after scanning the network: The PLC is now connected to the system: Now that the PLC has been detected, move on to insert a Profinet port on standard Ethernet: Right click on device and "add device": www.seneca.it...
- Page 37 User Manual R-P SERIES Then add the Profinet IO Master: Double click on Ethernet, set the Ethernet port and the IP address of the PLC (in this case use 192.168.90.44): www.seneca.it ALL RIGHTS RESERVED. NO PART OF THIS PUBLICATION MAY...
- Page 38 User Manual R-P SERIES Set also the address range for the Profinet peripheral, double click on PN_Controller: www.seneca.it ALL RIGHTS RESERVED. NO PART OF THIS PUBLICATION MAY Doc: MI-00605-3-IT Page 38 BE REPRODUCED WITHOUT PRIOR PERMISSION.
-
Page 39: Installing The Gsd
User Manual R-P SERIES 7.1.2. INSTALLING THE GSD Now you need to connect the Seneca slave device PROFINET IO to the profinet master (controller). First install the GSD file of the Seneca IO. Select Tools->Device Repository: Now import the GSD file by selecting Profinet IO Slave and then Install: Now point to the correct folder and press OK. - Page 40 User Manual R-P SERIES First compile the project and log in to the PLC: www.seneca.it ALL RIGHTS RESERVED. NO PART OF THIS PUBLICATION MAY Doc: MI-00605-3-IT Page 40 BE REPRODUCED WITHOUT PRIOR PERMISSION.
-
Page 41: Installation Of The Seneca Profinet Io
7.1.3. INSTALLATION OF THE SENECA PROFINET IO Now that you are connected to the PLC, run the scan to find the devices: In the list of devices, select the Seneca IO and then "Copy to project": www.seneca.it ALL RIGHTS RESERVED. NO PART OF THIS PUBLICATION MAY... -
Page 42: Configuration Of The Parameters Of The Seneca Io
R-P SERIES At this point you have added the device to the project: 7.1.4. CONFIGURATION OF THE PARAMETERS OF THE SENECA IO If you want to change the IO configuration parameters, you can set them from here: Check that everything is correct by compiling and running the PLC. - Page 43 User Manual R-P SERIES The PLC (Raspberry-pi) is quite slow and not real time, consequently it cannot manage the profinet at maximum speed so we modify the values by setting safety parameters: www.seneca.it ALL RIGHTS RESERVED. NO PART OF THIS PUBLICATION MAY...
-
Page 44: Reading And Writing The Seneca Io From Codesys
7.1.5. READING AND WRITING THE SENECA IO FROM CODESYS Now see how it is possible to read and write IO on the Seneca device. To write and read the status of the IO you have to insert a few code lines under PRG. - Page 45 User Manual R-P SERIES The value of the inputs can be read here: while to write the outputs you just set the byte value in the "prepared value" column, for example by writing 255 decimal = 11111111 binary all the outputs will be brought to 1: And then with "Write values"...
-
Page 46: Cable Harness For Models With Double Ethernet Port
User Manual R-P SERIES CABLE HARNESS FOR MODELS WITH DOUBLE ETHERNET PORT Models with double Ethernet port can be connected in daisy chain and take advantage of the Lan Fault Bypass. 8.1. CHAIN ETHERNET CONNECTION (DAISY CHAIN) Using the daisy chain connection it is not necessary to use switches to connect the devices. - Page 47 User Manual R-P SERIES www.seneca.it ALL RIGHTS RESERVED. NO PART OF THIS PUBLICATION MAY Doc: MI-00605-3-IT Page 47 BE REPRODUCED WITHOUT PRIOR PERMISSION.
-
Page 48: Lan Fault-Bypass Function
User Manual R-P SERIES In the Ethernet wiring there must be no loop, otherwise the communication will not work, some examples of incorrect wiring are the following: 8.2. LAN FAULT-BYPASS FUNCTION The LAN fault-bypass function allows you to keep the connection between the two Ethernet ports of the device ON, in the event of power failure problems. - Page 49 The software can be downloaded from: https://www.seneca.it/en/linee-di-prodotto/software/easy/sdd Pressing the "search" button starts the search for all Seneca devices present in the network even if with IP addresses not compatible with the current PC configuration: It is now possible to change the address by pressing the "Assign" button: www.seneca.it...
- Page 50 User Manual R-P SERIES The software works on layer 2 level and it is therefore not necessary to have an Ethernet configuration compatible with the device you are looking for. FIRMWARE UPDATE The firmware update can be performed via the web server in the appropriate section.
Need help?
Do you have a question about the R-P Series and is the answer not in the manual?
Questions and answers