Ormesa Grillo Use And Maintenance Handbook
Seating system with adjustable configuration
Hide thumbs
Also See for Grillo:
- Use and maintenance handbook (48 pages) ,
- Use and maintenance handbook (84 pages) ,
- Use and maintenance handbook (80 pages)
Table of Contents
Advertisement
Quick Links
Advertisement
Table of Contents

Related Manuals for Ormesa Grillo


Summary of Contents for Ormesa Grillo
- Page 1 Seating system with adjustable configuration USE AND MAINTENANCE HANDBOOK...
-
Page 3: Table Of Contents
1. GENERAL INFORMATIONS ..................3 1.1 THANKS FOR CHOOSING THE MEDICAL DEVICE ..............3 1.2 CONTACT DETAILS FOR ASSISTANCE ................... 3 1.3 PACKAGING INFORMATION. UNPACKING INSTRUCTIONS AND SUPPLY COMPOSITION ..4 1.4 MECHANICAL AND DIMENSIONAL CHARACTERISTICS ............6 1.5 PRODUCT PARTS LEGEND ....................7 1.6 SYMBOLOGY USED IN THE MANUAL ................... - Page 4 POSTURAL HEADREST 863 ....................33 HOW TO REMOVE THE HEADREST 863 ................35 HEADREST 835 AND 865 ....................36 PELVIC BELT WITH VARIABLE ANGLE 947 ................37 FOUR POINT PELVIC BELT 920 ................... 38 TRUNK SIDE SUPPORTS 838 ....................39 WRAPPABLE AND FLEXIBLE TRUNK SUPPORTS 868 ............
-
Page 5: General Informations
ORMESA s.r.l. thanks you for your confidence in choosing GRILLO Adaptive Seating, a medical device designed and manufactured by ORMESA Srl, an ISO 13485 certified company. GRILLO Adaptive Seating is a compact high chair for children and young people designed to be used in the performance of school, daily and play activities. -
Page 6: Packaging Information. Unpacking Instructions And Supply Composition
29,9 26,7 25.067 HOW TO TAKE GRILLO ADAPTIVE SEATING OUT OF THE BOX CAUTION! CUT WITHOUT PRESSING TOOT HARD WITH THE BLADE SO AS NOT TO DAMAGE THE CONTENTS OF THE BOX 2) TAKE THE ACCESSORIES OUT OF THE BOX TILT THE BOX TAKING CARE NOT TO SMEAR THE CONTENTS Pag. - Page 7 90° SUPPLY COMPOSITION SEGGIOLONE a configurazione regolabile Allen key MANUALE D’USO E MANUTENZIONE 2 harmrest Use and maintenance handbook Pag. 5/67...
-
Page 8: Mechanical And Dimensional Characteristics
MECHANICAL AND DIMENSIONAL CHARACTERISTICS User height size mini: 75-105 cm (29,5-41,3 in) User height size S: 90-120 cm (35,4-47,2 in) User height size M: 110-145 cm (43,3-57 in) peso portata SIZE totale max. (cm) (cm) (cm) (cm) (cm) (cm) (cm) (cm) (cm) (cm) -
Page 9: Product Parts Legend
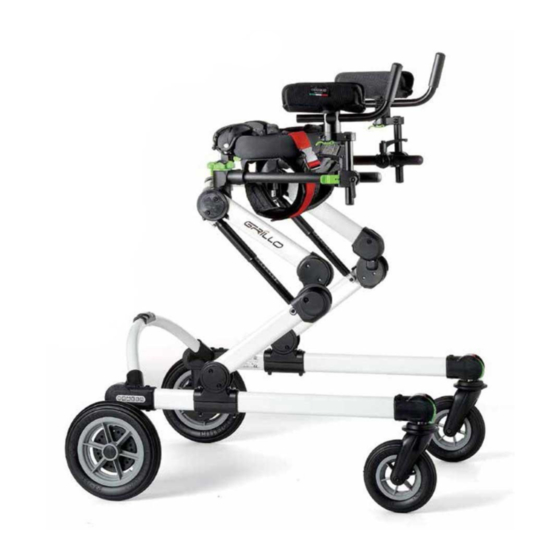
1.5 PRODUCT PARTS LEGEND HEADREST (according to the chosen configuration) HANDLE FRAME BACKREST LOAD-BEARING UPHOLSTERY REMOVABLE COVER HARMRESTS PELVIC SIDE SUPPORTS PELVIC BELT WITH VARIABLE ANGLE (947) provided as standard SEAT LEGRESTS CALF RESTS FOOTRESTS WHEELS RED SAFETY KNOB AND RED PEDAL FOR HEIGHT ADJUSTMENT BACK VIEW Pag. -
Page 10: Symbology Used In The Manual
Do not disperse the product in the environment after use IDENTIFICATION PLATE THE CE MARKING CERTIFIES GRILLO ADAPTIVE SEATING CONFORMS TO THE SAFETY REQUIREMENTS defined with the REGULATION (EU) 2017/745 OF THE EUROPEAN PARLIAMENT AND OF THE COUNCIL of 5 April 2017 applicable... -
Page 11: Legal And Regulatory References
2. LEGAL AND REGULATORY REFERENCES 2.1 LEGAL REFERENCES Regulation (EU) 2017/745 of the European Parliament and of the Council of April 5, 2017 on medical devices, repealing Council Directive 93/42/EEC, hereinafter also referred to as "Regulation (EU) 745/2017", or "RDM" 2.2 REGULATORY REFERENCES HARMONIZED STANDARDS Dispositivi medici - Sistemi di gestione per la qualità... -
Page 12: Warranty Conditions
2.3 WARRANTY CONDITIONS ORMESA and INNOVATION IN MOTION warrant the product for 2 years: in case of problems, contact the supplier (health professional) where you purchased it. Always ask for original spare parts, otherwise the guarantee will decline. ORMESA s.r.l. will not be liable for damage in the following cases: - use by an unsuitable person;... -
Page 13: Specific Warnings
National Health System. - GRILLO ADAPTIVE SEATING is a mechanical medical device. It must be delivered to the user by a health care professional who is responsible for explaining its functionality, the warnings and maintenance contained in this manual, performing the assembly/adjustment of components, and providing aftercare on the product. -
Page 14: Contraindications And Side Effects
DO NOT USE THE MEDICAL DEVICE IF THERE ARE DAMAGED OR MISSING PARTS. 3.5 CONTRAINDICATIONS AND SIDE EFFECTS GRILLO Adaptive Seating generalmente non è indicato per soggetti con deformità muscolo scheletriche strutturate gravi, che necessitino di unità posturali. 3.6 OPERATING ENVIRONMENTAL CONDITIONS - THE MEDICAL DEVICE IS NOT DESIGNED FOR USE IN OUTDOOR ENVIRONMENTS, unless it is a flat, paved and weather-protected surface. -
Page 15: Pre-Installation/Installation And Commissioning
§ 5.3 on page 16. 4.3 DESCRIPTION OF THE MEDICAL DEVICE Grillo Adaptive Seating is a compact adjustable configuration seating system that is ideal for use in many contexts, such as performing daily activities at school, at home, and during leisure time. -
Page 16: Operating Instructions
5. OPERATING INSTRUCTIONS 5.1 FIRST USE The medical device MUST BE CONFIGURED AND REGULATED BY A HEALTHCARE PROFESSIONAL 5.2 ASSEMBLY VIEW FROM BEHIND... - Page 17 LATERAL VIEW ARMREST HEIGHT ADJUSTMENT SCREW WRENCH SUPPLIED Pag. 15/67...
-
Page 18: Adjustment And Configuration Of The Medical Device By The Health Professional
5.3 ADJUSTMENT AND CONFIGURATION OF THE MEDICAL DEVICE by the health professional BRAKING BEWARE! BEFORE PLACING OR REMOVING THE CHILD FROM GRILLO AS AND BEFORE ANY ADJUSTMENT, IT IS NECESSARY O BRAKE THE AID. UNLOCK LOCK Pag. 16/67... -
Page 19: Backrest Height Adjustment
BACKREST HEIGHT ADJUSTMENT (video on the product page of the website www.ormesa.com) 1) LOOSEN THE SIDE SCREWS INDICATED 2) ADJUST THE HEIGHT OF THE BACKREST TO THE DESIRED POSITION TIGHTEN THE SCREWS BACKREST HEIGHT ADJUSTMENT SCREW WRENCH PRESS LIGHTLY SUPPLIED... -
Page 20: Backrest Inclination Adjustment
BACKREST INCLINATION ADJUSTMENT (video on the product page of the website www.ormesa.com) PLACE YOUR HAND ON THE HANDLE WITH THE OTHER HAND LOWER THE RED KNOB TO ADJUST THE INCLINATION OF THE BACKREST TILT THE BACKREST HOLDING DOWN THE KNOB (2) AND LEAVE IT WHEN THE BACKREST HAS REACHED THE DESIRED POSITION. -
Page 21: 863 Headrest Adjustment
863 HEADREST ADJUSTMENT INCLINATION AND DEPTH ADJUSTMENT 1) OPEN THE 4 LOCKING LEVERS 2) ADJUST THE INCLINATION AND DEPTH OF THE HEADREST 3) CLOSE THE LOCKING LEVERS CLOSED OPEN LOCKING LEVERS VIEW FROM BEHIND THE RIGHT AND LEFT SIDES CAN BE ASYMMETRICALLY ADJUSTED TO ACHIEVE AN OBLIQUE... - Page 22 HEIGHT ADJUSTMENTS 1) LOOSEN THE SCREWS (BOTH SIDES) 2) ADJUST THE HEIGHT OF THE HEADREST 3) TIGHTEN THE SCREWS (BOTH SIDES) HEIGHT ADJUSTMENT SCREW FOR HEADREST PRESS LIGHTLY WITH THE WRENCH INSERTED IN THE HOLE TO UNLOCK THE CURSOR FROM THE GUIDE SUPPLIED WRENCH...
-
Page 23: Seat Tilt Adjustment (Tilt In Space)
SEAT TILT ADJUSTMENT (TILT IN SPACE) (video on the product page of the website www.ormesa.com) PLACE YOOUR HAND ON THE HANDLE WITH YOUR OTHER HAND OPEN THE SPRING LOCK AND HOLDING IT OPEN MOVE THE GREEN TILT ADJUSTMENT KNOB UPWARDS TILT THE SEAT BY HOLDING PULLED THE KNOB (3) AND LET GO WHEN THE BASCULATION HAS REACHED THE DESIRED POSITION. - Page 24 ATTENTION! BEFORE ADJUSTING THE TILT OF THE SEAT WITH THE USER, MAKE SURE THAT THE BELT PROVIDED IS CORRECTLY ATTACHED, SO AS TO AVOID IT SLIDING FORWARD. AVOID SUDDEN MOVEMENTS TO THE USER SEATED/POSITIONED BACK VIEW SPRING LOCK LOCKED OPEN SPRING SPRING LOCK LOCK Pag.
-
Page 25: Seat Depth Adjustment
SEAT DEPTH ADJUSTMENT (video on the product page of the website www.ormesa.com) 1) LOOSEN THE SCREWS 2) ADJUST THE DEPTH OF THE SEAT 3) TIGHTEN THE SCREWS PRESS LIGHTLY WITH THE WRENCH INSERTED IN THE HOLE TO UNLOCK SEAT DEPTH... -
Page 26: Pelvic Side Supports Adjustment
PELVIC SIDE SUPPORTS ADJUSTMENT DEPTH ADJUSTMENT 1) LOOSEN THE SCREWS 2) ADJUST THE DEPTH OF THE PELVIC SIDE SUPPORTS 3) TIGHTEN THE SCREWS Supplied wrench PRESS LIGHTLY WITH THE WRENCH INSERTED IN THE HOLE TO UNLOCK THE CURSOR FROM THE GUIDE Pag. - Page 27 TILT AND WIDTH ADJUSTMENT 1) LOOSEN THE SCREWS 2) ADJUST THE SIDE SUPPORT IN TILT AND WIDTH 3) TIGHTEN THE SCREWS Supplied wrench SEAT: VIEW FROM ABOVE Pag. 25/67...
-
Page 28: Armrest Adjustment
ARMREST ADJUSTMENT HEIGHT ADJUSTMENT 1) LOOSEN THE SCREW 2) ADJUST THE HEIGHT OF THE ARMREST 3) TIGHTEN THE SCREW HARMREST HEIGHT ADJUSTMENT SCREW Supplied wrench PRESS LIGHTLY WITH THE WRENCH INSERTED IN THE HOLE TO UNLOCK THE CURSOR FROM THE GUIDE Pag. - Page 29 TILT ADJUSTMENT 1) TURN THE LEVER COUNTERCLOCKWISE TO RELEASE THE ARMREST 2) ADJUST THE ARMREST IN TILT 3) TURN THE LEVER CLOCKWISE TO LOCK IT ARMREST TILT LEVER ADJUSTMEN TOP VIEW T LEVER UNLOCK LEVER TOP VIEW LOCK Pag. 27/67...
-
Page 30: Calf Rests Adjustment
CALF RESTS ADJUSTMENT HEIGHT ADJUSTMENT 1) LOOSEN THE LATERAL SCREWS 2) ADJUST THE HEIGHT OF THE CALF RESTS 3) TIGHTEN THE SCREWS CALF REST HEIGHT ADJUSTMENT SCREW Supplied wrench PRESS LIGHTLY WITH THE WRENCH INSERTED IN THE HOLE TO UNLOCK THE CURSOR FROM THE GUIDE Pag. - Page 31 DEPTH ADJUSTMENT 1) LOOSEN THE LATERAL SCREWS 2) ADJUST THE DEPTH OF THE CALF RESTS 3) TIGHTEN THE SCREWS CALF REST DEPTH ADJUSTMENT SCREW Supplied wrench Pag. 29/67...
-
Page 32: Legrest Adjustment
LEGREST ADJUSTMENT TILT ADJUSTMENT 1) TURN THE LEVER COUNTERCLOCKWISE TO RELEASE THE LEGREST 2) ADJUST THE LEGREST IN TILT 3) TURN THE LEVER CLOCKWISE TO LOCK IT LEVER TOP VIEW LEGREST TILT ADJUSTMENT LEVER UNLOCK LEVER TOP VIEW LOCK Pag. 30/67... - Page 33 HEIGHT ADJUSTMENT 1) LOOSEN THE LATERAL SCREWS 2) ADJUST THE HEIGHT OF THE FOOTREST 3) TIGHTEN THE SCREWS FOOTREST HEIGHT ADJUSTMENT SCREW ESERCITATE UNA LEGGERA PRESSIONE CON LA CHIAVE INSERITA NEL FORO PER SBLOCCARE IL CURSORE DALLA GUIDA Suppplied wrench Pag.
-
Page 34: Footrests Adjustment
FOOTRESTS ADJUSTMENT 1) LOOSEN THE LATERAL SCREWS 2) ADJUST THE FOOTREST IN PLANTAR-DORSAL FLEXION. 3) TIGHTEN THE SCREWS SCREW ADJUSTMENT FLEXION-EXTENSION Supplied wrench Pag. 332/67... -
Page 35: Health Professional
5.4 ADJUSTMENT AND CONFIGURATION OF THE MEDICAL DEVICE BY THE HEALTH PROFESSIONAL POSTURAL HEADREST 863 Adjustable in height, tilt, depth and laterally 1) LOOSEN THE SCREWS MOUNTING THE HEADREST INSERT THE SCREWS PROVIDED WITH THE HEADREST AND SCREW THEM IN Chiave in dotazione Chiave in... - Page 36 ADJUST THE HEIGHT OF THE BACKREST (the red line indicates the maximum height of the backrest with the headrest 863 inserted) RED LINE BACK VIEW Pag. 34/67...
-
Page 37: How To Remove The Headrest 863
HOW TO REMOVE THE HEADREST 863 REMOVE THE EXTERNAL HEADREST 863 WHEN IT IS APPROPRIATE TO USE A HEADREST INSIDE THE BACKREST 1) RAISE THE BACKREST 2) REMOVE THE SCREWS 3) REMOVE THE HEADREST 4) INSERT THE SCREWS IN THE SAME POSITIONS AND TIGHTEN THEM 5) FIT THE PADDED HEADREST 865 OR THE MOLDED HEADREST 835 SEE P. -
Page 38: Headrest 835 And 865
HEADREST 835 AND 865 Adjustable in height BACK VIEW BACK VIEW OF THE 835 HEADREST OF THE 865 HEADREST Pag. 36/67... -
Page 39: Pelvic Belt With Variable Angle 947
PELVIC BELT WITH VARIABLE ANGLE 947 (Provided as standard) Supplied wrench Pag. 37/67... -
Page 40: Four Point Pelvic Belt 920
FOUR POINT PELVIC BELT 920 AVAILABLE ONLY FOR GRILLO AS SMALL AND MEDIUM Supplied wrench Pag. 38/67... -
Page 41: Trunk Side Supports 838
TRUNK SIDE SUPPORTS 838 (video on the product page of the website www.ormesa.com) MOUNTING 2) INSERT THE CURSOR IN THE GUIDE INSERT THE PELOTTE TO THE DESIRED HEIGHT AND TIGHTEN THE SCREW (by inserting the wrench in the indicated hole) - Page 42 WIDTH AND ROTATION ADJUSTMENT LOOSEN THE SCREW ADJUST THE PELOTTE IN WIDTH AND ROTATION TIGHTEN THE SCREW Supplied wrench BACKREST FRONT VIEW WIDTH ROTATING ADJUSTMENT ADJUSTMENT Pag. 40/67...
-
Page 43: Wrappable And Flexible Trunk Supports 868
WRAPPABLE AND FLEXIBLE TRUNK SUPPORTS 868 multiadjustable in height, width and inclination MOUNTING AND HEIGHT ADJUSTMENT 2) INSERT THE CURSOR INTO THE GUIDE INSERT THE PELOTTE TO THE DESIRED HEIGHT AND TIGHTEN THE SCREW (by inserting the wrench in the indicated hole) Supplied wrench PRESS LIGHTLY WITH THE... - Page 44 WITH AND ROTATION ADJUSTMENT LOOSEN THE SCREW ADJUST THE PELOTTE IN WIDTH AND ROTATION TIGHTEN THE SCREW Supplied wrench BACKREST FRONT VIEW Pag. 42/67...
-
Page 45: Elbow Side Supports 961
ELBOW SIDE SUPPORTS 961 MOUNTING AND HEIGHT ADJUSTMENT 2) INSERT THE CURSOR INTO THE GUIDE INSERT THE PAD TO THE DESIRED HEIGHT AND TIGHTEN THE SCREW (by inserting the wrench in the indicated hole) Supplied BACK VIEW wrench PRESS LIGHTLY WITH THE WRENCH INSERTED IN THE HOLE TO UNLOCK THE CURSOR FROM THE... -
Page 46: Vest Harness 853
VEST HARNESS 853 Pag. 44/67... -
Page 47: Slim Four Point Shaped Harness 853
SLIM FOUR POINT SHAPED HARNESS 853 Pag. 45/67... -
Page 48: Adjustable Abduction Block 834R
ADJUSTABLE ABDUCTION BLOCK 834R MOUNTING THE ABDUCTION BLOCK AND TIGHTEN THE KNOB ATTENTION! TIGHTEN THE KNOB KNOB OPEN THE FLAPS VIA THE TWO ZIPPERS zipper Pag. 46/67... - Page 49 ADJUST THE LEFT PART OF THE ABDUCTION BLOCK SHEET IN WIDTH Supplied wrench ADJUST THE RIGHT PART OF THE ABDUCTION BLOCK SHEET IN WIDTH BACK VIEW Pag. 47/67...
-
Page 50: Narrow Abduction Block 834N
NARROW ABDUCTION BLOCK 834N MOUNTING THE ABDUCTION BLOCK AND TIGHTEN THE KNOB ATTENTION! TIGHTEN THE KNOB KNOB Pag. 48/67... -
Page 51: Tray With Wrap-Around Recess 824
TRAY WITH WRAP-AROUND RECESS 824 RIGHT AND LEFT MECHANISM Supplied wrench REMOVE THE ARMREST PULL THE STOPPER OUT PUT THE STOPPER IN THE Screwdriver LOCKING PART OF THE TRAY INSERT THEM IN THE TUBE OF Tappo THE ARMREST USING A RUBBER HAMMER (ROTATE 45°... - Page 52 HIT THE TRAY LOCK WITH THE RUBBER HAMMER SLIGHTLY SO THAT IS INSERTS INTO THE TUBE SLOT PULL THE STOPPER OUT USING A SCREWDRIVER INSERT THE SPRING INTO THE SLOT OF THE TRAY LOCK Spring Pag. 50/67...
- Page 53 TURN THE LOCKING PART OF THE TRY OUTWARDS INSERT THE GREEN LEVER AND TIGHTEN THE SCREW REASSEMBLE THE ARMREST 90° Supplied wrench Supplied wrench Pag. 51/67...
- Page 54 INSERTION AND FIXING INSERT THE TRY SO THAT THE TOP IS HORIZONTAL LOCK THE INDICATED LEVER lever Pag. 52/67...
- Page 55 DEPTH ADJUSTMENT OPEN THE LEVER ADJUST THE DEPTH OF THE TRAY LOCK THE LEVER lever WARNING! BEFORE CHANGING THE INCLINATION OF THE SEAT (TILT-IN-SPACE) MAKE SURE THERE ARE NO HOT OBJECTS OR LIQUID CONTAINERS ON THE TRAY WICH, BY SPILLING, COULD CAUSE DAMAGE OR BURN TO THE USER.
-
Page 56: Heel Rests 960
HEEL RESTS 960 TIGHTEEN THE PIN ON THE FOOTREST BY INSERTING THE SLOT BETWEEN THE TWO WASHERS PLACE THE VELCRO STRAP ON THE FOOTREST Supplied wrench Plastic washer Velcro Slot Big washer Little washer Pag. 54/67... -
Page 57: Front Foot Straps And Heel Rest 962
FRONT FOOT STRAPS AND HEEL REST 962 Adjustable by velcro ASSEMBLE THE HEEL RESTS AS ON THE PREVIOUS PAGE ASSEMBLE THE FRONT STRAP WITH THE BRACKET ON THE OUTSIDE OF THE FOOTREST AND THE SLOT ON THE INSIDE FIX THE REAR STRAP BELOW VIEW FRONT STRAP SLOT... -
Page 58: Istructions For Daily Use By The Family, Or Care Giver
5.5 ISTRUCTIONS FOR DAILY USE by the family, or care giver HEIGHT ADJUSTMENT BACK VIEW Red safety knob Red pedal for height adjustment Pag. 56/67... -
Page 59: Tilt Adjustment Of The Seat, Backrest, Leg Rest And Armrests And Seat Height Adjustment
(video on the product page of the website www.ormesa.com) PUSH THE SAFETY KNOB WITH YOUR FOOT SIMULTANEOUSLY PRESS THE HEIGHT ADJUSTMENT PEDAL ADJUST THE HEIGHT OF THE GRILLO ADAPTIVE SEATING TO THE DESIRED POSITION AND REMOVE THE FOOT FROM THE PEDAL LATERAL VIEW... -
Page 60: Cleaning And Disinfection
6. CLEANING AND DISINFECTION Cleaning operations (and those of disinfection before reuse of the device with a new user) should be carried out regularly with the procedures and timelines outlined in § 6.3 by the family or care giver. 6.1 INFORMATION SANIFICATION is the complex of cleaning and / or disinfection procedures and operations The CLEANING is a physical and mechanical process (i.e., rubbing) with which a large part of potential pathogenic microorganisms (bacteria, fungus, or virus), further to the visible dirt, is... -
Page 61: Procedure
The operations of sanitization must be performed without the user inside the device. Do not use compressed air, which can cause aerosol and contamination of possible virus and bacteria in the environment and on his own person During the Covid-19 epidemic, the contaminated PPE (gloves, gowns, glasses, masks, caps, etc…) must be thrown away in the general waste bin, unless otherwise indications by the belonging municipality 6.3 PROCEDURE... -
Page 62: Ordinary And Extraordinary Maintenance
If in doubt about the safety or damage of the product, cease use and contact the orthopedic workshop that supplied the product, or ORMESA. 7.1 ORDINARY MAINTENANCE OPERATIONS (monthly) Routine periodic checks and maintenance should be carried out by a person with good technical competence;... - Page 63 § § Check the tightness of the adjustment mechanisms. If unsuccessful, contact the health professional who provided it, or distributor for replacement with an original component. In case you have encountered an inefficiency in TIGHTENING of the ADJUSTMENT LOCKING LEVERS of the ARMREST, LEGREST, HEADREST, TABLE, discontinue use and contact the health professional who provided it, to register the levers as described in...
-
Page 64: Registration Of Adjustment Locking Lever
REGISTRATION OF ADJUSTMENT LOCKING LEVER Adjust nuts and screws in small increments until proper tightness is restored Armrest and leg rest adjustment locking levers Supplied wrench Pag. 62/67... - Page 65 Headrest adjustment locking lever WRENCH Screw screw Tray adjustment locking levers Supplied wrench Pag. 63/67...
-
Page 66: Preventive Maintenance Operations (Biennial)
Extraordinary maintenance must be carried out by the health professional who supplied the product or by another subject indicated by the Manufacturer or the Distributor of the ORMESA products in the country of destination. The interventions must be performed with ORIGINAL REPLACEMENTS PARTS of the... -
Page 67: Life Span And Conditions For Reuse
Quality Management System certificated in 1998 according to ISO 13485, there is adequate confidence that the average lifespan of GRILLO ADAPTIVE SEATING is about 5 years, on condition that it is used according to the directions given in the user manual. -
Page 68: End-Of-Life Management Of The Medical Device
9. END-OF-LIFE MANAGEMENT OF THE MEDICAL DEVICE 9.1 USER OBLIGATIONS Comply with applicable local regulations and do not dispose of old products in normal household waste but separately in appropriate collection places. Proper disposal of the product helps to avoid possible negative environmental and human health consequences. -
Page 69: Manufacturer's Declaration
(Numero di Registrazione Unico): Not yet available (Single Registration Number): ORMESA srl dichiara sulla sua responsabilità che il Dispositivo Medico Ormesa srl declares on its own responsibility that the Medical Device UDI-DI di base 805571570GRILLOSEATINGNL Basic UDI-DI: Nome del Dispositivo:... - Page 70 Note:...
- Page 72 Ormesa srl Via delle Industrie, 6/8 - Z.I. Sant’Eraclio - 06034 FOLIGNO (PG) ITALY P.I. IT 00574020541 CCIAA Perugia 119215 Iscr. Trib. Perugia 11907 Tel. + 39 0742 22927 Fax +39 0742 22637 info@ormesa.com www.ormesa.com SINCE 1980 DISTRIBUTOR FOR USA: INNOVATION IN MOTION 201 Growth Parkway ANGOLA, IN 46703 P 1.260.665.2769...
Need help?
Do you have a question about the Grillo and is the answer not in the manual?
Questions and answers