
Related Manuals for VSYSTO F4.5X


Summary of Contents for VSYSTO F4.5X
- Page 1 MOTORCYCLE DASH CAM F4.5X USER MANUAL MENU support-us@vsysto.com https://www.facebook.com/szvsys https://www.youtube.com/c/szvsys Shenzhen V-SYS Technology Co.,Ltd. - 1 -...
-
Page 2: Before Using The Product
VSYSTO is not responsible for any loss caused by an accident, nor is it responsible for providing any support regarding the outcome of an accident. -
Page 3: Packing List
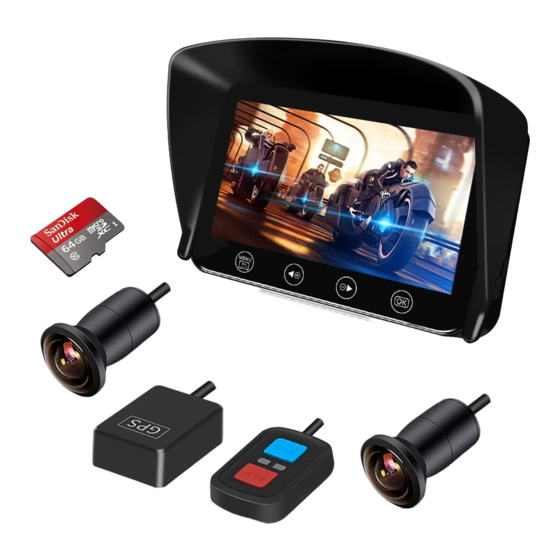
Packing List The items may vary for different buying options. Main Unit Power cord Cam1 & extension cable Wired Controller Cam2 & extension cable Handlebar mount GPS Tracker USB test cable Main unit structure The product design may change without prior notice. Mount hole LCD display Menu/Back... - Page 4 Menu Setting Description * Press button of remote controller to pause recording before setup the system, then long press button to enter menu system. • Short press in video mode to switch Select the setting options and different display mode; press the button to enter Video Mode.
-
Page 5: Parking Mode
Menu Setting Description Turn on/off the mirror image of the rear Movie clip time Set the loop clip time R-Cam mirror camera Display the current number of satellites, Sound record Toggles the microphone on/off GPS Status longitude, latitude and other information Set the sensitivity of the G-Sensor MIC sensitivity Set the sensitivity of the microphone... - Page 6 Wi-Fi Connection When successfully connected with your smartphone via built-in Wi-Fi, you can save and playback the driving recording videos on your smartphone. You can also change settings of dash cam via Wi-Fi app. 1) Scan the QR code below to download the latest App from Google Play and App Store.
- Page 7 GPS Playback 1) Navigate to the 'Online' tab, click 'Edit', and then select the video file you want to download. Press 'Save' to download the video files to your device. 2) Navigate to the 'Local' tab and select the video you want to play, and the GPS track will be displayed below the playing video.
-
Page 8: Quick Test
Quick Installation Guide • Please do NOT flush the main unit, lenses, power module, and remote with the high-pressure water gun. • Do not bend the cable nor twist the connector during installation. • The main unit and lens cable should be away from the high-voltage circuit like xenon lamp, ignition plug etc. •... -
Page 9: Power Module Installation
Power Module Installation Double-sided foam tape Positive double-sided foam tape Negative A 12V wire that is controlled by the key ACC Version: Connect red wire to the battery positive terminal, black wire to the negative terminal, and yellow wire to the 12V port controlled by key ignition (ACC wires). The dash cam will automatically turn on and off with your bike ignition. - Page 10 Smart Gauge Mode Long press in video mode to enter Smart Gauge Mode, and then short press to switch different display information. long press it again to quit Smart Gauge Mode. Optional Speed Short-Term Memory TRIP: 0 Km km/h 0:09 0 km/h ℃...
-
Page 11: Tpms(Optional)
TPMS(Optional) SAFETY REMINDERS • Consult your vehicle manual or a tire professional whether this accessory is fit your motorcycle. If this accessory affects your motorcycle’s performance, driving, or insurance coverage, do not install it! • The manufacturer and distributor will not be responsible for damage due to improper installation and usage. This manual can be changed at any time without prior notice. - Page 12 ● Installation 2. Screw on the hexagon nut 1. Unscrew the valve cap 3. Find the correct sensor 4. Screw on the sensor 5.Tightening the nut by wrench (F- front wheel; R- rear wheel) ● Battery Replacement 1. Remove the battery cover 2.
Need help?
Do you have a question about the F4.5X and is the answer not in the manual?
Questions and answers