Table of Contents
Advertisement
Quick Links
20V LI-ION 12L
ASH
VACUUM CLEANER
98503
These instructions accompanying the product are the original instructions. This document is part of the product,
keep it for the life of the product passing it on to any subsequent holder of the product. Read all these instructions
before assembling, operating or maintaining this product.
This manual has been compiled by Draper Tools describing the purpose for which the product has been designed,
and contains all the necessary information to ensure its correct and safe use. By following all the general safety
instructions contained in this manual, it will ensure both product and operator safety, together with longer life of the
product itself.
AlI photographs and drawings in this manual are supplied by Draper Tools to help illustrate the operation of the
product.
Whilst every effort has been made to ensure the accuracy of information contained in this manual, the Draper Tools
policy of continuous improvement determines the right to make modifications without prior warning.
Advertisement
Table of Contents

Subscribe to Our Youtube Channel
Related Manuals for Draper D20 98503


Summary of Contents for Draper D20 98503
- Page 1 AlI photographs and drawings in this manual are supplied by Draper Tools to help illustrate the operation of the product.
-
Page 2: Title Page
Commercial copying, redistribution, hiring or lending is prohibited. No part of this publication may be stored in a retrieval system or transmitted in any other form or means without written permission from Draper Tools Limited. In all cases this copyright notice must remain intact. -
Page 3: Table Of Contents
CONTENTS 2.1 CONTENTS TITLE PAGE 1.1 INTRODUCTION ........................2 1.2 REVISION HISTORY ......................2 1.3 UNDERSTANDING THIS MANUAL’S SAFETY CONTENT ..........2 1.4 COPYRIGHT® NOTICE .......................2 CONTENTS 2.1 CONTENTS ..........................3 WARRANTY 3.1 WARRANTY .........................4 INTRODUCTION 4.1 SCOPE ..........................5 4.2 SPECIFICATION ........................5 4.3 HANDLING AND STORAGE ....................5 HEALTH AND SAFETY INFORMATION 5.1 GENERAL SAFETY INSTRUCTIONS FOR POWER TOOL USE ........6 5.2 SPECIFIC PRODUCT USE AND CARE ................7... -
Page 4: Warranty
This warranty applies in lieu of any other warranty expressed or implied and variations of its terms are not authorised. Your Draper warranty is not effective unless you can produce upon request a dated receipt or invoice to verify your proof of purchase within the warranty period. -
Page 5: Introduction
INTRODUCTION 4.1 SCOPE 20V 12L ash vacuum cleaner for fires, stoves and barbecues. Suitable for wood and coal burning debris. This product is intended for use in the workshop and garage or DIY work around the home not for commercial use. Any application other than that it was intended for, is considered misuse. -
Page 6: Health And Safety Information
HEALTH AND SAFETY INFORMATION 5.1 GENERAL SAFETY INSTRUCTIONS FOR POWER TOOL USE When using any type of power tool there are steps that should be taken to make sure that you, as the user, remain safe. Common sense and a respect for the tool will help reduce the risk of injury. Read the instruction manual fully. -
Page 7: Specific Product Use And Care
HEALTH AND SAFETY INFORMATION Wait for the machine to stop. Unless the machine is fitted with a safety brake, some parts may continue to move due to momentum. Wait for all parts to stop, then unplug it from the power supply before making any adjustments, carrying out maintenance operations or just finishing using the tool. -
Page 8: Residual Risk
D.C. sources. Do not use a mains socket outlet that is not switched. – Use the correct Draper charger in conjunction with it’s corresponding battery pack (consult the Draper website for more information or to find your local stockist). –... -
Page 9: Connection To The Power Supply (Charger)
– For indoor use. Do not expose to rain. – Only use Draper D20 battery packs with this product. Consult your Draper stockist for details. – Do not charge any other manufacturer’s battery packs using Draper chargers. Any other application is considered misuse. -
Page 10: Technical Description
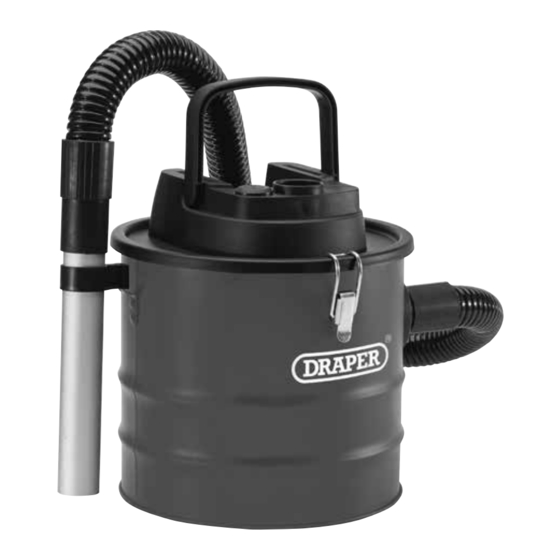
TECHNICAL DESCRIPTION 6.1 IDENTIFICATION Hose Hook rack Aluminium hose (tied) Hook Aluminium nozzle Top cover Inlet Battery pack port Tank On/off switch – 10 –... -
Page 11: Unpacking And Checking
Lay the contents out and check them against the parts shown below. If any part is damaged or missing, please contact the Draper Help Line (the telephone number appears on the Title page) and do not attempt to use the product. -
Page 12: Preparing The Vacuum Cleaner
PREPARING THE VACUUM CLEANER 8.1 ASSEMBLY – FIG. 1 NOTE: Before you start the ash vacuum, make sure that the dust filter is in the position. Ensure that the butterfly nut is tightened and seal the lid securing with the 2 x hooks (12) FIG. -
Page 13: Inserting The Battery Pack
Compatible batteries, chargers and accessories are available through Draper Tools stockists. Important: Only Draper D20 designated battery packs and chargers can be used in conjunction with this product. Use of any other third party battery packs/chargers with this product is considered misuse and will invalidate the product’s warranty. -
Page 14: Battery Pack Protection Features
If there are no foreign objects, it is probable that the battery or charger is malfunctioning. Allow battery/charger to normalise and try again. If a fault remains after trying this then contact Draper Tools. BATTERY PACK PROTECTION FEATURES Overcharging protection: This feature that ensures that the battery pack can never be overcharged. -
Page 15: Operating The Vacuum Cleaner
OPERATING THE VACUUM CLEANER 9.1 OPERATING THE ASH VACUUM – FIG. 8 Switch the machine on by pressing the on/off switch NOTE: Return the battery to the charger immediately after use so that it will be ready and fully charged for the next use. Ensure that the product is fully inserted into the charger. -
Page 16: Maintenance
10. MAINTENANCE 10.1 CLEANING AND MAINTENANCE – FIGS. 9-11 NOTE: Regular inspection and cleaning reduces the necessity for maintenance operations and will keep your tools in good working condition. The motor must be correctly ventilated during the tools operation. For this reason avoid blocking the air inlets. -
Page 17: Care And Storage
10. MAINTENANCE Clean the filter by shaking to dislodge and dispose of any ash (FIG. 12). Note: Replacement filters are available - see drapertools.com. Note: Do not leave the filter to dry in direct sunlight. FIG. 12 10.2 CARE AND STORAGE 1. -
Page 18: Troubleshooting
11. TROUBLESHOOTING 11.1 TROUBLESHOOTING GUIDE Note: Repairs should only be carried out by a qualified person. Problem Possible Cause Remedy Motor does not start. No battery inserted. Insert the battery. No power from the battery. Battery needs to be charged. Vacuum is not power on. -
Page 19: Explanation Of Symbols/Pictograms
12. EXPLANATION OF SYMBOLS/PICTOGRAMS 12.1 EXPLANATION OF SYMBOLS Do not incinerate or throw Read the instruction manual. onto fire. WEEE – Wear safety glasses. Waste Electrical & Electronic Equipment. Do not dispose of Waste Electrical & Electronic Equipment in with Wear ear defenders. - Page 20 ©Published by Draper Tools Limited. No part of this publication may be reproduced, stored in a retrieval system or transmitted in any form or by any means, electronic, mechanical photocopying, recording or otherwise without prior permission in writing from Draper Tools Ltd.
Need help?
Do you have a question about the D20 98503 and is the answer not in the manual?
Questions and answers