Table of Contents
Advertisement
Quick Links
Advertisement
Table of Contents

Related Manuals for Extech Instruments ExStik SX800 Series


Summary of Contents for Extech Instruments ExStik SX800 Series
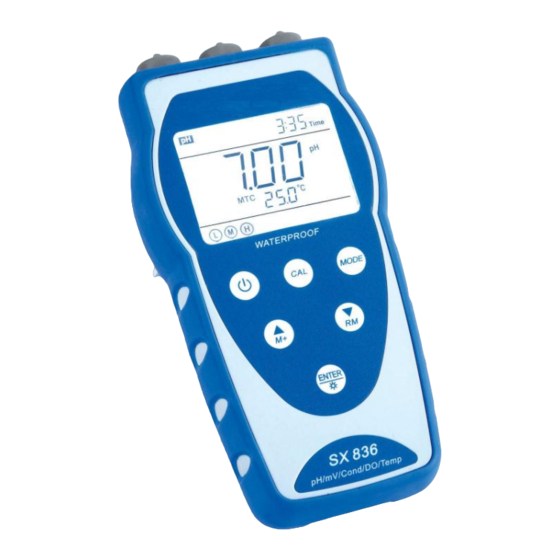
- Page 1 SX800 Series of Portable Electrochemical Meter Manual SX811 Portable pH Meter SX813 Portable Conductivity Meter SX816 Portable Dissolved Oxygen Meter SX823 Portable pH/Cond. Meter SX825 Portable pH/DO Meter SX836 Portable pH/Cond./DO Meter SX800 Version2.0...
- Page 2 SX800 Version2.0...
-
Page 3: Table Of Contents
Table of Contents 1. Introduction ---------------------------------------------------------------------------------------------------------------------- 1.1 Measuring parameters --------------------------------------------------------------------------------------------------- 1.2 Basic features ------------------------------------------------------------------------------------------------------------- 1.3 pH measurement features ----------------------------------------------------------------------------------------------- 1.4 Cond. measurement features ------------------------------------------------------------------------------------------- 1.5 DO measurement features ---------------------------------------------------------------------------------------------- 2. Technical specifications----------------------------------------------------------------------------------------------------------- 3. Instrument Description ---------------------------------------------------------------------------------------------------------- 3.1. LCD display---------------------------------------------------------------------------------------------------------------------- 3.2. Keypad functions --------------------------------------------------------------------------------------------------------------- 3.3. - Page 4 8.2. Submenu ---------------------------------------------------------------------------------------------------------------------- 8.3. Submenu of pH parameter setup --------------------------------------------------------------------------------------- 8.4. Submenu of Cond. parameter setup ----------------------------------------------------------------------------------- 8.5. Submenu of DO parameter setup ------------------------------------------------------------------------------------- 8.6. Submenu of basic parameter setup ----------------------------------------------------------------------------------- 9. USB communication------------------------------------------------------------------------------------------------------------- 9.1. System requirement-------------------------------------------------------------------------------------------------------- 9.2. Software interface----------------------------------------------------------------------------------------------------------- 9.3.
-
Page 5: Introduction
1. Introduction Thanks for buying and using the model SX800 pH/mV/Conductivity/DO Meter (the following called “meter” in short). This meter is a perfect combination with the most advanced electronic technology, sensor technology and software design. The meter includes 6 types and can measure 8 parameters. It is the best portable water analysis meter with the highest performance and the lowest cost. -
Page 6: Ph Measurement Features
1.3. pH measurement features (suited for model SX811, SX823, SX825 and SX836) ● 1-3 point automatic calibration, the meter provides calibration guide and automatic checking function. ● The meter is able to recognize up to 12 types of pH standard buffer solutions. There are three options of standard buffer solutions: USA series, NIST series and Chinese series (CH), there is also customer-defined solution calibration. -
Page 7: Technical Specifications
2. Technical Specifications 2.1. Main specifications Specifications Models (-2.00 ~ 19.99)pH Range Resolution 0.01/0.1 pH Accuracy ±0.01 pH ±1digit ≤1×10 Input current SX811 ≥1×10 Ω Input impedence SX823 SX825 Stability ±0.01 pH/3h ±1 digit SX836 (0 ~ 100)°C(manual or automatic) Temperature compensation Range -1,999mV ~ 0 ~ 1,999mV... - Page 8 SX823 Accuracy SX825 ±0.5℃±1digit SX836 2.2. Other specifications: 500 groups SX811,SX813,SX816 Data storage 1000 groups SX823,SX825,SX836 Serial number, date, time, measuring value, measuring unit and Storage content temperature value Output Power AAA batteries × 3 (1.5V× 3) / DC5V adaptor ( USB port) IP rating IP57 dustproof and waterproof Meter: (88×170×33 )mm / 313g...
-
Page 9: Instrument Description
3. Instrument description 3.1. LCD display: Diagram - 2 LCD (1) — Measurement mode icons (2) — Measurement value (3) — Timing storage icon. When this icon appears, the meter is in the automatic storage mode (4) — Date and time display value, and prompts of special display mode (5) —... -
Page 10: Keypad Functions
(11) — Temperature value and prompts of special display mode (12) — Automatic reading lock-up icon (13) — Temperature compensation icons ATC — automatic temperature compensation, MTC — manual temperature compensation (14) — Calibration guide icon (15) — Stability icon of readings (16) —... - Page 11 Chart – 1 Keypad operations and descriptions Keypad Operations Descriptions Momentary press Press this key to turn on or turn off the meter. Select measurement parameters: → pH meter: Momentary → → pH/Conductivity meter: press → → ...
-
Page 12: Meter Sockets
In the mode of manual temperature compensation (MTC), when press and hold this key, the temperature value flashes, then press this key to change the temperature value, and press to confirm, In the measurement mode, press to store the measuring value, press to recall the stored measuring value, Momentary/... -
Page 13: Display Mode
Connect pH, Conductivity and DO electrode BNC socket (middle) — connect pH or ORP electrode Four-pin socket (left) — connect Conductivity probe SX836 Eight-pin socket (right) — connect DO electrode When connect pH, Conductivity and DO electrode, electrode, temperature sensor is shared Chart –... -
Page 14: Ph Measurement
not work. Set time 0 from parameter P4.1 to exit from the automatic storage mode. 3.5.3. Recall stored value In the measurement mode, press key to recall the last stored measuring value. See Diagram – 9: display RM icon and storage serial number. Continue pressing key and key to recall successively the stored measuring... -
Page 15: Ph Calibration
calibration, see Chart-5. During the calibration process, the instrument displays the electrode slope of acidity range and alkalinity range respectively. Chart - 5 Calibration mode Chinese standard USA standard NIST standard Calibration guide Description Suited range (CH) (USA) (NIST) icons Accuracy One-point 6.86 pH... -
Page 16: Customer-Defined Calibration
temperature value, and press key to make confirmation. 4.3. pH calibration ( take an example of three-point calibration) key to enter into the calibration mode, “CAL 1” flashes at the top right of LCD and 4.3.1. Press “7.00 pH ”flashes at the bottom right of LCD, indicating using pH 7.00 buffer solution to make the 1 point calibration. -
Page 17: Sample Test
4.3.6. During the calibration process, press key to exit from the calibration mode. The meter can perform one-point, two-point and three-point calibration. Calibration guide icons appear on LCD. 4.4. Customer-defined calibration (take an example of 1.60pH and 6.50pH calibration solution) Diagram- 11 4.4.1. - Page 18 measurement process of pH meter. Diagram – 12 Calibration and measurement process of pH meter Submerge the After the 1 point electrode in pH7.00 point Press key to calibration is done, Press to turn calibration solution, press enter into the press key to on the meter.
-
Page 19: Ph Electrode Maintenance
Chart – 6 Self-diagnosis information of pH measurement mode Display Contents Checking Icons 1.Check whether pH buffer solution is correct. Wrong pH buffer solution or the buffer 2.Check whether the meter connects the electrode properly. solution out of range. 3.Check whether the electrode is damaged. Press key when measuring value Press... -
Page 20: Mv Measurement
4.6.3. Protect glass bulb The sensitive glass bulb at the front of the combination electrode should not come in contact with hard surfaces. Scratches or cracks on the electrode will cause inaccurate readings. Before and after each measurement, wash the electrode with pure water and then throw off the excess water on the electrode. Do not clean the glass bulb with a tissue for it will affect the stability of the electrode potential and increase the response time. -
Page 21: Conductivity Measurement
5.2.2. Clean and activate ORP electrode After the electrode has been used over a long period of time, the platinum surface will get polluted which causes inaccurate measurement and slow response. Please refer to the following methods to clean and activate ORP electrode: (a) For inorganic pollutant, submerge the electrode in 0.1mol/L dilute hydrochloric acid for 30 minutes, then wash it in pure water, then submerge it in the soaking solution for 6 hours. - Page 22 Item 8.4). The meter can recognize the standard solution automatically; can perform one-point or multi-point calibration (four-point calibration at maximum). The calibration guide icons at the bottom left of LCD correspond to the four standard values. See Chart – 9: Chart –...
-
Page 23: Conductivity Calibration
temperature compensation. Note: When the coefficient for the temperature compensation is set 0.00 (no compensation), the measurment value will be based on the current temperature. Chart-10 Temperature compensation coefficient of special solutions Solution Temperature compensation coefficient NaCl salt solution 2.12%/°C 5%NaOH solution 1.72%/°C Dilute ammonia solution... -
Page 24: Relations Among Tds, Salinity, Resistivity And Conductivity
calibration solution at the bottom right. Er 2 appears if press key before the value is locked. Please refer to Chart – 12. 6.3.3. When the meter locks 1413 μS, icon displays on LCD. Press key to calibrate the meter. End icon appears after calibration is done. The meter returns to the measurement mode and LCD shows icon at the bottom left. -
Page 25: Sample Test
6.5.3. When press key, the measuring value flashes, CUS icon appears at the right top of LCD. Press key or key to adjust the measuring value to 10.50μS/cm, then press key to calibrate the meter. After the calibration is done, the meter displays End icon and returns to the measurement mode. -
Page 26: Conductivity Electrode Maintenance
6.6.3. During the process of calibration and measurement, the meter has self-diagnosis functions, indicating the relative information, please refer to Chart – 12. Chart – 12 Self-diagnosis information of conductivity measurement mode Display Icons Contents Checking 1. Check whether conductivity calibration solution is correct. -
Page 27: Do Measurement
7. DO (Dissolved Oxygen) Measurement 7.1. DO (Dissolved Oxygen) electrode information 7.1.1. DO electrode structure The meter matches model DO500 DO electrode with built-in temperature sensor and salinity sensor and has automatic temperature compensation and automatic salinity compensation functions. Please refer to the DO electrode structure: Chart –... -
Page 28: Do Calibration Consideration
layer of platinum black to lower electrode polarization. This surface must not be rubbed or wiped but should be cleaned by swirling it in water. Wash organic matter off the surface with lukewarm water containing detergent or use alcohol if necessary. 7.1. - Page 29 7.3.1. Dissolved oxygen calibration steps (a) Press key to turn on the meter, connect DO500 DO electrode to the meter, (b) Press and hold key to select the desired unit of measure (mg/L, ppm, %); then release, (c) Put the DO electrode into the calibration cover and tightly secure the cap of the calibration cover, and allow polarizing for 3 to 5 minutes until the reading is stable, (d) Press key to enter in the calibration mode, the flashing CAL icon will appear at the top right of...
-
Page 30: Sample Test
perform full scale and zero oxygen calibration according to the item 7.3.1 and 7.3.2. 7.3.3. Salinity Calibration: The meter has an automatic salinity compensation function, so salinity calibration is required. Since salinity calibration is done by factory before delivery, so no need salinity calibration during initial use. Only make salinity calibration when replace with a new electrode, or when the electrode is unused for long time. - Page 31 the water is a 45°to 75°angle. Quickly stir the electrode in water at a speed >5cm/s and allow 3 to 5 minutes to take the reading. 7.4.3. Notes: (a) When measuring, remove air bubbles from the solution under test. Larger bubbles in the electrode’s electrolyte are also not allowed (small air bubbles are acceptable).
-
Page 32: Parameter Setup
8. Parameter setup 8.1. Main menu In the measurement mode, press and hold key to enter in mode P1.0, then press switch among main menu: P1.0→P2.0→P3.0→P4.0. Please refer to chart – 20. P1.0: pH parameter setup menu, P2.0: Conductivity parameter setup menu, P3.0: Dissolved oxygen (DO) parameter setup menu, P4.0: Basic parameter setup menu. - Page 33 Diagram – 20 Main menu and submenu of parameter setup Main menu of parameter setup Submenu of pH parameter setup P1.1 Select pH standard solution P1.2 Set due calibration P1.3 Check calibration date P1.4 Set pH measurement of pure water P1.5 Set pH measurement of pure water mixed with ammonia P1.6 Restore to factory default setting...
-
Page 34: Submenu Of Ph Parameter Setup
8.3. Submenu of pH parameter setup (press key to switch) P1.1. – Select pH standard solution (USA-NIST-CUS-CH) 1. In P1.0 mode, press to enter in P1.1 mode, refer to the left diagram. 2. When press key,USA flashes,then press key, NIST flashes,etc. to make confirmation(USA –... -
Page 35: Submenu Of Cond. Parameter Setup
P1.5. – Set pH measurement of pure water with ammonia (Off – On) 1. Press key, Off flashes, then press key, On flashes, when parameter flashes, press key to confirm. Off–turn off temperature compensation, On–turn on temperature compensation. 2. After confirm parameter, press key to enter in P1.6 mode, press key to return to the measurement mode. -
Page 36: Submenu Of Do Parameter Setup
P2.5. – Select reference temperature (15.0°C-30.0°C) 1. Press key, 25.0°C flashes, then press key to adjust temperature value 15.0-30.0, press key to confirm. 2. After confirm parameter, press key to enter in P2.6 mode, or press key to return to the measurement mode. P2.6. -
Page 37: Submenu Of Basic Parameter Setup
P3.3. – Adjust barometric pressure value (60.0-199.9 kPa) 1. Press key, 101.3 flashes (101.3 kPa is the barometric pressure value initially set), press key or key to revise the value according to the standard barometric pressure table, press confirm. 2. After confirm the parameter, press key to enter in mode P3.4, or press key to return to the measurement mode. - Page 38 P4.4. – Select automatic power-off time (10-20-30-On) key, “ 20 ” flashes, then press 1. Press key to select blinking 30 → → 10. When the parameter flashes, press key to confirm. Select On to turn on the function, the unit is day. 2.
-
Page 39: Usb Communication
9. USB communication 9.1 System requirement The meter uses “PC-Link” software with USB communication function. This software requires the computer to meet such requirement: Personal computer (Microsoft Excel 2000 or the version of higher rank) which can operate Windows XP operation system, PC – IBM compatible with XT and CD-ROM driver, USB communication port. -
Page 40: Automatic Connection Port
Diagram -21 1 — Meter serial number 2 — Stored value display area 3 — Keys Clear — press this key to clear the data Download — press this key to download the data from the meter to the computer, pH, mV, conductivity and dissolved oxygen are classified in the file. -
Page 41: Meter Kits
9.5.1. Upload the stored value Press “Download” key, all the data stored in the meter is downloaded to the computer. pH and mV are sorted in the program. 9.5.2. Storage during operation During operation, press key to store or set timing storage. The measuring information is downloaded to the computer through USB and will not be stored in the meter. -
Page 42: Selection On Electrodes
√ √ √ √ √ √ USB adaptor (DC 5V) 1 pc √ √ √ Combined electrode clip 1 pc √ √ Small portable case 1 pc √ √ √ √ Big portable case 1 pc √ √ √ √ √... -
Page 43: Appendix I: Parameter Setup And Factory Default Setup
11. Warranty 11.1. We warrant this instrument to be free of defects in parts and workmanship for one year from date of shipment. 11.2. The warranty does not apply to other electrodes except for temperature sensors. Besides, new electrode unused but found defected is free to be repaired or changed. 11.3. -
Page 44: Appendix Ii: Abbreviation Glossary
P2.7 Adjust TDS factor 0.40~1.00 0.71 P2.8 Restore factory default setting No-Yes 0.01/0.1(mg/L, ppm) P3.1 Select resolution 0.01 0.1/1(%) - - P3.2 Salinity calibration P3.0 DO Adjust barometric pressure - P3.3 101.3 value P3.4 Restore factory default setting No-Yes - P4.1 Adjust storage timing 0:00... -
Page 45: Appendix Iii: Self-Diagnosis Information
P3.1 Resolution Resolution P3.2 Salinity Salinity P3.0 DO P3.3 Air pressure Barometric air pressure P3.4 Factory default setting Factory default setting P4.1 P4.2 P4.3 Backlight Backlight P4.0 P4.4 Auto power-off Auto power-off Basic P4.5 Clear readings Clear readings parameters P4.6 P4.7 P4.8 China... -
Page 46: Appendix V: Do Of Saturated Water Vs Barometric Pressure And Temperature
(mg/L) (mg/L) (mg/L) 14.64 9.86 7.30 14.22 9.66 7.18 13.82 9.46 7.07 13.44 9.27 6.95 13.09 9.08 6.84 12.74 8.90 6.73 12.42 8.73 6.63 12.11 8.57 6.53 11.81 8.41 6.43 11.53 8.25 6.34 11.26 8.11 6.25 11.01 7.96 6.17 10.77 7.82 6.09 10.53... -
Page 47: Appendix Vi: Do Of Saturated Water Vs. Altitude
Barometric pressure Dissolved Oxygen Concentration (mg/L) mmHg 100.00 9.94 8.14 6.85 100.13 9.96 8.15 6.86 100.26 9.97 8.16 6.87 100.40 9.98 8.17 6.88 100.53 9.99 8.18 6.89 100.66 10.00 8.20 6.90 100.80 10.01 8.21 6.91 100.93 10.03 8.22 6.92 101.06 10.04 8.23 6.93... - Page 48 Barometric Barometric Altitude Altitude pressure (25°C) pressure (25°C) Feet meters mmHg mg/l Feet Meters mmHg mg/l 101.3 8.25 7500 2287 77.1 6.28 99.34 8.09 8000 2439 75.63 6.16 1000 97.6 7.95 8500 2591 74.44 6.06 1500 95.87 7.81 9000 2744 72.97 5.94 2000...
- Page 49 SX800 Version2.0...
Need help?
Do you have a question about the ExStik SX800 Series and is the answer not in the manual?
Questions and answers