Table of Contents
Advertisement
Quick Links
Advertisement
Table of Contents

Related Manuals for Element CA850


Summary of Contents for Element CA850
- Page 1 VERSION 2.0 December 2022 Element CA850 User Manual Page 1 of...
- Page 2 9. Never push objects of any kind into this product through cabinet slots as they may touch dangerous voltage points or short out parts that could result in a fire or electric shock. Never spill liquid of any kind on the product. Element CA850 User Manual Page 2 of...
- Page 3 For MOVABLE EQUIPMENT having a total mass exceeding 18kg and for all STATIONARY EQUIPMENT, the material of a FIRE ENCLOSURE, in the thinnest significant wall thickness used, shall be of 5VB CLASS MATERIAL or shall pass the test of Clause A.1 Element CA850 User Manual Page 3 of...
- Page 4 Business users should contact their supplier and check the terms and conditions of the purchase contract. This product should not be mixed with other commercial wastes for disposal. Element CA850 User Manual Page 4 of...
- Page 5 Changes to the original user manual are listed below: Revision Description Date • Initial release November 2020 • F64U motherboard removed • F34 & F84U motherboard added December • D84U & F14 motherboard version update 2022 Element CA850 User Manual Page 5 of...
-
Page 6: Table Of Contents
4-1. Install the MSR/ NFC/ iButton/ Fingerprint Module.. 16 4-2. Install the Customer Display ......... 17 4-3. Install the Second Display ..........18 4-4. Install the Table Mount Kits ........... 20 4-5. Cash Drawer Installation ..........21 Element CA850 User Manual Page 6 of... - Page 7 6-3-1. Motherboard Layout ............42 6-3-2. Connectors & Functions ..........43 6-3-3. Jumper Settings ..............44 6-4. F84U Motherboard ............48 6-4-1. Motherboard Layout ............48 6-4-2. Connectors & Functions ..........49 6-4-3. Jumper Settings ..............50 Element CA850 User Manual Page 7 of...
- Page 8 The page is intentionally left blank. Element CA850 User Manual Page 8 of...
-
Page 9: Packing List
1-1. Standard Accessories System Power adapter (90W) Power cord Note: Power cord will be supplied differently according to various region or country. Element CA850 User Manual Page 9 of... -
Page 10: Optional Accessories
1-2. Optional Accessories a. MSR module b. NFC module c. iButton module d. Fingerprint e. Customer display 11.6" or 15.6" 2 display g. Motherboard box h. Powered USB box Element CA850 User Manual Page 10 of... -
Page 11: System View
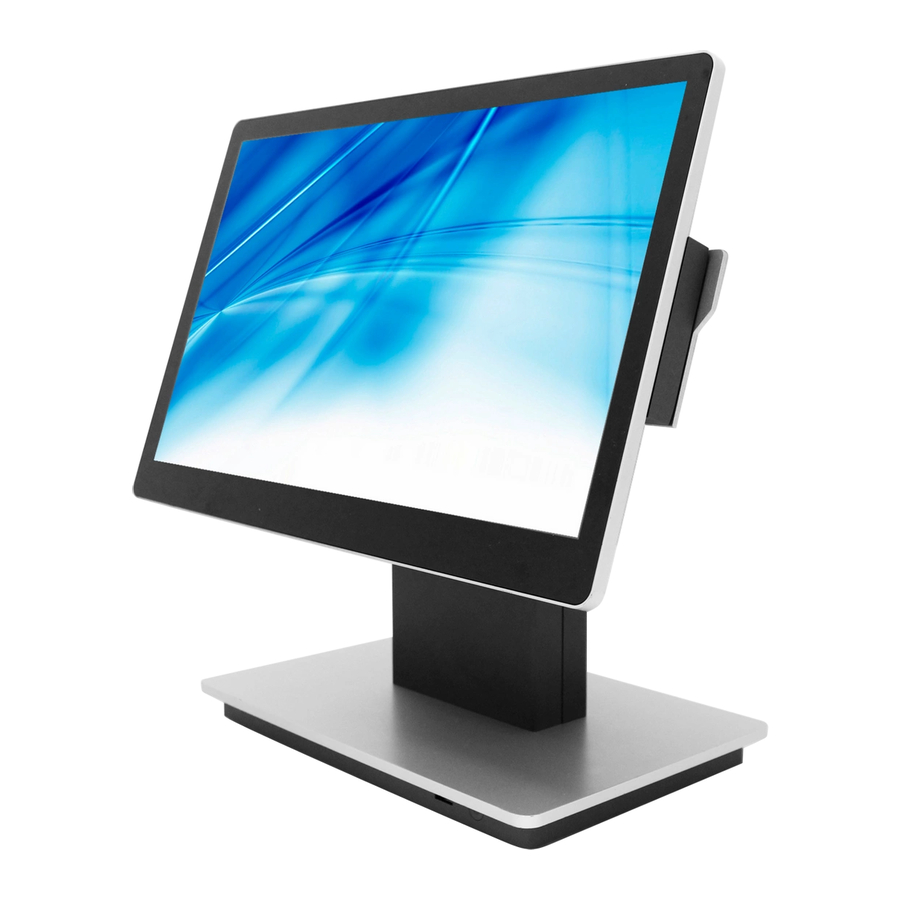
Front & Side View Description Touch screen USB2.0 Power button Hinge cover Stand arm Stand arm cover Stand front cover 2-2. Rear View Description Dummy door of MSR/iButton module Power/OSD button System box Element CA850 User Manual Page 11 of... -
Page 12: Io Ports View
Cash drawer FeDP (Main display) F14 Motherboard Description FeDP (2 display) DC 19V in USB 2.0 x 2 USB Type C USB 3.0 x 2 COM x 2 Cash drawer FeDP (Main display) Element CA850 User Manual Page 12 of... -
Page 13: System Dimensions
2-4. System Dimensions 368.8mm 200mm Element CA850 User Manual Page 13 of... -
Page 14: System Assembly & Disassembly
AC outlet. 3-2. Remove the System Box 1. Lay down the system to access the bottom of the stand. 2. Remove the screws (x2) and pull the holder of the system box outwards. Element CA850 User Manual Page 14 of... - Page 15 3. Disconnect the cable of the LCD panel. 4. The system box is placed onto four hooks. Lift the system box and then pull it outwards to release it from the bottom of the stand. Element CA850 User Manual Page 15 of...
-
Page 16: Peripherals Installation
3. Position the MSR module and fasten the screws (x2) on the back to secure the module. 4. Attach the top cover of the MSR module and make sure it locks in place. Element CA850 User Manual Page 16 of... -
Page 17: Install The Customer Display
Then press the top side of the cover into place. 2. Connect the customer display cable (x1) to the connector on system side. 3. Attach the customer display and fasten it into place with the screws (x2) provided. Element CA850 User Manual Page 17 of... -
Page 18: Install The Second Display
2 display cable through the hole of the stand as picture shown. 3. Fasten the 2 display module in place with the screws (x5) provided. 4. Slide the top arm cover. Element CA850 User Manual Page 18 of... - Page 19 7. Follow steps 1 and 2 described in Chapter 3-2 to release the holder of the system box. Thread the 2 display cable through the opening and connect the host end of the cable to FeDP port. (Refer to Chapter 2-3 a). 8. Finally attach the hinge cover. Element CA850 User Manual Page 19 of...
-
Page 20: Install The Table Mount Kits
3. Position the wall mount kits under the table and fasten with the screws (x4) to secure. Element CA850 User Manual Page 20 of... -
Page 21: Cash Drawer Installation
The Cash Drawer Controller use one I/O addresses to control the Cash Drawer. Register Location: 0x482h Attribute: Read / Write Size: 8bit BIT7 BIT6 BIT5 BIT4 BIT3 BIT2 BIT1 BIT0 Reserved Attribute CD1 Out CD1 In Reserved Element CA850 User Manual Page 21 of... - Page 22 I 482 Check status ► The I/O address 482h bit3 =1 mean the Cash Drawer is opened or not exist. ► The I/O address 482h bit3 =0 mean the Cash Drawer is closed. Element CA850 User Manual Page 22 of...
-
Page 23: Specification
2 x DB9 (COM1 / COM2 w/5V/12V powered enabled by BIOS) LAN (10/100/1000) 1 x RJ45 Cash drawer 1 x RJ-11 (2 in 2 out) DC jack 1x 4 pin w/ lock Micro USB Power switch Power Element CA850 User Manual Page 23 of... - Page 24 Embedded industry 8.1(64-bit), Windows 10 (64-bit), Windows IOT 10(64-bit) OS supported Linux: Ubuntu After 15.10, Fedora After 23, OpenSUSE 42.1 no support (Kernel 4.1) * This specification is subject to change without prior notice. Element CA850 User Manual Page 24 of...
- Page 25 1 (USB) Second display 11,6” or 15.6" 2 display (touch option) Customer display Powered USB Box 1 (USB Type-C) Speaker 1 x 3W Camera 1 (USB) Wi-Fi dongle WLAN dongle USB2.0 802.11ac/b/g/n,2.4G+5G +bt4.2(1X1) Control/Indicator Element CA850 User Manual Page 25 of...
- Page 26 PC Box: 260 x 94.1 x 19 (mm) (w/o rubber feet) Dimension (W x D x H) Plate: 280 x 200 x 6 (mm) (w/o rubber feet) Android 10 OS supported * This specification is subject to change without prior notice. Element CA850 User Manual Page 26 of...
- Page 27 1 (USB Type-C) Speaker 1 x 3W Camera 1 (USB) Wi-Fi dongle WLAN dongle USB2.0 802.11ac/b/g/n,2.4G+5G +bt4.2(1X1) Control/Indicator 1 on the display (POS667N only @back cover) Power button 1 on the stand box (@front) Element CA850 User Manual Page 27 of...
- Page 28 Plate: 280 x 200 x 6 (mm) (w/o rubber feet) Windows 10 (64-bit), Windows IOT enterprise 10(64-bit), Windows 11 OS supported IoT Linux * This specification is subject to change without prior notice. Element CA850 User Manual Page 28 of...
- Page 29 19~19.5V/65W, 120W with powered USB box Peripherals (optional) 1 (USB) Fingerprint 1 (USB) iButton 1 (USB) NFC card reader 1 (USB) 2D scanner 1 (USB) Second display 11,6” or 15.6" 2 display (touch option) Element CA850 User Manual Page 29 of...
- Page 30 Embedded industry 8.1(64-bit), Windows 10 (64-bit), Windows IOT 10(64-bit) OS supported Linux: Ubuntu After 15.10, Fedora After 23, OpenSUSE 42.1 no support (Kernel 4.1) * This specification is subject to change without prior notice. Element CA850 User Manual Page 30 of...
-
Page 31: Configuration
6-1. D84U Motherboard 6-1-1. Motherboard Layout Element CA850 User Manual Page 31 of... -
Page 32: Connectors & Functions
USB type C (DP / USB3.0) USB8 USB type C (data only) COM1/COM2 COM port connector Audio Line-out setting Cash drawer power setting CPU power setting JP5 (1-2) (3-4) Speaker cable setting JP5(5-6) Speaker watt setting TPM connector Element CA850 User Manual Page 32 of... -
Page 33: Jumper Settings
Reserved (line-out) Cash Drawer Power Setting Function ▲ +19V +12V Panel Setting Function ▲Disable Enable Speaker Cable Setting Function ▲ L=0.46m~2m(2W) M/B(2W) L=0. 46m~2.m(3W) M/B(3W) Jumper open Jumper short ▲ = Manufacturer Default Setting Element CA850 User Manual Page 33 of... - Page 34 800 x 600 1024 x 768 1024 x 768 1366 x 768 1366 x 768 CN10 1024 x 600 1280 x 1024 CN11 1440 x 900 CN12 1920 x 1080 Jumper short Jumper open Element CA850 User Manual Page 34 of...
- Page 35 Panel Backlight Current Setting JP1 JP2 LED current 200mA 240mA 280mA 320mA 360mA 400mA 420mA CN10 460mA CN11 500mA CN12 Jumper open Jumper short Element CA850 User Manual Page 35 of...
- Page 36 3. Select VGA/COM Power Configuration Ports and press <Enter> to go to display the available options. 4. To enable the power, select COM1, COM2 Power setting and press <Enter>. Select Power and press <Enter>. Save the change by pressing F10. Element CA850 User Manual Page 36 of...
-
Page 37: F14 Motherboard
Element CA850 User Manual Page 37 of... -
Page 38: Connectors & Functions
USB type C connector (USB 2.0 only) USB6/USB7 USB 3.0 connector FeDP1 Main display connector FeDP2 display connector Power button w/LED COM1/COM2 RS-232 connector Speaker R/L setting Speaker watt setting Cash drawer power setting PoE watt setting Element CA850 User Manual Page 38 of... -
Page 39: Jumper Settings
▲R/L mix (single speaker) Speaker Watt Setting Function ▲with FeDP cable without FeDP cable Cash Drawer Power Setting Function +12V ▲+19V PoE Watt Setting Function ▲40W Jumper open Jumper short ▲ = Manufacturer Default Setting Element CA850 User Manual Page 39 of... - Page 40 800 x 600 1024 x 768 1024 x 768 1366 x 768 1366 x 768 CN10 1024 x 600 1280 x 1024 CN11 1440 x 900 CN12 1920 x 1080 Jumper short Jumper open Element CA850 User Manual Page 40 of...
- Page 41 JP1 JP2 Panel Backlight Current Setting LED current 200mA 240mA 280mA 320mA 360mA 400mA 420mA CN10 460mA CN11 500mA CN12 Jumper open Jumper short Element CA850 User Manual Page 41 of...
-
Page 42: F34 Motherboard
Element CA850 User Manual Page 42 of... -
Page 43: Connectors & Functions
USB4/USB5 USB2.0 connector USB6 USB-C data only connector (USB3.0/2.0) USB7 USB-C data only connector (USB2.0) COM1/COM2 COM port connector Speaker watt setting Audio Line out setting Cash drawer power setting TPM BD connector Element CA850 User Manual Page 43 of... -
Page 44: Jumper Settings
▲ L=0.46m~2.0m (2W) on M/B (2W) L=0.46m~2.0m (3W) on M/B (3W) Audio Line-out Setting Function ▲Stereo Reserved (line-out) Cash Drawer Power Setting Function ▲ +19V +12V ▲ = Manufacturer Default Setting Jumper open Jumper short Element CA850 User Manual Page 44 of... - Page 45 800 x 600 1024 x 768 1024 x 768 1366 x 768 1366 x 768 CN10 1024 x 600 1280 x 1024 CN11 1440 x 900 CN12 1920 x 1080 Jumper short Jumper open Element CA850 User Manual Page 45 of...
- Page 46 Panel Backlight Current Setting JP1 JP2 LED current 200mA 240mA 280mA 320mA 360mA 400mA 420mA CN10 460mA CN11 500mA CN12 Jumper open Jumper short Element CA850 User Manual Page 46 of...
- Page 47 3. Select VGA/COM Power Configuration Ports and press <Enter> to go to display the available options. 4. To enable the power, select COM1, COM2 Power setting and press <Enter>. Select Power and press <Enter>. Save the change by pressing F10. Element CA850 User Manual Page 47 of...
-
Page 48: F84U Motherboard
Element CA850 User Manual Page 48 of... -
Page 49: Connectors & Functions
USB4/USB5 USB2.0 connector USB6 USB type C (DP / USB3.0) USB7 USB type C COM1/COM2 COM port connector Speaker cable setting Audio Line-out setting Cash drawer power setting Speaker selection (AD52068) TPM connector Element CA850 User Manual Page 49 of... -
Page 50: Jumper Settings
Audio Line-out Setting Function ▲Stereo Reserved (line-out) Cash Drawer Power Setting Function ▲ +19V +12V Speaker Selection (AD52068) Function ▲ Internal & FeDP (3W) Internal (2W) Jumper open Jumper short ▲ = Manufacturer Default Setting Element CA850 User Manual Page 50 of... - Page 51 3. Select MISC. Power Configuration Ports and press <Enter> to go to display the available options. 4. To enable the power, select COM1, COM2 Power setting and press <Enter>. Select Power and press <Enter>. Save the change by pressing F10. Element CA850 User Manual Page 51 of...
Need help?
Do you have a question about the CA850 and is the answer not in the manual?
Questions and answers