Advertisement
Quick Links
Advertisement

Related Manuals for Trotec BE42


Summary of Contents for Trotec BE42
- Page 1 BE42 ORIGINAL INSTRUCTIONS CLAMP METER...
-
Page 2: Table Of Contents
• Do not open the device. • Never charge batteries that cannot be recharged. • Different types of batteries and new and used batteries must not be used together. • Insert the batteries into the battery compartment according to the correct polarity. clamp meter BE42... - Page 3 To use the device for its intended use, only use accessories and Warning of electrical voltage spare parts which have been approved by Trotec. Electric shock due to contact with live parts! Do not touch any live parts. Secure neighbouring live parts by Foreseeable misuse covering them or by switching them off.
-
Page 4: Information About The Device
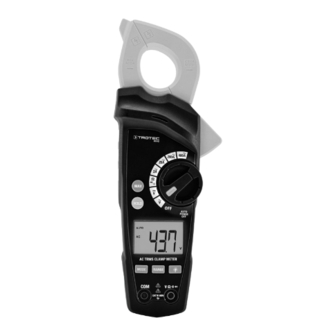
Furthermore, AC voltages in electric fields can be detected protection devices, main without contact and the forward voltage of diodes can be tested. switches clamp meter BE42... - Page 5 Rotary switch Display Setting buttons Input connection for measuring cable (red) Torch Battery compartment Test probes Red measuring cable Black measuring cable COM connection for measuring cable (black) HOLD button MAX button NCV detection LED NCV sensor Wear indicator for clamping tongs clamp meter BE42...
- Page 6 RANGE button For choosing between manual and automatic setting of the measuring range Also for choosing the individual measuring ranges in the manual setting Switching the display illumination on/ button off. Switching the torch on/off. clamp meter BE42...
- Page 7 + counter deviating from the last digit Continuity check Acoustic signal at ≤ 100 Ω of the value) (at a temperature of 23 °C ± 5 °C and a Acoustic signal possible at relative humidity of < 80 %). 20 Ω – 150 Ω No acoustic signal at > 150 Ω • OL = outside limits clamp meter BE42...
-
Page 8: Transport And Storage
Please proceed as follows to attach the warning sign to the rear of the device: 1. Remove the label in your local language from the supplied film. 2. Affix the label in the intended position at the rear of the device. clamp meter BE42... - Page 9 AC voltage, the NCV detection LED (16) is illuminated. The closer the device is positioned to the voltage source or the more powerful this source is, the higher is the flash frequency and brightness of the LED. clamp meter BE42...
- Page 10 ð The unit of the resistance (27) will appear on the display. 3. Tap the desired measuring points of the electric circuit with the test probes at the measuring cables (10). ð The measured value will be displayed in the measurement value display (29). clamp meter BE42...
- Page 11 ð The current maximum value is shown in the measurement value display (29). 3. Carry out further measurements. ð The maximum value is updated currently in the measurement value display (29). 4. Press the MAX button (15) again to deactivate the MAX function. clamp meter BE42...
-
Page 12: Maintenance And Repair
You can also find out Info about other return options that apply for many EU countries on the website https://hub.trotec.com/?id=45090. Otherwise, In case of a low battery the displayed values may be please contact an official recycling centre for electronic and inaccurate or incorrect! If so, stop using the measuring electrical equipment authorised for your country. - Page 13 Trotec GmbH Grebbener Str. 7 D-52525 Heinsberg +49 2452 962-400 +49 2452 962-200 info@trotec.com www.trotec.com...
Need help?
Do you have a question about the BE42 and is the answer not in the manual?
Questions and answers