Trotec BE40 Original Instructions Manual
Clamp meter
Hide thumbs
Also See for BE40:
- Operating manual (13 pages) ,
- Operating manual (172 pages) ,
- Operating manual (11 pages)
Advertisement
Quick Links
Advertisement

Related Manuals for Trotec BE40


Summary of Contents for Trotec BE40
- Page 1 BE40 ORIGINAL INSTRUCTIONS CLAMP METER...
-
Page 2: Table Of Contents
• Never short-circuit the supply terminal in the battery compartment! • Do not swallow batteries! If a battery is swallowed, it can BE40 cause severe internal burns within 2 hours! These burns can lead to death! https://hub.trotec.com/?id=43773 clamp meter BE40... - Page 3 To use the device for its intended use, only use accessories and Warning of electrical voltage spare parts which have been approved by Trotec. When performing non-contact measurements of the Any use other than the intended use is regarded as misuse.
-
Page 4: Information About The Device
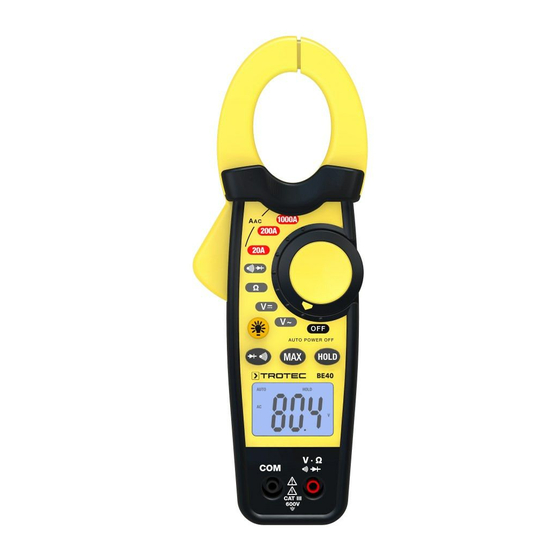
Input connection for measuring cable (red) COM connection for measuring cable (black) Diode test / continuity test button Display illumination on/off button (hold for 3 s) Lever for opening the clamp Test probes Protection against contact Red measuring cable Black measuring cable clamp meter BE40... - Page 5 Diode test / continuity test AC measurement Measuring resistance DC measurement Measuring DC voltage Automatic measuring range selection Measuring AC voltage Diode test OFF (for switching the device off) Continuity test MAX indication (indication of the maximum value) HOLD indication (display of the measured value is frozen) clamp meter BE40...
- Page 6 0 Ω to 2000 Ω 1 Ω ± (1.5 % + 2 digits) 20 kΩ 0 kΩ to 20.00 kΩ 10 Ω ± (1.5 % + 2 digits) 200 kΩ 0 kΩ to 200.0 kΩ 100 Ω ± (1.5 % + 2 digits) 2 MΩ 0 MΩ to 2.000 MΩ 1 kΩ ± (2.0 % + 3 digits) 20 MΩ 0 MΩ to 20.00 MΩ 10 kΩ ± (3.0 % + 5 digits) clamp meter BE40...
-
Page 7: Transport And Storage
This physical and unavoidable effect can falsify the measurement. In this case, the display shows either no measured values or they are incorrect. Wait a few minutes until the device has become adjusted to the changed conditions before carrying out a measurement. clamp meter BE40... - Page 8 • Check the measuring lines for damaged insulation before each measurement. • Test the device for proper functioning at a known voltage source before each measurement. • When holding onto the measuring cables, make sure not to reach behind the protection against contact (12): clamp meter BE40...
- Page 9 ð The measured value will be displayed in the ð The voltage unit (25) is displayed. measurement value display (28). ð The resistance unit (26) is displayed (k = kilo = Example: 1000 ohms, M = mega =1 million ohms). clamp meter BE40...
- Page 10 ð If OL is indicated on the display, the test probes are not resistance of the electric circuit. ð If the measured resistance value amounts to more than positioned correctly. 120 Ω, the device will not emit an acoustic signal and the measurement value display (28) will continue to indicate OL. clamp meter BE40...
- Page 11 • When holding onto the clamp meter, make sure not to touch the clamp (1): = AC MAX. 20 A = AC MAX. 200 A = AC MAX. 1000 A Info Only measure one conductor at a time to ensure an unambiguous measurement result. clamp meter BE40...
-
Page 12: Maintenance And Repair
• The battery voltage is too low. Exchange the batteries measurement value display (28). immediately. 2. Press the MAX button (3) again to deactivate the maximum • The opening of the current clamp is dirty. Clean the device value display function. as described in the Cleaning chapter. clamp meter BE40... -
Page 13: Disposal
You can also find out about other return options that apply for many EU countries on the website https://hub.trotec.com/?id=45090. Otherwise, please contact an official recycling centre for electronic and electrical equipment authorised for your country. - Page 14 Trotec GmbH Grebbener Str. 7 D-52525 Heinsberg +49 2452 962-400 +49 2452 962-200 info@trotec.com www.trotec.com...
Need help?
Do you have a question about the BE40 and is the answer not in the manual?
Questions and answers