Table of Contents
Advertisement
Quick Links
Advertisement
Table of Contents

Related Manuals for FLIR Si124


Summary of Contents for FLIR Si124
- Page 1 User’s manual FLIR Si124 Acoustic Camera tester...
-
Page 2: Table Of Contents
Table of contents Safety information ...............1 Notice to user ..............2 List of contents............2 Read the manual before use ......... 2 Customer help ............2 Disposal of electronic waste.......... 2 Markings ..............3 Introduction................4 Device parts ...............5 Getting started..............6 Required items............6 Startup .............. -
Page 3: Safety Information
Misuse might cause hearing damage, device damage, or false readings. CAUTION Do not try to repair the device or open the enclosure of the FLIR Si124 Acoustic Camera tester. Do not use a damaged device or damaged power cords. CAUTION Use only the power supply provided by the FLIR Si124 Acoustic Camera with the FLIR Si124 Acoustic Camera tester. -
Page 4: Notice To User
Misuse can cause damage to the camera or false sensor readings. To access online documentation and technical data specifications for the FLIR Si124 Acoustic Camera tester, go to: http://support.flir.com/resources/g9wc 2.3 Customer help Do not hesitate to contact our Customer Support Center if you experience problems or have any questions about your product. -
Page 5: Markings
More detailed information is available from the techni- cal administration of the relevant local authority. 2.5 Markings An ID-label consisting of the identification data, CE, and WEEE markings are on the back side of the FLIR Si124 Acoustic Camera tester. #T810596; r. AA/79681/79681; en-US... -
Page 6: Introduction
FLIR Si124 Acoustic Camera. The device produces a sound signal that is perceived and evaluated by the camera. The perceived dB-level of the signal can be used to ensure the correct level of the FLIR Si124 Acous- tic Camera’s readings and the condition of the microphone array. -
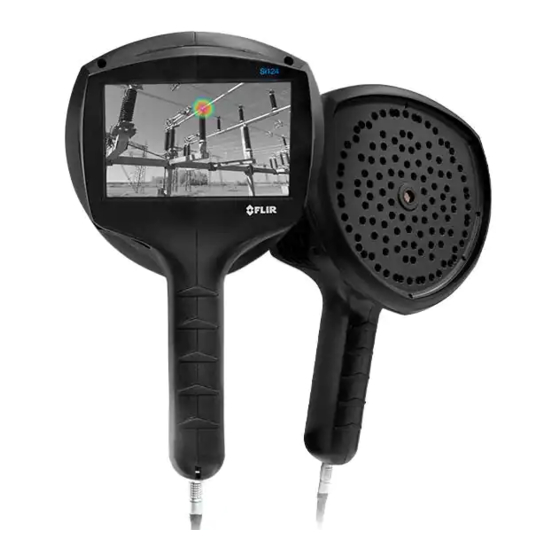
Page 7: Device Parts
Device parts 1. Loudspeaker 2. IR LED 3. Mode switch 4. Quick Release plate 5. Power LED 6. Power socket #T810596; r. AA/79681/79681; en-US... -
Page 8: Getting Started
(3) clockwise from the OFF position. The following oper- ating modes are available: 1. OFF: No sound is emitted. 2. CALIBRATION: Test signal for checking the accuracy of the FLIR Si124 Acoustic Camera. 3. PD 1: The sound of a corona discharge. - Page 9 Getting started Operating modes 3, 4, 5, and 6 can be used to demonstrate the functionality of the FLIR Si124 Acoustic Camera for detecting partial discharges and com- pressed air leaks. #T810596; r. AA/79681/79681; en-US...
-
Page 10: Using The Device For Checking Camera Accuracy
6. Mount the device on a tripod. Place the device at least 1.0 meter from any surface. If you are using the tripod provided with the FLIR Si124 Acoustic Camera tester (or similar low tripod), place it on a table. - Page 11 Using the device for checking camera accuracy 9. Place the front side of the FLIR Si124 Acoustic Camera at a distance of 1.0 m from the front side of the FLIR Si124 Acoustic Camera tester. Make sure that the camera is aligned parallel to the camera tester.
- Page 12 Using the device for checking camera accuracy 10. Align the FLIR Si124 Acoustic Camera in such a way that the calibrator is exactly within the outline in the middle of the screen and the IR LED (2) is within the circle and it is illuminated at its brightest. This means that the calibrator and camera are aligned properly.
- Page 13 Customer support http://support.flir.com Copyright © 2021, FLIR Systems, Inc. All rights reserved worldwide. Disclaimer Specifications subject to change without further notice. Models and accessories subject to regional market considerations. License procedures may apply. Products described herein may be subject to US Export Regulations.
Need help?
Do you have a question about the Si124 and is the answer not in the manual?
Questions and answers