Oventrop mote 200 - Electronic Wireless Thermostat Manual
- Operating instructions manual (16 pages)
Advertisement
Safety-related information
Correct use
Safe operation is only guaranteed if the product is used correctly. The Oventrop "mote 200" is a programmable, electric remote thermostat designed to control radiators in enclosed spaces. Use the product in dry, dust-free environments without direct sunlight only. Any other use of the product will be considered unintended use. Claims of any kind against the manufacturer and/or its authorised representatives due to damage caused by incorrect use will not be accepted.
Observance of the operating instructions is part of compliance with correct use.
Safety notes
We developed this product in accordance with the current safety requirements.
Please note the following information concerning safe use.
Risk of injury caused by batteries
Gaseous or liquid substances may escape as a result of mechanical damage to batteries. These may be severely irritating or toxic. An electrical fault, such as a short-circuit, may result in overheating. External warming up, for instance caused by exposure to direct sunlight or attempts to charge the batteries, may lead to an explosion.
- Ensure that the "mote 200" is sufficiently protected from mechanical and thermal influences.
- Do not use the product any longer if it shows visible signs of damage.
- Ensure that the batteries are inserted with the correct polarity (+/-).
- Do not expose the batteries to direct sunlight or naked flames.
- Do not use partially discharged batteries together with new ones.
- Do not try to charge the batteries.
- If any battery fluid leaks and comes into contact with skin, eyes or mucous membranes, rinse the affected areas immediately with plenty of clean water and seek medical attention.
Suffocation risk for children
Keep the "mote 200" and its packaging out of reach of children to avoid risk of ingestion and suffocation.
- Keep the "mote 200" out of reach of children.
- Seek medical attention immediately if small parts have been swallowed.
Technical description
Control operation and menu mode
- The menu mode serves to activate the "Installation/Removal"
![]() function and the key lock.
function and the key lock. - During control operation, you may set the desired temperature by using the "Plus"
![]() and "Minus"
and "Minus" ![]() buttons.
buttons.
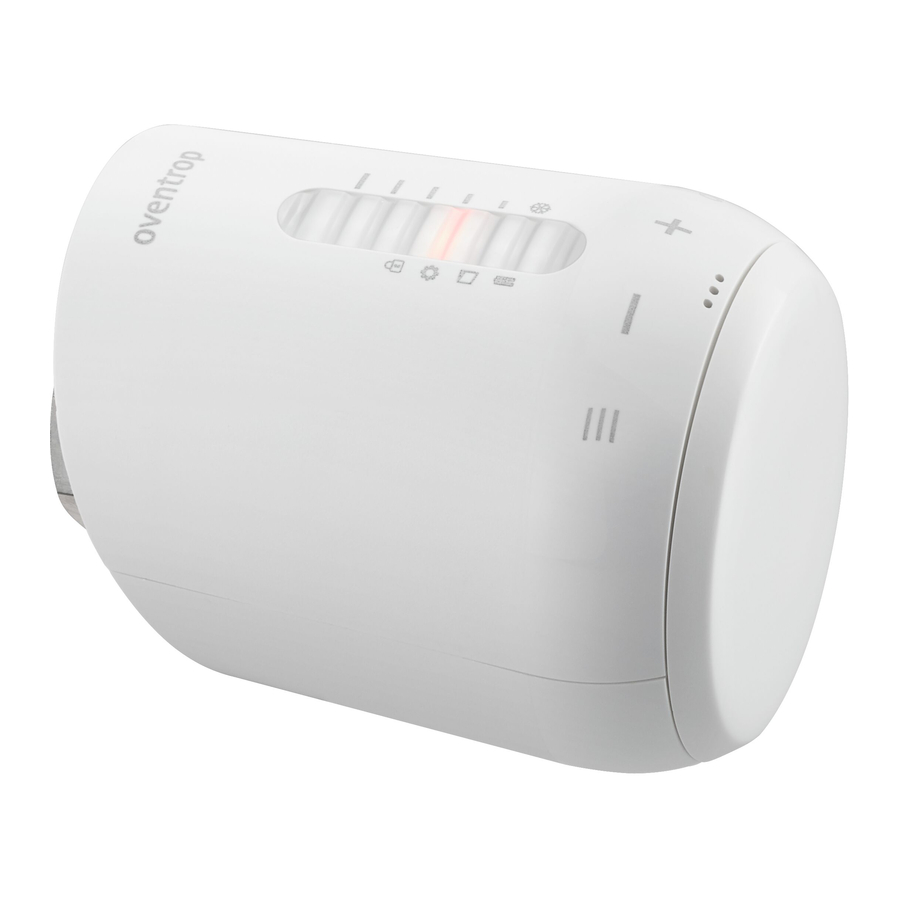
Operating elements and indicators
Overview

Fig. 1: Operating and indicator elements
| (1) |  | Battery status |
| (2) |  | Open-window recognition |
| (3) |  | Installation/Removal |
| (4) |  | Key lock |
| (5) |  , a to e , a to e | LED display |
| (6) | Battery case cover | |
| (7) |  | OK/SET (confirm) |
| (8) |  | PLUS (increase temperature) |
| (9) |  | MINUS (reduce temperature) |
| (10) |  | MENU |
LED display for temperature levels
 to (e) ON to (e) ON | = | 28°C |
| to (d) ON, (e) flashes | = | 26°C |
| to (d) ON | = | 24°C |
| to (c) ON, (d) flashes | = | 22°C |
| to (c) ON | = | 21°C |
| to (b) ON, (c) flashes | = | 20°C |
| to (b) ON | = | 19°C |
| to (a) ON, (b) flashes | = | 18°C |
| to (a) ON | = | 16°C |
| ON, (a) flashes | = | 12°C |
| ON | = | 7°C frost protection |
Technical data
| Transmission power | +0 dBm at 3.0 V |
| Frequency | 2.4 GHz |
| Battery | 2× 1.5 V LR6/Mignon/AA |
| Threaded connection | M30 x 1.5 mm |
| Operation mode | Type 1 |
| Dimensions (W x H x D) | 56 x 68 x 89 mm |
| Weight | 150 g (incl. batteries) |
| Protection | IP20 |
| Degree of contamination | 2 |
Installation
Inserting the batteries
 The configuration is maintained when replacing the batteries.

Fig. 2: Removing the battery case cover
| (1) | LED display | ||
| (2) | Battery case | ||
| (3) | Battery case cover | ||
| (4) | Notch | ||
- Remove the battery case cover by pulling it off at the notch.
- Now insert the batteries. Observe the correct polarity! Do not use rechargeable batteries!
![information]()
- Only during initial commissioning and after having restored the factory settings (see 8.5), the "mote 200" is in menu mode after having inserted the batteries. The installation/removal
![]() menu option flashes.
menu option flashes. - When replacing the batteries, this step is skipped and the adaptation run is carried out automatically.
- Only during initial commissioning and after having restored the factory settings (see 8.5), the "mote 200" is in menu mode after having inserted the batteries. The installation/removal
- Refit the battery case cover by pushing it down until it engages with an audible click.
Installation on the radiator
The "mote 200" can be fitted to any valve body with connection thread M 30 x 1.5.

Fig. 3: Installing the "mote 200"
| (1) | Valve |
| (2) | Adapter (OPTIONAL!) |
| (3) | "mote 200" |
- Turn the old radiator thermostat to fully open position.
- Loosen the fixing device and remove the old radiator thermostat from the valve.
- If required, select a suitable adapter for the "mote 200" (see Fig. 3) and fi t it to the radiator.
- Fit the "mote 200" to the valve and/or adapter by turning the collar nut clockwise.
Commissioning
You may start the adaptation run, once installation of the wireless thermostat has been completed.
Adaptation
The "mote 200" has to be adapted to the stroke of the valve first. To this end, it is essential to launch an adaptation process after installation.
Ensure that the installation/removal function is active ( flashes).
- Press and hold the OK/SET
![]() button for approx. 3 seconds.
button for approx. 3 seconds. - The adaptation process starts. The "mote 200" adapts to the stroke of your valve. The LEDs flash in sequence.
Once the adaptation process is complete, the product switches to control mode. The LEDs indicate the target temperature. After approx. 5 seconds, the "mote 200" switches to standby mode. All LEDs are switched off in standby mode.
- The adaptation process starts. The "mote 200" adapts to the stroke of your valve. The LEDs flash in sequence.
Installing the app
To enter time profiles, connect the "mote 200" using a smartphone via the Bluetooth interface.
Apps for iOS and Android operating systems are available in the relevant app stores (iTunes, Google Play).
- Install the appropriate "mote 200" app for the operating system you are using. Follow the information in the applicable installation guide.
- Activate the location request for the „mote 200" app.
- The connection via app can be established when all LEDs at the „mote 200" are off.
Operation
Manual operation
Setting the temperature manually
During control operation, you may set the desired temperature by using the "Plus" and "Minus" buttons. At the next switching point, the "mote 200" will return to the values of the heating programme programmed via app.
- After 5 seconds, the display goes blank and the set value is adopted.
Operating and programming via app
The Oventrop app „mote 200" guides you through the programming of the timed radiator control. Refer to the operating instructions for further information.
Disposal
Directive 2012/19/EU WEEE:
 | Old appliances must not be disposed of with standard domestic waste, but must be dropped off at a collection point for the recycling of electrical and electronic appliances. |
Directive 2006/66/EC:
 | Do not dispose of batteries or rechargeable batteries with normal domestic waste. The following symbols may be listed below the symbol for separate collection:
|
OVENTROP GmbH & Co. KG
Paul-Oventrop-Straße 1
59939 Olsberg
DEUTSCHLAND
www.oventrop.com
The operating instructions with further situation-specific warnings can be found at „www.oventrop.com/qr/1150961".
Alternatively, use the following QR code.

115096181-V.02.10.2019

Documents / Resources
References
![www.oventrop.com]() Oventrop
Oventrop![www.oventrop.com]() mote 200 Electronic wireless actuator (Bluetooth) battery operated, connection thread M 30 x 1.5 - Oventrop GmbH & Co. KG
mote 200 Electronic wireless actuator (Bluetooth) battery operated, connection thread M 30 x 1.5 - Oventrop GmbH & Co. KG
Download manual
Here you can download full pdf version of manual, it may contain additional safety instructions, warranty information, FCC rules, etc.
Download Oventrop mote 200 - Electronic Wireless Thermostat Manual
Advertisement


Need help?
Do you have a question about the mote 200 and is the answer not in the manual?
Questions and answers