Table of Contents
Advertisement
Quick Links
Instant Internet
Evaluation Board
II-EVB-363MW/L/D/S/O
for Board rev. 3
User Manual
Copyright © 2008,2009 Connect One Ltd.
Version 1.20
International:
Connect One Ltd.
20 Atir Yeda Street
Kfar Saba 44643, Israel
Phone: +972-9-766-0456
Fax: +972-9-766-0461
Email: sales@connectone.com
http://www.connectone.com
USA:
Connect One Semiconductors, Inc.
560 S. Winchester Blvd.
Suite 500
San Jose, CA 95128
Tel: (408) 572-5675
Fax: (408) 572-5601
Advertisement
Table of Contents

Related Manuals for Connect One II-EVB-363MW

Summary of Contents for Connect One II-EVB-363MW
- Page 1 Instant Internet Evaluation Board II-EVB-363MW/L/D/S/O for Board rev. 3 User Manual Version 1.20 Copyright © 2008,2009 Connect One Ltd. USA: International: Connect One Semiconductors, Inc. Connect One Ltd. 560 S. Winchester Blvd. 20 Atir Yeda Street Suite 500 Kfar Saba 44643, Israel...
- Page 2 No license is granted by implication or otherwise under any patent rights of Connect One other than for circuitry embodied in Connect One’s products. Connect One reserves the right to change circuitry at any time without notice.
-
Page 3: Table Of Contents
Connect One TABLE OF CONTENTS Introduction......................4 Unpacking ......................4 Connections......................4 Installing the iChipConfig Utility & Evaluation Software ........5 Testing the WiFi module Wireless Connection .............5 Testing the Nano LANReach/Socket LAN Connection ........6 Additional Connections ..................7 SPI Slave........................7 RJ45 10/100BaseT Ethernet LAN (for Nano WiReach/Socket iWiFi) .....7 Connectors and Switch Positions................8... -
Page 4: Introduction
Connections 1. Communications Cable: • Serial RS232: Connect one end of the RS232 cable to the D-shell, 9- pin female, Host RS232 port on the II-EVB-363 (J4) and connect the other DB-9 connector to the COM1 or COM2 serial port on your PC, or to the serial port of your embedded device. -
Page 5: Installing The Ichipconfig Utility & Evaluation Software
Connect One • USB: Connect one the device end of the USB cable to the EVB-363 USB connector (J1) and connect the other end to a Host USB port on your PC or embedded device. 2. Connect the II-EVB-363 to the power supply. -
Page 6: Testing The Nano Lanreach/Socket Lan Connection
Connect One 4. In the Dumb Terminal window, enter the AT+i command to verify that the iChip is communicating with your PC. You should receive an I/OK in response. If this has failed, click the “Setup Port” button and select the correct COM port. -
Page 7: Additional Connections
Connect One To test the connection, use the iChipConfig utility to perform any activity that requires network connection such as retrieving a web page, sending an email, or opening a socket. You may also try to PING the iChip from another station on the network. -
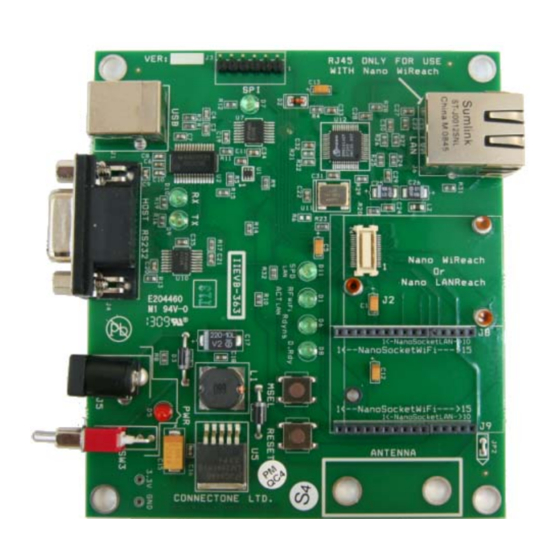
Page 8: Connectors And Switch Positions
Connect One Connectors and Switch Positions Nano SocketLAN RJ45 LAN (For use exclusively Nano WiReach or with Nano WiReach) Antenna Nano LANReach (exclusively for Nano WiReach Connection Module Reset Mode Select RS232 Serial Connection +9VDC Power Switch Connection Power Jack... -
Page 9: Ii-Evb-363 Bill Of Materials
Connect One II-EVB-363 Bill of Materials Item Quant. Reference Part Manufacturer C1,C5,C12,C13 10UF/6.3V C3,C4 15PF C6,C11,C16,C18,C22,C23,C24, C27,C28,C29,C30,C31,C32,C33, C34,C35 100NF C7,C8,C9,C10,C19,C20,C21 470NF 10UF/25V 220UF/10V C25,C26 100UF/6.3V D1,D11 G.LED LLN4148 1N4001 MUR115 R.LED D6,D7,D8,D9,D10 GREEN LED 1,2,3.3V,GND JUMPER USB-B 52991-0308 Molex CON6... - Page 10 USB-B USB-B 10UF/6.3V 10UF/6.3V 15PF 15PF 15PF 15PF VDD1 TXD0 RXD0 TACK_SW TACK_SW nRTS0 nCTS0 MSEL DATA_RDY DATA_RDY RF_ACT_LED nRESET VDD1 nRESET G.LED G.LED nSPI1_CLK nSPI1_CS nSPI1_CS nSPI1_MOSI nSPI1_MISO READYNESS nSPI1_INT READYNESS VDD1 EREFCK ETXEN ERXER CRSDV nSPI1_INT EMDC EMDIO nSPI1_MISO ERX1 ETX1...
- Page 11 100NF 100NF F4100-50MHZ F4100-50MHZ REF_CLK/XT2 EREFCK AVDD1 ETX1 ETX0 ETXEN TX_EN TX_CLK/ISOLATE RXD3/PHYAD3 RXD2/PHYAD2 ERX1 RXD1/PHYAD1 ERX0 RXD0/PHYAD0 RX_CLK/10BTSER AVDD1 CRSDV RX_DV/TESTMODE SHILD BK2125HM601 BK2125HM601 TX_ER/TXD4 SHILD 100NF 100NF ERXER RX_ER/RXD4/RPTR COL/RMII AVDDR AGND1 CRS/PHYAD4 100NF 100NF AVDDR 100UF/6.3V 100UF/6.3V 100UF/6.3V 100UF/6.3V 100NF...
- Page 12 3.3V 3.3V JUMPER JUMPER 1N4001 1N4001 VDD1 FEEDBACK DC-JACK-MALE DC-JACK-MALE SWITCH SWITCH OTPUT 220UF/10V 220UF/10V 100NF 100NF 10UF/25V 10UF/25V 68UH/1A 68UH/1A LM2591HVS-3.3 LM2591HVS-3.3 MUR115 MUR115 100NF 100NF R.LED R.LED 100NF 100NF 100K 100K READYNESS NC7WZ04P6X NC7WZ04P6X GREEN LED GREEN LED CEXT 100K 100K...
-
Page 13: Appendix 2: Nano Wireach Mechanical Views
Connect One Appendix 2: Nano WiReach Mechanical Views II-EVB-363NW User’s Manual... -
Page 14: Appendix 3: Nano Lanreach Mechanical Views
Connect One Appendix 3: Nano LANReach Mechanical Views II-EVB-363NW User’s Manual... -
Page 15: Appendix 4: Installing Usb Drivers On A Pc
Folder Options. 2. Copy usbser4.sys to C:\WINDOWS\system32\drivers. 3. Connect one end of a USB cable to your PC. Connect the other end to the USB module “device” connector of the II-EVB-363 board on which the is mounted. - Page 16 Connect One 6. When prompted with the message “What do you want the wizard to do?” Select Install the software automatically (Recommended). See Figure 2. Figure 2 II-EVB-363NW User’s Manual...
- Page 17 Connect One 7. Windows will install the driver. See Figure 3. Figure 3 Figure 4 8. When a pop-up window reports that the software for the new hardware — Connect One Sabalo USB Device — has not passed Windows Logo testing, select Continue Anyway.
-
Page 18: Viewing The Properties Of The New Driver
. In the dialog box displayed, select the Hardware tab. . Click the Device Manager button. . If the Flash memory is empty: Open the Modems list to find the Connect One Sabalo USB Device. The virtual COM port number will be written in the properties information of this device. - Page 19 Connect One Figure 6 II-EVB-363NW User’s Manual...
-
Page 20: Faqs
Connect One FAQs Q: What should I do if Windows does not automatically locate the driver for the new hardware? A: Please use the “Back” button to browse to the previous step and manually browse to the directory of the iChip Configuration Utility, usually located in “C:\Program Files\iChipConfig”.
Need help?
Do you have a question about the II-EVB-363MW and is the answer not in the manual?
Questions and answers