Table of Contents
Advertisement
Quick Links
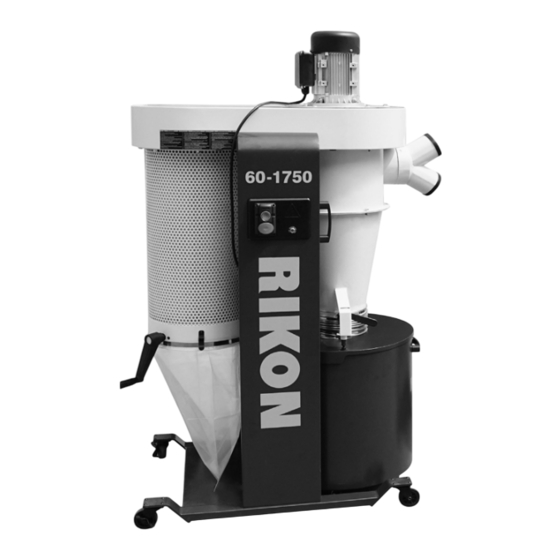
60-1750
60-2500
CYCLONE
DUST COLLECTORS
2.5HP
1.75HP
Operator's Manual
Record the serial number and date of purchase in your manual for future reference.
The serial number can be found on the specification label on the side of your machine.
Serial Number: _________________________
Date of purchase: _________________________
For technical support, email techsupport@rikontools.com - For parts questions, email parts@rikontools.com
www.rikontools.com
60-1750 60-2500M1
Advertisement
Table of Contents

Related Manuals for Rikon Power Tools POWER TOOLS 60-1750


Summary of Contents for Rikon Power Tools POWER TOOLS 60-1750
- Page 1 60-1750 60-2500 CYCLONE DUST COLLECTORS 2.5HP 1.75HP Operator’s Manual Record the serial number and date of purchase in your manual for future reference. The serial number can be found on the specification label on the side of your machine. Serial Number: _________________________ Date of purchase: _________________________ For technical support, email techsupport@rikontools.com - For parts questions, email parts@rikontools.com www.rikontools.com...
-
Page 2: Table Of Contents
Changes and improvements may be made at any time, with no obligation on the part of Rikon Power Tools, Inc. to modify previously delivered units. Reasonable care has been taken to ensure that the information in this manual is correct, to provide you with the guidelines for the proper safety,... -
Page 3: Safety Warnings
SAFETY INSTRUCTIONS IMPORTANT! Safety is the single most important consideration in the operation of this equipment. The following instructions must be followed at all times. Failure to follow all instructions listed below may result in electric shock, fire, and/or serious personal injury. There are certain applications for which this tool was designed. - Page 4 SAFETY INSTRUCTIONS 12. KEEP PROTECTIVE GUARDS IN PLACE AND IN 25. ALWAYS WEAR A DUST MASK TO PREVENT WORKING ORDER. INHALING DANGEROUS DUST OR AIRBORNE PARTICLES, including wood dust, crystalline silica dust 13. AVOID ACCIDENTAL STARTING. Make sure that and asbestos dust. Direct particles away from face and the power switch is in the “OFF”...
- Page 5 SAFETY INSTRUCTIONS - 60-1750 EXTENSION CORDS ELECTRICAL SAFETY THE USE OF AN EXTENSION CORD THIS TOOL MUST BE GROUNDED WITH THIS MACHINE IS NOT RECOMMENDED. For WHILE IN USE TO PROTECT THE OPERATOR FROM best power and safety, plug the machine directly into a ELECTRIC SHOCK.
-
Page 6: Electrical Requirements
SAFETY INSTRUCTIONS - 60-2500 ELECTRICAL SAFETY EXTENSION CORDS THIS TOOL REQUIRES THE USE OF USE OF AN EXTENSION CORD A 230V PLUG (NOT INCLUDED), AND MUST BE WITH THIS MACHINE IS NOT RECOMMENDED. FOR GROUNDED WHILE IN USE TO PROTECT THE BEST POWER AND SAFETY, PLUG THE MACHINE OPERATOR FROM ELECTRIC SHOCK. -
Page 7: Dust Collector Safety Rules
SAFETY INSTRUCTIONS SPECIFIC SAFETY INSTRUCTIONS FOR DUST COLLECTORS This machine is intended for the collection of chips, shavings and dust from the surfacing, cutting and sanding of natural wood, plywood, plastics and other man-made wood based composites. It is for collecting DRY materials only. -
Page 8: Contents Of Package
CONTENTS OF PACKAGE - 60-1750 NOTE: Contents of Package and Assembly are shown for the 60-1750 1.75HP Cyclone only. Assembly steps for the 60-2500 2.5HP Cyclone are the same. Parts lists at the rear of this manual will show differences in both units. Box 1 of 2 Base Panel with Casters Box 2 of 2... - Page 9 CONTENTS OF PACKAGE - 60-1750 Hardware Pack Parts Diagram and Parts List are listed Filter Cleaning Crank Handle on Pages 22 through 36. Handles for Support Panels Wrenches - 10mm & 13mm Hex Wrenches - 3mm, 4mm, 5mm, 6mm Casters for Collector Drum (x4) Hex Head Flange Bolt M8X16 (x44) Models #60-1750 and #60-2500 Cyclone Dust Collectors are shipped complete in two boxes.
-
Page 10: Assembly
ASSEMBLY NOTE: The parts listed in the instructions refer to THE MACHINE MUST NOT BE either the Contents of Package on page 8, or the PLUGGED IN AND THE POWER SWITCH MUST BE IN THE Parts Diagram & Parts List on pages 22 thru 36. OFF POSITION UNTIL ASSEMBLY IS COMPLETE. - Page 11 ASSEMBLY MOUNTING THE DUST PLENUM Locate the following parts: Dust Plenum w/ Cyclonic Separator (E - Page 8, Parts List #1A,2A) - Hex Head Flange Bolt M8X16 (x4) (Parts List #44A) - 13mm Wrench (Included) - Finished Support Panel Assembly NOTE: Assistance may be required for this step.
- Page 12 ASSEMBLY ASSEMBLE IMPELLER TO MOTOR Locate the following parts: Motor & Switch Assembly (I - Page 8) - Impeller (F - Page 8) - Hex Head Bolt M8X25 (A - Fig. 9/Parts List #11B) - Spring Washer 8mm (B - Fig. 9/Parts List #10B) - Big Washer 8mm (C - Fig.
- Page 13 ASSEMBLY INSTALL THE MOTOR TO THE DUST PLENUM CONTINUED FROM PAGE 12 Locate the following parts: - Hex Head Bolt M8X16 (x6) (Parts List #3B) A (x6) - 13mm Wrench (Included) 2. Align the six holes in the Motor Mounting plate with the six holes in the Dust Plenum.
- Page 14 ASSEMBLY ASSEMBLE CYCLONIC SEPARATOR TO THE DUST PLENUM NOTE: This step is only necessary if the Cyclonic Separator was removed for the installation of the Dust Plenum to the Support Panel Assembly, page 10, Fig. 5. Locate the following parts: Cyclonic Separator (B - Page 8, Parts List #2A) - Hex Head Flange Bolt M8X16 (x6) (Parts List #44A)
- Page 15 ASSEMBLY INSTALLING THE MOVING HANDLES Locate the following parts: Handles (x2) (B Page - 9, Parts List #37A) - Hex Flange Nut M8 (x4) (Parts List #34A) - Hex socket Cap Screw M8X30 (x4) (Parts List #38A) - 5mm Hex Wrench (Included) 1.
- Page 16 ASSEMBLY INSTALLING THE FILTER PLASTIC DUST BAG 1. Install the (smaller) clear plastic collection bag (H - Page 8) onto the bottom rim of the Filter Cartridge. Temporarily secure it in place with the provided spring clips. 2. Install the Strap Clamp (#8C) around the canister and over the plastic bag.
- Page 17 ASSEMBLY CONTINUED FROM PAGE 16 3. From inside the Collection Drum, install the Cap Nut (#13A) (x4) to each protruding threaded shaft. This will protect the plastic collection bag from damage. Figure 29. FIG. 29 INSTALLING THE COLLECTION DRUM PLASTIC DUST BAG 1.
-
Page 18: Operation
ASSEMBLY INSTALLING THE INLET 60-1750: 2 @ 4” 60-2500: 3 @ 4” Install the Inlet to the Cyclonic Separator with three M6X16 Hex Socket Flat Round Head Screws (#4A) and three M6 Hex Lock Nuts (#3A). Fig. 33. FIG. 33 OPERATION ON/OFF SWITCH CAUTION: Make sure that the On/Off switch is in the... -
Page 19: Dust Hazards And Safety
DUST HAZARDS AND SAFETY EMPTYING & CLEANING THE DUST COLLECTOR CAUTION: Make sure the dust collector is unplugged before cleaning or servicing. Always wear a dust mask or respirator while emptying the collector bags or cleaning the dust collector. Please refer to the California Proposition 65 warning on page 7 of this manual regarding hazards from exposure to wood dust. -
Page 20: Troubleshooting
TROUBLESHOOTING PROBLEM POSSIBLE CAUSE SOLUTION 1. Plug cord into electrical outlet. 1. Machine not plugged in. 2. Lift switch to ‘ON’ position. The safety 2. Power switch in ‘OFF’ position. key must be in place. See page 11. 3. Power switch or cord is faulty. Motor does not 3. -
Page 21: Maintenance
MAINTENANCE Turn the power switch “OFF” and disconnect the plug from the outlet prior to adjusting or maintaining the machine. DO NOT attempt to repair or maintain the electrical components of the motor. Contact a qualified service technician for this type of maintenance. 1. -
Page 22: Parts Lists & Diagrams
60-1750 PARTS DIAGRAM A NOTE: Please reference the Part Number when calling for Replacement Parts. For Parts under Warranty, the Serial Number of your machine is required. - Page 23 60-1750 PARTS LIST A PART DESCRIPTION QTY. Dust Plenum P60-1750-1A Cyclonic Separator P60-1750-2A Hex lock nut M6 P60-1750-3A Hex socket flat round hd screw M6X16 P60-1750-4A Inlet P60-1750-5A Muti-Way Connector cover P60-1750-6A Collection Drum Cover P60-1750-7A Steel ring P60-1750-8A Cross recessed pan head screw M5X8 P60-1750-9A Vertical column P60-1750-10A...
- Page 24 60-1750 PARTS DIAGRAM B NOTE: Please reference the Part Number when calling for Replacement Parts. For Parts under Warranty, the Serial Number of your machine is required.
- Page 25 60-1750 PARTS LIST B PART DESCRIPTION QTY. Cap nut M10 P60-1750-1B Motor P60-1750-2B Hex head flange bolt M8X16 P60-1750-3B Motor mounting plate P60-1750-4B Flat washer 10 P60-1750-5B Spring washer 10 P60-1750-6B Hex headed bolt M10X30 P60-1750-7B Impeller P60-1750-8B Big washer 8 P60-1750-9B Spring washer 8 P60-1750-10B...
- Page 26 60-1750 PARTS DIAGRAM C NOTE: Please reference the Part Number when calling for Replacement Parts. For Parts under Warranty, the Serial Number of your machine is required.
- Page 27 60-1750 PARTS LIST C PART DESCRIPTION QTY. Filter cartridge P60-1750-1C Filter cartridge shield P60-1750-2C Hex head flange bolt M8X16 P60-1750-3C Hex lock nut M6 P60-1750-4C Spring clip P60-1750-5C Hex socket flat round hd screw M6X12 P60-1750-6C Handle P60-1750-7C Clamping assembly P60-1750-8C Hex socket flat end set screw M6X10 P60-1750-9C...
- Page 28 60-1750 PARTS DIAGRAM D NOTE: Please reference the Part Number when calling for Replacement Parts. For Parts under Warranty, the Serial Number of your machine is required. 60-1750 PARTS LIST D PART DESCRIPTION QTY. Base bracket P60-1750-1D Hex socket flat round hd screw M6X16 P60-1750-2D Caster wheel P60-1750-3D...
- Page 29 60-1750 NOTES Use this section to record maintenance, service and any calls to Technical Support:...
- Page 30 60-2500 PARTS DIAGRAM A NOTE: Please reference the Part Number when calling for Replacement Parts. For Parts under Warranty, the Serial Number of your machine is required.
- Page 31 60-2500 PARTS LIST A PART DESCRIPTION QTY. Dust Plenum P60-2500-1A Cyclonic Separator P60-2500-2A Hex lock nut M6 P60-2500-3A Hex socket flat round hd screw M6X16 P60-2500-4A Inlet P60-2500-5A Muti-Way Connector cover P60-2500-6A Collection Drum Cover P60-2500-7A Steel ring P60-2500-8A Cross recessed pan head screw M5X8 P60-2500-9A Vertical column P60-2500-10A...
- Page 32 60-2500 PARTS DIAGRAM B NOTE: Please reference the Part Number when calling for Replacement Parts. For Parts under Warranty, the Serial Number of your machine is required.
- Page 33 60-2500 PARTS LIST B PART DESCRIPTION QTY. Cap nut M10 P60-2500-1B Spring washer 10 P60-2500-2B Flat washer 10 P60-2500-3B Motor P60-2500-4B Hex head flange bolt M8X16 P60-2500-5B Motor mounting plate P60-2500-6B Hex headed bolt M10X30 P60-2500-7B Impeller P60-2500-8B Big washer 8 P60-2500-9B Spring washer 8 P60-2500-10B...
- Page 34 60-2500 PARTS DIAGRAM C NOTE: Please reference the Part Number when calling for Replacement Parts. For Parts under Warranty, the Serial Number of your machine is required.
- Page 35 60-2500 PARTS LIST C PART DESCRIPTION QTY. Filter cartridge P60-2500-1C Filter cartridge shield P60-2500-2C Hex head flange bolt M8X16 P60-2500-3C Hex lock nut M6 P60-2500-4C Spring clip P60-2500-5C Hex socket flat round hd screw M6X12 P60-2500-6C Handle P60-2500-7C Clamping assembly P60-2500-8C Hex socket flat end set screw M6X10 P60-2500-9C...
- Page 36 60-2500 PARTS DIAGRAM D NOTE: Please reference the Part Number when calling for Replacement Parts. For Parts under Warranty, the Serial Number of your machine is required. 60-2500 PARTS LIST D PART DESCRIPTION QTY. Base bracket P60-2500-1D Hex socket flat round hd screw M6X16 P60-2500-2D Caster wheel P60-2500-3D...
- Page 37 60-2500 NOTES Use this section to record maintenance, service and any calls to Technical Support:...
-
Page 38: Warranty
® 5-Year Limited Warranty RIKON Power Tools Inc. (“Seller”) warrants to only the original retail consumer/purchaser of our products that each product be free from defects in materials and workmanship for a period of five (5) years from the date the product was purchased at retail. This warranty may not be transferred. - Page 39 NOTES...
- Page 40 60-1750 60-2500 For more information: 25 Commerce Way North Andover, MA 01845 877-884-5167 / 978-528-5380 techsupport@rikontools.com LINK TO RIKON WEBSITE www.rikontools.com 60-1750 60-2500M1...
Need help?
Do you have a question about the POWER TOOLS 60-1750 and is the answer not in the manual?
Questions and answers