
Subscribe to Our Youtube Channel
Related Manuals for Endress+Hauser Ceramax CPS341D


Summary of Contents for Endress+Hauser Ceramax CPS341D
- Page 1 Operating Instructions Ceramax CPS341D Sensor with pH-sensitive enamel and digital Memosens technology BA468C/07/EN/06.10 71116332...
-
Page 3: Table Of Contents
Ceramax CPS341D Table of contents Safety instructions ..4 Technical data... . . 26 Designated use ..... . 4 Input . -
Page 4: Safety Instructions
Safety instructions Ceramax CPS341D Safety instructions Designated use The pH sensor is designed for the continuous measurement of the pH value in liquids. Recommended applications include: • Food production, including thick, high-viscosity media • Beverage production and filling • Quality control •... -
Page 5: Operational Safety
Ceramax CPS341D Safety instructions Operational safety The sensor is designed to meet state-of-the-art safety requirements, has been tested and left the factory in a condition in which it is safe to operate. Relevant regulations and European standards have been observed. -
Page 6: Identification
Identification Ceramax CPS341D Identification Nameplate The nameplate can be found on the sensor. The following information is provided on the nameplate: • Order code • Extended order code • Serial number • Protection class • Ambient/process conditions Compare the data on the nameplate with your order. -
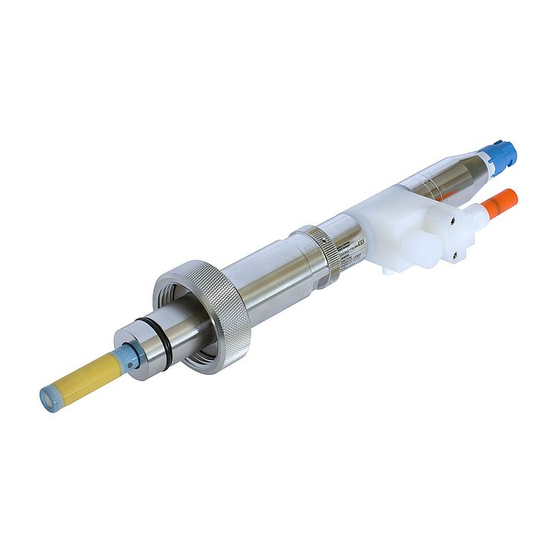
Page 7: Installation
Ceramax CPS341D Installation Installation Overview of sensor The CPS341D can be divided into the following parts: • pH-sensitive part • Reference system • Process connection pH-sensitive part Reference system Process connection • Glass-lined steel tube (3) • Electrolyte vessel (8) Depends on version •... -
Page 8: Installation Conditions
Installation Ceramax CPS341D Installation conditions 3.2.1 Orientation The CPS341D can be installed in any position. 0 ... 360° a0013862 Fig. 3: Installation angle Endress+Hauser... - Page 9 Ceramax CPS341D Installation 3.2.2 Dimensions a0013874 Fig. 4: Dimensions Endress+Hauser...
-
Page 10: Installing In The Process
Installation Ceramax CPS341D Installing in the process NOTICE Built-in parts can damage the sensor enamel ► When installing in tanks and pipes, keep a sufficient distance from built-in parts and the wall. Screw the sensor directly into an existing process connection. -
Page 11: Mounting The Optional Electrolyte Monitor
Ceramax CPS341D Installation NOTICE Minimum internal pressure in electrolyte system If the internal pressure is too low, there is the danger of the process medium entering the sensor through the diaphragm and contaminating the electrolyte. ► Set the compressed air supply in such a way that the pressure in the electrolyte vessel is always at least 0.5 bar (7 psi) above the process pressure. -
Page 12: Wiring
Wiring Ceramax CPS341D Wiring Connecting the sensor The sensor is electrically connected to the transmitter via the special measuring cable CYK10. a0003350 Fig. 7: Special measuring cable CYK10 NOTICE Zero point shift If the sensor is immersed in medium and the transmitter is disconnected from the power supply, polarization can cause an irreversible zero point shift. -
Page 13: Connecting The Optional Electrolyte Monitor
Ceramax CPS341D Wiring Connecting the optional electrolyte monitor Connect the connecting cable to an onsite power supply provided by the customer (see examples). Connect the M12 plug to the M12 connection of the bubble sensor (if not already performed during installation). -
Page 14: Commissioning
Commissioning Ceramax CPS341D Commissioning Prior to initial commissioning, make sure that: • The sensor has been installed correctly • The electrical connection is correct Several steps are involved in the process of commissioning the sensor: Disinfecting the electrolyte system (optional, for sterile applications) -
Page 15: Regenerating The Sensor
Ceramax CPS341D Commissioning Disinfect the electrolyte system a. Apply at least 3 bar (45 psi) pressure to the electrolyte vessel. b. Open the vent screw on the sensor (5) (one revolution) until approx. 50 to 100 ml of ethanol flows out of the vent opening (4). -
Page 16: Filling The Electrolyte Vessel
Commissioning Ceramax CPS341D Filling the electrolyte vessel The electrolyte must be free from bubbles. This is the only way to ensure the correct electrical connection between the reference electrode and the diaphragm. The electrolyte is 3M KCl (pH 4) with an added inhibitor (1 ml/l colloidal silicic acid) which prevents the formation of bacteria. - Page 17 Ceramax CPS341D Commissioning Fill the electrolyte system a. Apply at least 3 bar (45 psi) pressure to the electrolyte vessel. b. If you have not already done so: – Connect the electrolyte vessel and the sensor via the electrolyte hose that can be plugged in at both ends.
-
Page 18: Calibration
Commissioning Ceramax CPS341D Calibration 5.4.1 Need for calibration The calibration data are stored in the Memosens head at the factory and are transferred to the transmitter. The sensor is ready to measure immediately. It is recommended to verify the calibration data and recalibrate if necessary if the device has not been in operation for an extended period. -
Page 19: Maintenance
Ceramax CPS341D Maintenance Maintenance Changing the electrolyte bottle You should change the bottle before it is completely empty. In this way, you can ensure that the electrolyte system is always full. If you are using the optional electrolyte monitor, a message is activated when the first air bubble is detected at the outlet of the vessel. -
Page 20: Cleaning The Sensor
Maintenance Ceramax CPS341D Reinsert the (self-sealing) connector of the electrolyte hose into the coupling on the electrolyte vessel. Fill the electrolyte system a. Apply at least 3 bar (45 psi) pressure to the electrolyte vessel. b. Open the vent screw on the sensor (5) (one revolution) until bubble-free electrolyte exits the vent opening (4). - Page 21 Ceramax CPS341D Maintenance 6.2.2 Cleaning the sensor NOTICE Acids and alkalis If the permitted process limits are exceeded, this can increase the level of enamel corrosion ► Avoid exceeding the maximum permitted values for temperatures and cleaning times. ► Please note that when cleaning with alkalis, the level of corrosion doubles with every 10 °C increase in temperature.
- Page 22 Maintenance Ceramax CPS341D 6.2.3 Sterilizing the sensor The sensor can be sterilized in place (SIP). The following are permitted for SIP: • Process medium • Water vapor • Alcohol solutions • Aseptic solutions Endress+Hauser...
-
Page 23: Accessories
CPS341Z Correct function of Ceramax CPS341D depends on reliable supply of KCl to the reference part of the sensor. The pressurized electrolyte vessel CPS341Z-D1 is best suited for this. The electrolyte supply can be monitored by the ultrasonic sensor for level monitoring CPS341Z-D2 (air bubble sensor). -
Page 24: Buffer Solutions
PROFIBUS possible • Order as per product structure, Technical Information TI233C/07/en Liquisys CPM223/253 is not recommended. The CPM223/253 software does not fully support the function of Ceramax CPS341D. Buffer solutions High-quality buffer solutions of Endress+Hauser - CPY20 The secondary buffer solutions have been referenced to primary reference material of the PTB... -
Page 25: Troubleshooting
Ceramax CPS341D Troubleshooting Troubleshooting Troubleshooting instructions Problem Cause Remedial action Value displayed fluctuates when • Not vented sufficiently • Vent the electrolyte hose is touched • Overpressure too low • Check and increase pressure Reading does not change in Pinhole in pH enamel/insulation error... -
Page 26: Technical Data
Technical data Ceramax CPS341D Technical data Input 9.1.1 Measured variables pH value Temperature 9.1.2 Measuring range 0 to 10 pH (linear range) -2 to 14 pH (operating range) 0 to 140 °C (32 to 280 °F) Environment 9.2.1 Ambient temperature range The sensor may not be used at temperatures below 0 °C (32 °F). -
Page 27: Mechanical Construction
Ceramax CPS341D Technical data Mechanical construction 9.4.1 Weight 600 g (1.3 lbs) 9.4.2 Material Sensor body: Glass-lined steel, chemically resistant and shock resistant Adapter and terminal head: Stainless steel 1.4404 (AISI 316 L), PVDF, PTFE Electrolyte vessel: Stainless steel 1.4301 (AISI 304) Process connections: Stainless steel 1.4404 (AISI 316 L) -
Page 28: Index
Ceramax CPS341D Index Approvals ....... 6 Maintenance ......19 Material . - Page 29 Ceramax CPS341D Filling the electrolyte vessel ....16 Regeneration ......15 Sterilization .
- Page 30 Ceramax CPS341D...
- Page 31 Declaration of Hazardous Material and De-Contamination Please reference the Return Authorization Number (RA#), obtained from Endress+Hauser, on all paperwork and RA No. mark the RA# clearly on the outside of the box. If this procedure is not followed, it may result in the refusal of the package at our facility.
- Page 32 BA468C/07/EN/06.10 71116332...
Need help?
Do you have a question about the Ceramax CPS341D and is the answer not in the manual?
Questions and answers