Nortel 2033 User Manual
Ip audio conference phone
Hide thumbs
Also See for 2033:
- Installation and operation manual (602 pages) ,
- User manual (92 pages) ,
- Quick reference card (2 pages)

Related Manuals for Nortel 2033


Summary of Contents for Nortel 2033
- Page 1 Title page Nortel Communication Server 2000/2100 Nortel IP Audio Conference Phone 2033 User Guide...
- Page 3 Revision history Revision history August 2005 Standard 1.00. This document is issued to support Communication Server 2000 Release SN08 and Communication Server 2100 Release SE08.
- Page 4 Revision history...
-
Page 5: Table Of Contents
Configure settings on the IP Audio Conference Phone 2033 ......27 Use the Regional settings menu ..... . . 27 Set the language for the telephone display . - Page 6 Contents Set feature options ......54 Reset the feature keys to their defaults ....60 Reset the Inbox and Outbox .
- Page 7 Contents Terms you should know ......95 Index ......... . . 99...
- Page 8 Contents...
-
Page 9: Regulatory And Safety Information
Regulatory and safety information Regulatory and safety information Table 1: EMC Jurisdiction Standard Description United States FCC CFR 47 Class B Emissions: FCC Rules for Part 15 Radio Frequency Devices (see Notes 1a and 1b on page 10) Canada ICES-003 Class B Emissions: Interference- Causing Equipment Standard: Digital Apparatus... - Page 10 Consult the dealer or an experienced radio/ television technician for help. Note 1b: The user should not make changes or modifications not expressly approved by Nortel. Any such changes could void the user’s authority to operate the equipment. Note 2:...
- Page 11 Regulatory and safety information interference. Install and use the equipment according to the instruction manual. Table 2: Safety Jurisdiction Standard Description United States UL 60950 Safety for Information Technology Equipment Canada CSA 60950 Safety for Information Technology Equipment European EN 60950 Safety for Information Technology Community Equipment...
- Page 12 Regulatory and safety information...
-
Page 13: About The Ip Audio Conference Phone 2033
About the IP Audio Conference Phone 2033 About the IP Audio Conference Phone 2033 The IP Audio Conference Phone 2033 brings voice and data to the tabletop audio conference environment by connecting directly to a Local Area Network (LAN) through an Ethernet connection. -
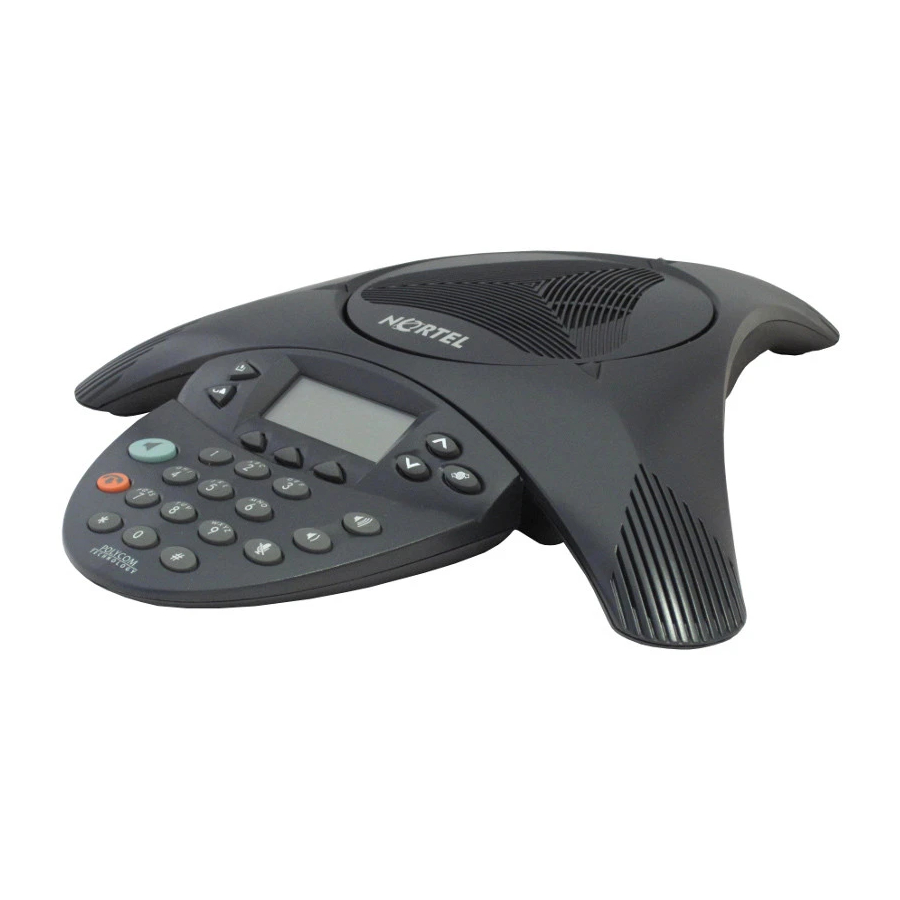
Page 14: Extension Microphones
Figure 1 shows the IP Audio Conference Phone 2033. Figure 1: IP Audio Conference Phone 2033 Extension microphones The IP Audio Conference Phone 2033 supports up to two extension microphones that extend the microphone range in large rooms. Each extension microphone has a... -
Page 15: Telephone Controls
About the IP Audio Conference Phone 2033 Figure 2 shows an extension microphone. Figure 2: Extension microphone Telephone controls Use the Volume control buttons to adjust the volume of the ringer and speaker. Press the Mute button on the main unit or any extension speaker to mute the ringer and speaker. -
Page 16: Telephone Display
Telephone display The IP Audio Conference Phone 2033 has two areas on the LCD screen: • The upper display area contains single-line information for items such as the caller number, caller name, feature prompt strings, digits entered by the user, date and time information, and set information. -
Page 17: Telephone Status Indicators
Figure 3: IP Audio Conference Phone 2033 LCD screen display Telephone status indicators The IP Audio Conference Phone 2033 uses three bi-color LED lights, located around the speaker, to indicate the telephone status. Table 3 lists the telephone state corresponding to the status indicator. -
Page 18: Call Features And Feature Access Codes
About the IP Audio Conference Phone 2033 Call features and Feature Access Codes System administration is required for call features and Feature Access Codes (FAC). Contact your system administrator to configure these features and codes on your telephone. Call features and FACs must be assigned to your telephone and... -
Page 19: Connect The Ip Audio Conference Phone 2033 Components
Connect the IP Audio Conference Phone 2033 components Connect the IP Audio Conference Phone 2033 components Before you begin CAUTION Damage to equipment Do not plug the IP Audio Conference Phone 2033 into a regular telephone jack. Doing so results in severe damage to the IP Audio Conference Phone. - Page 20 Connect the IP Audio Conference Phone 2033 components Figure 4: Power Interface Module (PIM) 2. Connect one end of the AC power adapter cord to the power supply port located on the back of the PIM. Thread the cord through the channel on the bottom of the PIM and plug the other end into the AC power source.
- Page 21 Connect the IP Audio Conference Phone 2033 components Figure 5: IP Audio Conference Phone 2033 connections 4. To connect an extension microphone, run the microphone cord through one of the channels on the bottom of the main unit, and plug it into one of the extension microphone jacks.
-
Page 22: Menu System
Menu system Menu system The IP Audio Conference Phone 2033 uses a menu system to access all the features and functions of the telephone. Figure 7 on page 24 shows a schematic map of the menu system. This section describes the main Menu. - Page 23 Menu system Press the Menu soft key to access the main Menu. The Menu soft key is always displayed. The following may also appear on the screen: • The display reads if you did not answer an Missed Call(s) incoming call. •...
- Page 24 Menu system Figure 7: Menu Map Main Menu 1. Logoff 2. Settings 3. Inbox 4. Outbox 5. Directory Confirmation 1. Regional 1. Dial 1. Dial 1. Dial 2. User 2. Display 2. Display 2. Edit 3. Terminal 3. Store 3. Store 3.
-
Page 25: Log In To The Ip Audio Conference Phone 2033
Log in to the IP Audio Conference Phone 2033 Log in to the IP Audio Conference Phone 2033 The IP Audio Conference Phone 2033 has a Selective Gateway feature — a list of available gateways — that allows you to log in to any gateway in the system. - Page 26 Log in to the IP Audio Conference Phone 2033 To log off of the telephone: 1. Press the Menu soft key. 2. Choose one of the following: — Use the Navigation keys to scroll and highlight Logoff, and press the soft key.
-
Page 27: Configure Settings On The Ip Audio Conference Phone 2033
Configure settings on the IP Audio Conference Phone 2033 Configure settings on the IP Audio Conference Phone 2033 The IP Audio Conference Phone 2033 Settings menu lists the following submenus: • Regional settings menu enables you to configure telephone preferences, such as language, date, and time. - Page 28 Configure settings on the IP Audio Conference Phone 2033 2. Choose one of the following: — Use the Navigation keys to scroll and highlight Settings, and press soft key. — Press the key. 3. Choose one of the following: — Use the...
-
Page 29: Set The Time And Date Options
Configure settings on the IP Audio Conference Phone 2033 6. Choose one of the following: — Press the key to save the new setting. — Press the Cancel key to quit without saving. Set the time and date options To set the time format on the telephone display: 1. - Page 30 Configure settings on the IP Audio Conference Phone 2033 4. Choose one of the following: — Use the Navigation keys to scroll and highlight Time, and press the soft key. — Press the key. 5. Choose one of the following: —...
- Page 31 Configure settings on the IP Audio Conference Phone 2033 2. Choose one of the following: — Use the Navigation keys to scroll and highlight Settings, and press soft key. — Press the key. 3. Choose one of the following: — Use the...
- Page 32 Configure settings on the IP Audio Conference Phone 2033 6. Use the Navigation keys to scroll and highlight the format you want to use. Note: The check mark indicates the currently selected date format. 7. Press the soft key. To set the hours from Greenwich Mean Time (GMT): 1.
- Page 33 Configure settings on the IP Audio Conference Phone 2033 4. Choose one of the following: — Use the Navigation keys to scroll and highlight Time, and press the soft key. — Press the key. 5. Choose one of the following: —...
- Page 34 Configure settings on the IP Audio Conference Phone 2033 3. Choose one of the following: — Use the Navigation keys to scroll and highlight Regional, and press soft key. — Press the key. 4. Choose one of the following: — Use the...
- Page 35 Configure settings on the IP Audio Conference Phone 2033 To reset the date and time options to the system defaults: 1. Press the Menu soft key to go to the main Menu. 2. Choose one of the following: — Use the...
-
Page 36: Use The User Settings Menu
Configure settings on the IP Audio Conference Phone 2033 5. Choose one of the following: — Use the Navigation keys to scroll and highlight Reset, and press the soft key. — Press the key. Use the User settings menu Use the options in the... - Page 37 Configure settings on the IP Audio Conference Phone 2033 3. Choose one of the following: — Use the Navigation keys to scroll and highlight User, and press the soft key. — Press the key. 4. Choose one of the following: —...
- Page 38 Configure settings on the IP Audio Conference Phone 2033 3. Choose one of the following: — Use the Navigation keys to scroll and highlight User, and press the soft key. — Press the key. 4. Choose one of the following: —...
- Page 39 Configure settings on the IP Audio Conference Phone 2033 2. Choose one of the following: — Use the Navigation keys to scroll and highlight Settings, and press soft key. — Press the key. 3. Choose one of the following: — Use the...
-
Page 40: Use The Terminal Settings Menu
Configure settings on the IP Audio Conference Phone 2033 7. Enter your new password using the dialpad. 8. Press the soft key. 9. Reenter your new password to verify it. 10. Press the soft key again to save it. Use the Terminal settings menu... -
Page 41: Use The Call Settings Menu
Configure settings on the IP Audio Conference Phone 2033 3. Choose one of the following: — Use the Navigation keys to scroll and highlight Terminal, and press soft key. — Press the key. 4. Choose one of the following: — Use the... -
Page 42: View Available Features
Configure settings on the IP Audio Conference Phone 2033 • reset feature keys to their defaults • reset (clear) your Inbox or Outbox View available features To see which features are available on your telephone: 1. Press the Menu soft key to go to the main Menu. -
Page 43: Assign Feature Keys
Assign feature keys Note: In SN08/SE08, changes to feature keys are visible only when you log out of the IP Audio Conference Phone 2033 and log back in using an IP Phone 2002 or IP Phone 2004; or when the IP Audio Conference Phone 2033 is used in a joint session with the M6350 Softclient. - Page 44 Configure settings on the IP Audio Conference Phone 2033 2. Choose one of the following: — Use the Navigation keys to scroll and highlight Settings, and press soft key. — Press the key. 3. Choose one of the following: — Use the...
- Page 45 Configure settings on the IP Audio Conference Phone 2033 6. Choose one of the following: — Use the Navigation keys to scroll and highlight Assign, and press the soft key. — Press the key. 7. Choose one of the following: —...
- Page 46 Configure settings on the IP Audio Conference Phone 2033 2. Choose one of the following: — Use the Navigation keys to scroll and highlight Settings, and press soft key. — Press the key. 3. Choose one of the following: — Use the...
- Page 47 Configure settings on the IP Audio Conference Phone 2033 6. Choose one of the following: — Use the Navigation keys to scroll and highlight Assign, and press the soft key. — Press the key. 7. Choose one of the following: —...
- Page 48 Configure settings on the IP Audio Conference Phone 2033 2. Choose one of the following: — Use the Navigation keys to scroll and highlight Settings, and press soft key. — Press the key. 3. Choose one of the following: — Use the...
- Page 49 Configure settings on the IP Audio Conference Phone 2033 6. Choose one of the following: — Use the Navigation keys to scroll and highlight Assign, and press the soft key. — Press the key. 7. Choose one of the following: —...
- Page 50 Configure settings on the IP Audio Conference Phone 2033 2. Choose one of the following: — Use the Navigation keys to scroll and highlight Settings, and press soft key. — Press the key. 3. Choose one of the following: — Use the...
- Page 51 Configure settings on the IP Audio Conference Phone 2033 6. Choose one of the following: — Use the Navigation keys to scroll and highlight Assign, and press the soft key. — Press the key. 7. Choose one of the following: —...
-
Page 52: Label Feature Keys
Label feature keys Note: In SN08/SE08, changes to feature keys are visible only when you log out of the IP Audio Conference Phone 2033 and log back in using an IP Phone 2002 or IP Phone 2004; or when the IP Audio Conference Phone 2033 is used in a joint session with the M6350 Softclient. - Page 53 Configure settings on the IP Audio Conference Phone 2033 4. Choose one of the following: — Use the Navigation keys to scroll and highlight Feature, and press the soft key. — Press the key. 5. Use the Navigation keys to scroll and...
-
Page 54: Set Feature Options
Set feature options Note: In SN08/SE08, changes to feature keys are visible only when you log out of the IP Audio Conference Phone 2033 and log back in using an IP Phone 2002 or IP Phone 2004; or when the IP Audio Conference Phone 2033 is used in a joint session with the M6350 Softclient. - Page 55 Configure settings on the IP Audio Conference Phone 2033 3. Choose one of the following: — Use the Navigation keys to scroll and highlight Call, and press the soft key. — Press the key. 4. Choose one of the following: —...
- Page 56 Configure settings on the IP Audio Conference Phone 2033 7. Choose one of the following: — Use the Navigation keys to scroll and highlight Auto Hide, and press soft key. — Press the key. 8. Do one of the following: —...
- Page 57 Configure settings on the IP Audio Conference Phone 2033 3. Choose one of the following: — Use the Navigation keys to scroll and highlight Call, and press the soft key. — Press the key. 4. Choose one of the following: —...
- Page 58 Configure settings on the IP Audio Conference Phone 2033 7. Choose one of the following: — Use the Navigation keys to scroll and highlight Default Feature, and press the soft key. — Press the key. 8. Use the Navigation keys to scroll and...
- Page 59 Configure settings on the IP Audio Conference Phone 2033 3. Choose one of the following: — Use the Navigation keys to scroll and highlight Call, and press the soft key. — Press the key. 4. Choose one of the following: —...
-
Page 60: Reset The Feature Keys To Their Defaults
Reset the feature keys to their defaults Note: In SN08/SE08, changes to feature keys are visible only when you log out of the IP Audio Conference Phone 2033 and log back in using an IP Phone 2002 or IP Phone 2004; or when the IP Audio Conference Phone 2033 is used in a joint session with the M6350 Softclient. - Page 61 Configure settings on the IP Audio Conference Phone 2033 2. Choose one of the following: — Use the Navigation keys to scroll and highlight Settings, and press soft key. — Press the key. 3. Choose one of the following: — Use the...
-
Page 62: Reset The Inbox And Outbox
Configure settings on the IP Audio Conference Phone 2033 6. Choose one of the following: — Use the Navigation keys to scroll and highlight Reset, and press the soft key. — Press the key. 7. Press the soft key. Reset the Inbox and Outbox To reset the Inbox: 1. - Page 63 Configure settings on the IP Audio Conference Phone 2033 3. Choose one of the following: — Use the Navigation keys to scroll and highlight Call, and press the soft key. — Press the key. 4. Choose one of the following: —...
- Page 64 Configure settings on the IP Audio Conference Phone 2033 To reset the Outbox: 1. Press the Menu soft key to go to the main Menu. 2. Choose one of the following: — Use the Navigation keys to scroll and highlight Settings, and press soft key.
- Page 65 Configure settings on the IP Audio Conference Phone 2033 5. Choose one of the following: — Use the Navigation keys to scroll and highlight Reset Outbox, and press the soft key. — Press the key. 6. Choose one of the following: —...
-
Page 66: Make A Call
Make a call This section describes features associated with making a call. There are several ways to make a call from an IP Audio Conference Phone 2033. In addition to the ways described in this section, you can also make a call directly from your Inbox, Outbox, or Directory. -
Page 67: Use Speed Call
Make a call 2. Choose one of the following to dial the number: — Press the Line (DN) key. — Press the soft key. To edit a predialed number: 1. Without selecting the Line (DN) key, enter the number to be dialed. 2. - Page 68 Make a call To create a Speed Call number: 1. Press the key and enter the Speed Call FAC. 2. At the prompt: — Enter a one-, two-, or three-digit number (0-999) for the Speed Call code. — If required, enter the access code (for example, 9).
-
Page 69: Answer A Call
Answer a call Answer a call Each incoming call causes the telephone to ring and the status indicator lights to flash red. To answer a call: Press the Line (DN) key. -
Page 70: While On An Active Call
While on an active call While on an active call This section describes features available during an active call. Place a call on hold Use the Hold feature when talking on one line and another call arrives on a second line. Retain the original call by putting it on hold, and then answer the second call. -
Page 71: Use Call Park
While on an active call 2. Dial the DN to which the call is transferred. 3. When that number rings or a person answers, press the Services key to connect the calling party. 4. Press the Release key. To return to the original call, if the transfer is incomplete: If the person called is not available, press the Line (DN) key to reconnect to the original... - Page 72 While on an active call 3. Press the Release key. To park a call on a DN other than your own DN: 1. During an active call, press the Services key. 2. Press the key and enter the Call Park FAC.
-
Page 73: While Away From Your Desk
While away from your desk While away from your desk This section describes a feature that is used when you are away from your desk. Use Call Forward Use the Call Forward feature to direct incoming calls to ring on another line (DN). -
Page 74: Talk With More Than One Person
In addition to setting up a conference call, you can also use the IP Audio Conference Phone 2033 for audio conferences. Contact your system administrator for information on accessing audio bridge applications. Set up a conference call Use the Conference feature to set up a conference call for three people, including yourself. - Page 75 Talk with more than one person If the person you attempt to add to the conference is unavailable: Press the Release key.
-
Page 76: Work Without Interruption
Work without interruption Work without interruption This section describes a feature that provides uninterrupted work time. Use Make Set Busy Use the Make Set Busy feature to make your telephone appear busy to all callers. To activate Make Set Busy: 1. -
Page 77: Additional Features
Additional features Additional features This section describes the following additional features: • Inbox • Outbox • Directory Use the Inbox The Inbox keeps a record of all incoming calls. Note: To clear the list of callers from your telephone, follow the instructions in “To reset the Inbox:”... - Page 78 Additional features 2. Use the Navigation keys to scroll through the list of callers. To dial a number in the list of callers: 1. Choose one of the following: — Press the Messages key. — Press the Menu soft key to go to the main Menu and choose one of the...
- Page 79 Additional features 4. Choose one of the following: — Use the Navigation keys to scroll and highlight Dial, and press the soft key. — Press the key. To display the details about a call in the list of callers: 1. Choose one of the following: —...
- Page 80 Additional features 3. Press the soft key. 4. Choose one of the following: — Use the Navigation keys to scroll and highlight Display, and press the soft key. — Press the key. To store a number from the list of callers in the Directory: 1.
-
Page 81: Use The Outbox
Additional features 2. Use the Navigation keys to scroll through the list of callers and highlight the number you want to store in the Directory. 3. Press the soft key. 4. Choose one of the following: — Use the Navigation keys to scroll and highlight Store, and press the soft key. - Page 82 Additional features 2. Choose one of the following: — Use the Navigation keys to scroll and highlight Outbox, and press the soft key. — Press the key. 3. Use the Navigation keys to scroll through the list of calls. To dial a number in the list of calls: 1.
- Page 83 Additional features 4. Press the soft key. 5. Choose one of the following: — Use the Navigation keys to scroll and highlight Dial, and press the soft key. — Press the key. To display the details for a call in the list of calls: 1.
- Page 84 Additional features 4. Press the soft key. 5. Choose one of the following: — Use the Navigation keys to scroll and highlight Display, and press the soft key. — Press the key. To store a number from the list of calls in the Directory: 1.
-
Page 85: Use The Directory
Additional features 4. Press the soft key. 5. Choose one of the following: — Use the Navigation keys to scroll and highlight Store, and press the soft key. — Press the key. Use the Directory The Directory contains a list of names and telephone numbers of contacts. - Page 86 Additional features 3. Use the Navigation keys to scroll through the list of contacts. To add a contact to the Directory: 1. Press the Menu soft key to go to the main Menu. 2. Choose one of the following: — Use the Navigation keys to scroll and highlight Directory, and press...
- Page 87 Additional features b. Enter the new contact’s number. 5. To enter the new contact’s last name: a. Choose one of the following: — Use the Navigation keys to scroll and highlight Surname, and press the soft key. — Press the key.
- Page 88 Additional features To call a contact: 1. Press the Menu soft key to go to the main Menu. 2. Choose one of the following: — Use the Navigation keys to scroll and highlight Directory, and press soft key. — Press the key.
- Page 89 Additional features To edit a contact’s information: 1. Press the Menu soft key to go to the main Menu. 2. Choose one of the following: — Use the Navigation keys to scroll and highlight Directory, and press soft key. — Press the key.
- Page 90 Additional features 7. To edit the contact’s number: a. Choose one of the following: — Use the Navigation keys to scroll and highlight Edit number, and press the soft key. — Press the key. b. Enter the contact’s new number. 8.
- Page 91 Additional features b. Enter the contact’s first name using the steps in “Using the dialpad to enter text” on page 93. 10. To set the format of feature keys: a. Choose one of the following: — Use the Navigation keys to scroll and highlight Feature Key Format, and press the...
- Page 92 Additional features 3. Use the Navigation keys to scroll and highlight the contact you want to remove from the Directory. 4. Press the soft key. 5. Choose one of the following: — Use the Navigation keys to scroll and highlight Delete, and press the soft key.
-
Page 93: Using The Dialpad To Enter Text
Using the dialpad to enter text Using the dialpad to enter text To enter text using the dialpad, perform the following steps: 1. For each letter: a. Repeatedly press the numeric key corresponding to the desired letter until the letter is displayed. For example, to select b, press key two times. -
Page 94: Feature Access Codes (Facs)
Feature Access Codes (FACs) Feature Access Codes (FACs) Contact your system administrator for a list of features available on your telephone set and the corresponding Feature Access Codes. Use this worksheet to keep track of the FACs. Feature Feature Note: When entering an FAC, remember to press the key first. - Page 95 Terms you should know Terms you should know Attendant A telephone operator in your organization. Calling Party Name Display Information, such as the caller’s name and telephone number, appearing on the LCD screen. The system must have CPND enabled. Category 5 (CAT5) Balanced 100 Ohm Ethernet cable and associated connecting hardware whose transmission characteristics are specified up to 100 MHz.
- Page 96 Information display Any display of call activity, lists, prompts, and status of calls. On the IP Audio Conference Phone 2033, this information area is a one-line by 24-characters area. If the text message exceeds this area, a scroll arrow icon indicates that you must use the scroll keys to view the remaining text.
- Page 97 Terms you should know Navigation keys Keys used to scroll through menus and lists appearing on the LCD screen. Off-hook Any line selected to make a call or receive an incoming call. The term off-hook is applied whether (a) the user presses a line key, (b) the call is automatically answered at the set, or (c) a line is automatically selected for an outgoing call.
- Page 98 Terms you should know Status Messages A message displayed to inform the user of important information. A right arrow appears if more than one Status Message is present. System or Switch Your office communications system. User Interface Screen displays that interact with the user as a result of an action or event.
- Page 99 Index Symbols >> soft key 16 Fastbusy 95 Feature Access Codes (FAC) 94 Fixed key 96 About the IP Audio Conference Phone 2033 13 Answer a call 69 Hold 70 Attendant 95 Hold key 15 Basic features 13 Inbox 77...
- Page 100 Index Navigation keys 16, 97 Telephone controls 15 Telephone display 16 Terminal settings 40 Off-hook 97 Time and date options 29 Off-hook dialing 66 Transfer a call 70 Outbox 81 User Interface 98 Predial feature 66 User settings 36 Regional settings 27 Volume control buttons 15 Regulatory information 9 Release key 15, 97...
- Page 102 User Guide Copyright © Nortel Networks Limited 2005 All Rights Reserved. Information is subject to change without notice. Nortel reserves the right to make changes in design or components as progress in engineering and manufacturing may warrant. SL-100 and Meridian SL-100 are trademarks of Nortel.
Need help?
Do you have a question about the 2033 and is the answer not in the manual?
Questions and answers