Advertisement
Quick Links
R410A DC Inverter V4 Plus 50Hz
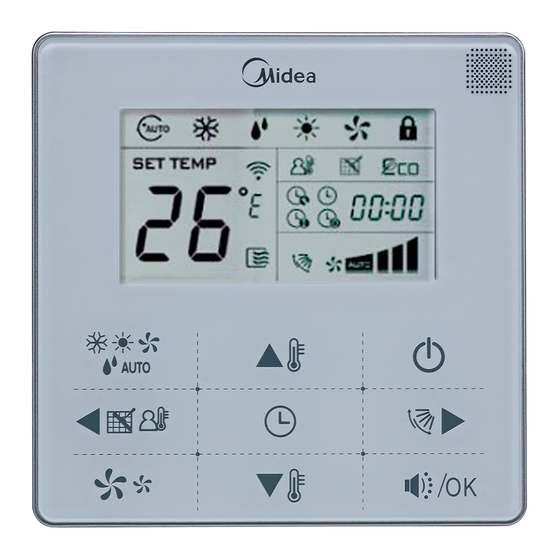
2.3 Touch- style key wired controller: KJR-29B/BK-E
Wired controller specifications
Power Supply Voltage
Ambient Temperature Range
Ambient Humidity Range
Performance Features
1. Operating mode: Cool, heat, dry, fan and auto.
2. Set the mode through buttons.
3. Indoor setting temperature range: 17°C ~30°C.
4. LCD (Liquid Crystal Display).
5. Touch-style key
2.3.1 Function summarize
KJR-29B is the touch-style key wired controller.
Air filter cleaning reminding function
Indoor unit address setting function
Remote control receiver function
Lock the wired controller
26
operation shortcut
℃
Control system
Model
New function
setting and 26
operation lock
℃
Follow me
KJR-29B/BK-E
Setting the Operating mode, Temperature
MCAC-VTSM-2013-03
KJR-10B/DB(T)-E
5.0V DC
-5°C~43°C
RH40%~RH90%
Basic function
ON and OFF the air-conditioner
Auto-restart function
Time ON and Time OFF setting
Clock setting
Fan speed and Swing functions
185
Advertisement

Related Manuals for Midea KJR-29B/BK-E


Summary of Contents for Midea KJR-29B/BK-E
- Page 1 R410A DC Inverter V4 Plus 50Hz MCAC-VTSM-2013-03 2.3 Touch- style key wired controller: KJR-29B/BK-E KJR-29B/BK-E Wired controller specifications Model KJR-10B/DB(T)-E Power Supply Voltage 5.0V DC -5°C~43°C Ambient Temperature Range Ambient Humidity Range RH40%~RH90% Performance Features 1. Operating mode: Cool, heat, dry, fan and auto.
- Page 2 MCAC-VTSM-2013-03 R410A DC Inverter V4 Plus 5 0Hz 2.3.2 Wired controller appearance (1) Remote signal receiving function There is the signal receiver for wireless remote controller on the KJR-29B.You can use the wireless remote controller to control the air-conditioner through the wired remote controller when the system has been powered Notes: The wired controller will not receive the swing controlling instruction.
- Page 3 R410A DC Inverter V4 Plus 50Hz MCAC-VTSM-2013-03 (5)Temperature setting Under AUTO, COOL, DRY, HEAT modes, press the Temp adjust Up/Down buttons to set the temperature, the adjusting range is 17℃~30 ℃ or 62℉~88 ). The setting temperature cannot be adjusted under FAN mode. ℉...
- Page 4 MCAC-VTSM-2013-03 R410A DC Inverter V4 Plus 5 0Hz function is turned on, the swing icon will be lighted up. (12)Follow me function When the system is running and the operating mode is AUTO. COOL or HEAT, press the left button will activate the Follow Me function.
- Page 5 R410A DC Inverter V4 Plus 50Hz MCAC-VTSM-2013-03 ※ Prepare for the following at installation site. Qty.(embedded Specification remarks Name Remarks into wall) (only for reference) 0.05 mm ×5 cable 4-core Shield Cable RVVP-0.5 mm ×4 no more than 12M 86 electrician box Wiring Tube (Insulating Sleeve and Tightening Screw)
- Page 6 MCAC-VTSM-2013-03 R410A DC Inverter V4 Plus 5 0Hz ※ Wiring figure: 1) Connect two terminals of embedded 4-core shielding wire with the switching wires of wired remote controller and signal receiving board. Make sure the sequence of 4 terminals (A/B/C/D) should correspond to the wire sequence of signal switching wires (A/B/C/D).
- Page 7 R410A DC Inverter V4 Plus 50Hz MCAC-VTSM-2013-03 2) Use three GB950-86 M4X20 screws to directly install the back cover on the wall. Screw hole installed on the wall,use three GB950-86 M4X20 3) Use two M4X25 GB823-88screws to install the back cover on the 86 electrician box, and use one GB950-86 M4X20 screw for fixing the wall.
- Page 8 MCAC-VTSM-2013-03 R410A DC Inverter V4 Plus 5 0Hz ※ Wiring 1) Wiring, three outlet positions Top side Upper left wire outlet wire outlet Left middle side wire outlet Cutting place of top Cutting place of upper Cutting place of left side wire outlet left wire outlet middle side...
- Page 9 R410A DC Inverter V4 Plus 50Hz MCAC-VTSM-2013-03 ※ Wired controller initial parameters setting: Change the related functions of the controller through adjusting the initial parameters, details refer to table 1 2. The wired controller initial parameter includes two codes "XY", the first code "X" means function class, and the second code "Y"...
Need help?
Do you have a question about the KJR-29B/BK-E and is the answer not in the manual?
Questions and answers