
Related Manuals for Avidsen YLVA 3+


Summary of Contents for Avidsen YLVA 3+
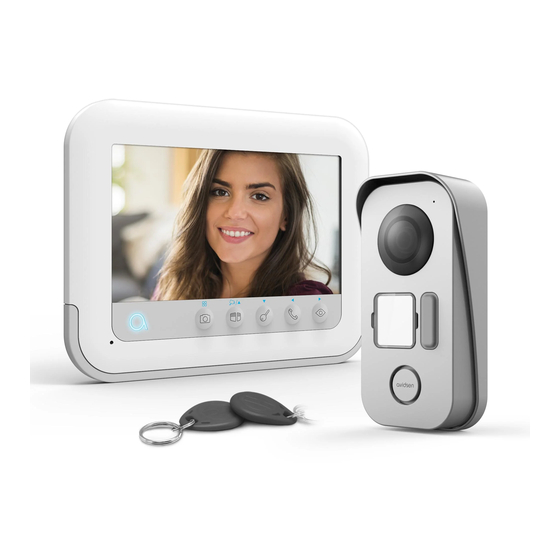
- Page 1 YLVA 3+ Colour videophone 7" 2 wires - RFID feature ref. 112271 7” Picture memory feature 100m Mémorisation des visiteurs RFID www.avidsen.com...
-
Page 2: Table Of Contents
COLOUR VIDEO INTERCOM 7" CONTENTS A - SAFETY INSTRUCTIONS 1 - INTRODUCTION 2 - MAINTENANCE AND CLEANING 3 - RECYCLING B - PRODUCT DESCRIPTION 1 - KIT CONTENTS 2 - MONITOR 3 - INTERCOM PANEL 4 - WALL BRACKET 5 - MAINS ADAPTOR C - INSTALLATION 1 - INSTALLATION OF THE INTERCOM PANEL 2 - INSTALLING THE MONITOR... - Page 3 D - USING THE PRODUCT 1 - IDENTIFY AND SPEAK TO THE VISITOR 2 - ACTIVATE THE INTERCOM PANEL FROM THE MONITOR 3 - OPENING AN ELECTRIC LOCK AND AN AUTOMATIC CONTROL SYSTEM (OPTIONAL) 4 - INTERCOM FEATURE 5 - MONITOR SETTINGS 6 - UNLOCKING USING A BADGE 7 - CHECKING PHOTOS TAKEN IN YOUR ABSENCE E - TECHNICAL AND LEGAL INFORMATION...
-
Page 5: A - Safety Instructions
COLOUR VIDEO INTERCOM 7" A - SAFETY INSTRUCTIONS 1 - INTRODUCTION • Be careful not to lose the administrator badge (red colour) or your product will be locked and This video intercom system pairs two modules: a the warranty voided. receiver-monitor and an easy-to-install Keep it in a safe place. -
Page 6: B - Product Description
COLOUR VIDEO INTERCOM 7" B - PRODUCT DESCRIPTION 1 - CONTENTS OF THE KIT Monitor Screws (2 for the monitor, 3 for the intercom Intercom panel panel) Monitor wall bracket Screws for the intercom panel Dowels (2 for the monitor, 3 for the intercom Mains adapter panel) RFID badges (red x1, grey x1, blue X2) -
Page 7: Intercom Panel
COLOUR VIDEO INTERCOM 7" B - PRODUCT DESCRIPTION Loudspeaker Communication terminals Power supply terminals *Subject to availability. 3 - INTERCOM PANEL Protective hood Call button Lens RFID reset button Name label Connection terminals Loudspeaker Main or secondary intercom selection switch Microphone Camera direction slots Infrared illumination... -
Page 8: C - Installation
COLOUR VIDEO INTERCOM 7" C - INSTALLATION The recommended installation height for the intercom panel is about 160 cm from the ground and 150 cm from the floor for the indoor unit. 50cm 70° 160cm 150cm NOTE: For obvious safety reasons, the connections must only be made after shutting off the power supply. 1 - INTERCOM PANEL INSTALLATION The intercom panel must not be directly exposed to bad weather. -
Page 9: Installing The Monitor
COLOUR VIDEO INTERCOM 7" C - INSTALLATION Then screw the intercom panel to the hood with the screw provided. Put on the name label. 2 - INSTALLING THE MONITOR Attach the wall mount to the wall using the screws and wall plugs suited to the support (the screws and plugs supplied are suitable for solid walls). -
Page 10: Connections
COLOUR VIDEO INTERCOM 7" C - INSTALLATION 3 - CONNECTIONS • Do not increase the number of insulating screw joints or connectors on the connecting wire between the intercom panel and the monitor • Keep the connecting wire between the intercom panel and the monitor more than 50 cm away from any electromagnetic interference (230 V cable, WiFi device, microwave ovens, etc.) •... -
Page 11: Connection Between The Monitor And The Intercom Panel
COLOUR VIDEO INTERCOM 7" C - INSTALLATION The cable's length determines which cable section is to be used: Cable length Section to use 0 to 50 m 0.75 mm2 50 m to 100 m 1.5 mm2 Between the intercom panel and an electric strike plate (not included) Use a 12V/1.1A maximum electric latch with or without mechanical memory. -
Page 12: Connections
COLOUR VIDEO INTERCOM 7" C - INSTALLATION 3.2 - CONNECTIONS 3.2.1 - CONNECTIONS 2 MONITORS + 2 INTERCOM PANELS Monitor Monitor ref. 112279 Intercom panel Intercom panel ref. 112273 3.2.2 - CONNECTIONS 2 MONITORS + 1 CAMERA Intercom panel Monitor Monitor ref 112279 CCTV... -
Page 13: Settings For 2 Families
COLOUR VIDEO INTERCOM 7" C - INSTALLATION 3.2.3 - SETTINGS FOR 2 FAMILIES Intercom panel 2 families 112276 Monitor Monitor ref 112279 CCTV ref 112248 CCTV ref 112248 Monitor ref 112279 Monitor ref 112271 112272... -
Page 14: Connection To An Electric Strike Plate With Additional Power Supply
COLOUR VIDEO INTERCOM 7" C - INSTALLATION Intercom panel Intercom panel ref. 112273 2 families Monitor 112276 ref 112279 Monitor Intercom panel Monitor Monitor ref. 112273 ref 112279 ref 112271-112272 IMPORTANT: if you have trouble opening the lock, which may be caused by a large distance between the screen and the intercom panel, for example, we recommend that you connect it to a separate power supply. -
Page 15: Initialisation
COLOUR VIDEO INTERCOM 7" C - INSTALLATION 3.3.1 - INITIALISATION With the video doorkeeper powered on, press on the “RESET” button on the back of the intercom panel. The intercom panel will beep 4 times. Within the next 10 seconds, pass the administrator badge (red) in front of the name plate. Within the next 10 seconds, pass the add badge (grey) in front of the name plate. -
Page 16: Deactivating All Badges
COLOUR VIDEO INTERCOM 7" C - INSTALLATION The intercom panel will beep 4 times. Within the next 10 seconds, pass one of the user badges in front of the name plate. The intercom panel will beep once. Wait 10 seconds for the intercom panel to exit add mode. 3.3.3 - DEACTIVATING ALL BADGES Pass the administrator badge in front of the name plate to deactivate all of the recognized badges. -
Page 17: D - Using The Product
COLOUR VIDEO INTERCOM 7" D - USING THE PRODUCT 1 - IDENTIFY AND SPEAK TO THE VISITOR paragraph), press the button (for the lock) or button (for the automatic control system) to The visitor presses the intercom panel Nils Larsson let a visitor enter. -
Page 18: Monitor Settings
COLOUR VIDEO INTERCOM 7" D - USING THE PRODUCT 5 - MONITOR SETTINGS • DATE: Press the buttons to adjust the When the screen is on, press the button for 5 highlighted value and the button to switch to secs to display the following screen: the next value. -
Page 19: E - Technical And Legal Information
COLOUR VIDEO INTERCOM 7" E - TECHNICAL AND LEGAL INFORMATION 1 - TECHNICAL CHARACTERISTICS MONITOR Ultra-flat 7" colour LCD Screen PAL/NTSC Video standard 800 x 3 (RGB) x 480 Resolution with 230 VAC 50 Hz / 17 VDC 1.5 A Power supply mains adapter included 17 VDC 1.5 A (adapter included) -
Page 20: Warranty
• None of the parts of this product may be http://sav.avidsen.com opened or repaired by any persons not employed by Smarthome France. Smarthome France undertakes to keep a stock •... - Page 22 Smarthome France 19 Avenue Marcel Dassault ZAC des Deux Lions - 37200 Tours - France...
Need help?
Do you have a question about the YLVA 3+ and is the answer not in the manual?
Questions and answers