Advertisement
Available languages
Available languages
Quick Links
Item #000-000
Model #FLS80132
USE AND CARE GUIDE
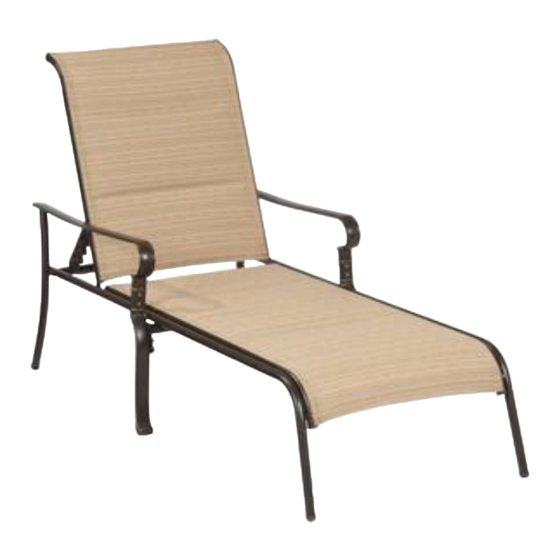
BELLEVILLE CHAISE
Questions, problems, missing parts? Before returning to the store,
call Hampton Bay Customer Service.
8 a.m. - 6 p.m., EST, Monday-Friday
1-855-HD-HAMPTON
HAMPTONBAY.COM
THANK YOU
We appreciate the trust and confidence you have placed in Hampton Bay through the purchase of this chaise. We strive to continually create
quality products designed to enhance your home. Visit us online to see our full line of products available for your home improvement needs.
Thank you for choosing Hampton Bay!
Advertisement

Related Manuals for HAMPTON BAY BELLEVILLE CHAISE FLS80132


Summary of Contents for HAMPTON BAY BELLEVILLE CHAISE FLS80132
- Page 1 THANK YOU We appreciate the trust and confidence you have placed in Hampton Bay through the purchase of this chaise. We strive to continually create quality products designed to enhance your home. Visit us online to see our full line of products available for your home improvement needs.
-
Page 2: Table Of Contents
Table of Contents Table of Contents ............2 Assembly............... 4 Warranty ................. 2 Care and Cleaning ............6 What is Covered ...............2 What is Not Covered ..............2 Pre-Assembly ..............2 ..............2 Planning Assembly Hardware Included ..............2 Package Contents..............3 Warranty 1 YEAR FRAME AND FABRIC WARRANTY WHAT IS COVERED We warrant the frame and fabric to be free of manufacturing defects to the original purchaser for one year. -
Page 3: Pre-Assembly
Pre-Assembly (continued) PACKAGE CONTENTS Part Description Quantity Right arm Left arm Chaise back Chaise seat Support bar Back bar HAMPTONBAY.COM Please contact 1-855-HD-HAMPTON for further assistance. -
Page 4: Assembly
Assembly Connecting the support bar and the back bar to the chaise arm Attach the support bar (E) to the left arm (B) using M6x15 bolts (AA) and M6x13 washers (EE). Attach the back bar (F) to the left arm (B) using M6x40 bolts (DD) and plastic spacers (GG). Repeat step 1 and step 2 for the right arm (A). - Page 5 Assembly (continued) Connecting the chaise seat to the chaise arm Attach the chaise seat (D) to the left arm (B) using M6x30 bolts (CC), M6x13 washers (EE), and M6x16 washers (FF). Repeat for the right arm (A). Use the wrench (II) to tighten the M6x30 bolts (CC). HAMPTONBAY.COM Please contact 1-855-HD-HAMPTON for further assistance.
-
Page 6: Care And Cleaning
Assembly (continued) Connecting the chaise back to the chaise seat Attach the chaise back (C) to the chaise seat (D) using M6x20 bolts (BB), M6x13 washers (EE), and M6x16 washers (FF). Use the hex wrench (HH) to tighten the M6x20 bolts (BB). Ensure all connections are secure. - Page 7 Questions, problems, missing parts? Before returning to the store call Hampton Bay Customer Service. 8 a.m. - 6 p.m., EST, Monday-Friday 1-855-HD-HAMPTON HAMPTONBAY.COM Retain this manual for future use.
- Page 8 HAMPTONBAY.COM GRACIAS Apreciamos la confianza que has depositado en Hampton Bay al comprar esta reposera. Nos esforzamos para continuamente crear productos de calidad diseñados para mejorar tu hogar. Visítanos por Internet para ver nuestra línea completa de productos disponibles para las necesidades de mejoras de tu hogar.
- Page 9 Tabla de contenido Tabla de contenido ............2 Ensamblaje............... 4 Garantía ................2 Mantenimiento y limpieza ..........6 Qué cubre la garantía ...............2 Qué no cubre la garantía ............2 Preensamblaje ..............2 ............2 Planificación del ensamblaje Herrajes incluidos ..............2 Contenido del paquete..............3 Garantía GARANTÍA DE 1 AÑO PARA EL ARMAZÓN Y LA TELA...
- Page 10 Preensamblaje (continuación) CONTENIDO DEL PAQUETE Pieza Descripción Cantidad Brazo derecho Brazo izquierdo Respaldo de la reposera Asiento de la reposera Barra de soporte Barra de respaldo HAMPTONBAY.COM Para obtener asistencia, por favor llama al 1-855-HD-HAMPTON.
- Page 11 Ensamblaje Cómo conectar la barra de soporte y la barra de respaldo a los brazos de la reposera Fija la barra de soporte (E) al brazo izquierdo (B) con los pernos M6x15 (AA) y las arandelas M6x13 (EE). Conecta la barra de respaldo (F) al brazo izquierdo (B), con los pernos M6x40 (DD) y los espaciadores de plástico (GG). Repite los pasos 1 y 2 para el brazo derecho (A).
- Page 12 Ensamblaje (continuación) Cómo conectar el asiento de la reposera a los brazos Fija el asiento de la reposera (D) al brazo izquierdo (B) con los pernos M6x30 (CC), las arandelas M6x13 (EE) y las arandelas M6x16 (FF). Repite para el brazo derecho (A). Usa la llave (II) para apretar los pernos M6x30 (CC).
- Page 13 Ensamblaje (continuación) Cómo conectar el respaldo de la reposera al asiento Fija el respaldo de la reposera (C) al asiento de la reposera (D) con los pernos M6x20 (BB), las arandelas M6x13 (EE) y las arandelas M6x16 (FF). Usa la llave hexagonal (HH) para apretar los pernos M6x20 (BB). Cerciórate de que todas las conexiones estén seguras.
- Page 14 ¿Preguntas, problemas o piezas faltantes? Antes de regresar a la tienda, llama al Servicio al Cliente de Hampton Bay, de lunes a viernes, entre 8 a.m. y 6 p.m., (Hora Estándar del Este) 1-855-HD-HAMPTON HAMPTONBAY.COM Conserva este manual para uso en el futuro.
Need help?
Do you have a question about the BELLEVILLE CHAISE FLS80132 and is the answer not in the manual?
Questions and answers